实现一个标准的OAuth2协议中Provider角色的主要功能
1.注释或者删掉zhqx-security-demo项目中pom文件的
<dependency>
	<groupId>com.zhqx.security</groupId>
	<artifactId>zhqx-security-browser</artifactId>
	<version>${zhqx.security.version}</version>
</dependency>
修改为:
<dependency>
	<groupId>com.zhqx.security</groupId>
	<artifactId>zhqx-security-app</artifactId>
		<version>${zhqx.security.version}</version>
</dependency>
2.在zhqx-security-core项目中新增包com.zhqx.security.core.support。并将zhqx-security-browser项目中,com.zhqx.security.browser.support包下的SimpleResponse类移入其中。
同时删除zhqx-security-browser项目中的SimpleResponse类。并重新导入一下原来zhqx-security-browser项目中引用到的SimpleResponse类。
3.在zhqx-security-app项目中新增包com.zhqx.security.app.authentication。并将zhqx-security-browser项目中,com.zhqx.security.browser.authentication包下的代码移入其中。
4.将zhqx-security-browser项目中,com.zhqx.security.browser包下的BrowserSecurityConfig类中的如下代码删除:
@Bean
public PasswordEncoder passwordEncoder() {
	return new BCryptPasswordEncoder();
}
并移动到zhqx-security-core项目com.zhqx.security.core包下的SecurityCoreConfig类中:
package com.zhqx.security.core;

import org.springframework.boot.context.properties.EnableConfigurationProperties;
import org.springframework.context.annotation.Bean;
import org.springframework.context.annotation.Configuration;
import org.springframework.security.crypto.bcrypt.BCryptPasswordEncoder;
import org.springframework.security.crypto.password.PasswordEncoder;

import com.zhqx.security.core.properties.SecurityProperties;

//让配置类生效
@Configuration
@EnableConfigurationProperties(SecurityProperties.class)
public class SecurityCoreConfig {
	@Bean
	public PasswordEncoder passwordEncoder() {
		return new BCryptPasswordEncoder();
	}
}
不如不在SecurityCoreConfig类中配置PasswordEncoder,系统启动会报错:
Unsatisfied dependency expressed through field 'passwordEncoder'
使用默认的认证服务器流程
1.在zhqx-security-app项目的com.zhqx.security.app包下新增类ZhqxAuthorizationServerConfig:
package com.zhqx.security.app;

import org.springframework.context.annotation.Configuration;
import org.springframework.security.oauth2.config.annotation.web.configuration.EnableAuthorizationServer;

@Configuration
@EnableAuthorizationServer
public class ZhqxAuthorizationServerConfig {

}
2.启动服务,浏览器直接访问:http://localhost:8080/oauth/authorize。该地址是默认的授权地址。发现页面出现如下提示:
OAuth Error
error="invalid_client", error_description="Bad client credentials"
这是因为该地址需要提供一些额外的参数,参考地址:https://tools.ietf.org/html/rfc6749#section-4.1的4.1.1
补齐所有参数的地址如下:
http://localhost:8080/oauth/authorize?response_type=code&client_id=438a4421-a31e-4241-9a1e-8bf45b8dd90f&redirect_uri=http://example.com&scope=all
再次访问之后,发现页面提示:
服务器内部错误!
此时后台出现错误提示:
User must be authenticated with Spring Security before authorization can be completed.
意思是在授权之前,必须要有一个登录用户。在springboot1.x版本中,Oauth会默认配置security的安全验证,访问后自动弹出一个登录页面提示登录。但是在Springboot2.x版本中已经不会默认弹出一个登录页面提示登录了。
修改zhqx-security-app项目com.zhqx.security.app包下的ZhqxAuthorizationServerConfig类。
package com.zhqx.security.app;

import org.springframework.context.annotation.Configuration;
import org.springframework.security.config.annotation.web.configuration.WebSecurityConfigurerAdapter;
import org.springframework.security.oauth2.config.annotation.web.configuration.EnableAuthorizationServer;

@Configuration
@EnableAuthorizationServer
public class ZhqxAuthorizationServerConfig extends WebSecurityConfigurerAdapter {

}
让其继承WebSecurityConfigurerAdapter类即可。
输入正确的用户名和密码之后,浏览器显示如下内容:
OAuth Error
error="invalid_request", error_description="At least one redirect_uri must be registered with the client."
参考内容:https://blog.csdn.net/maple_son/article/details/100006361。
这是因为在不同版本中oauth2授权重定向处理逻辑不同(DefaultRedirectResolver类的resolveRedirect方法):
springboot 1.x版本中:
public String resolveRedirect(String requestedRedirect, ClientDetails client) throws OAuth2Exception {
    Set<String> authorizedGrantTypes = client.getAuthorizedGrantTypes();
    if (authorizedGrantTypes.isEmpty()) {
        throw new InvalidGrantException("A client must have at least one authorized grant type.");
    } else if (!this.containsRedirectGrantType(authorizedGrantTypes)) {
        throw new InvalidGrantException("A redirect_uri can only be used by implicit or authorization_code grant types.");
    } else {
        Set<String> redirectUris = client.getRegisteredRedirectUri();
        if (redirectUris != null && !redirectUris.isEmpty()) {
            return this.obtainMatchingRedirect(redirectUris, requestedRedirect);
            //为空返回当前URL地址
        } else if (StringUtils.hasText(requestedRedirect)) {
            return requestedRedirect;
        } else {
            throw new InvalidRequestException("A redirect_uri must be supplied.");
        }
    }
}
springboot 2.x版本中:
public String resolveRedirect(String requestedRedirect, ClientDetails client) throws OAuth2Exception {

	Set<String> authorizedGrantTypes = client.getAuthorizedGrantTypes();
	if (authorizedGrantTypes.isEmpty()) {
		throw new InvalidGrantException("A client must have at least one authorized grant type.");
	}
	if (!containsRedirectGrantType(authorizedGrantTypes)) {
		throw new InvalidGrantException(
				"A redirect_uri can only be used by implicit or authorization_code grant types.");
	}

	Set<String> registeredRedirectUris = client.getRegisteredRedirectUri();
	//为空未抛出异常
	if (registeredRedirectUris == null || registeredRedirectUris.isEmpty()) {
		throw new InvalidRequestException("At least one redirect_uri must be registered with the client.");
	}
	return obtainMatchingRedirect(registeredRedirectUris, requestedRedirect);
}
因为当前的版本是Springboot版本是2.0.8。所以我们需要配置默认的重定向地址,用来做比对。
修改zhqx-security-demo项目的配置文件application.yml。并且考虑每次重启服务,clientid都会变化。增加如下配置:
#只显示新增的代码,其余省略

security:
  oauth2:
    client:
      client-id: zhqx
      client-secret: zhqxsecret
      registered-redirect-uri:
      - http://example.com
修改完毕后,再次启动服务,访问:
http://localhost:8080/oauth/authorize?response_type=code&client_id=zhqx&redirect_uri=http://example.com&scope=all
界面显示如下结果:
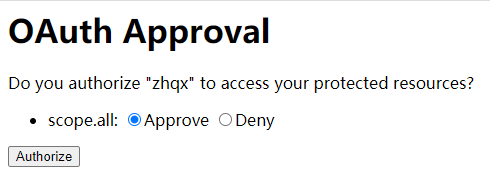
这个页面相当于QQ授权时,跳转到QQ登录授权的页面。Approve表示同意,Deny表示拒绝。
选择Approve同意授权后,页面跳转到类似地址:http://example.com/?code=9Ywi7n。
在google浏览器中添加插件Talend API Tester。帮助我们测试和发送请求。
测试界面图如下:

其中Authorization的值为:username:zhqx;password:zhqxSecret。
点击send发送POST请求,获得如下响应结果:
至此,Oauth授权码流程就全部结束了。
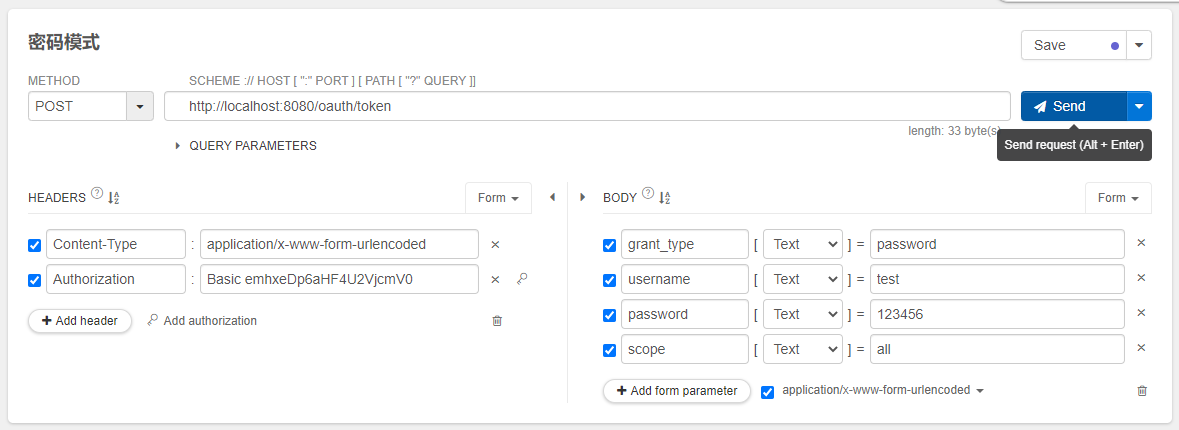
密码模式下,获取token:
测试界面图如下:
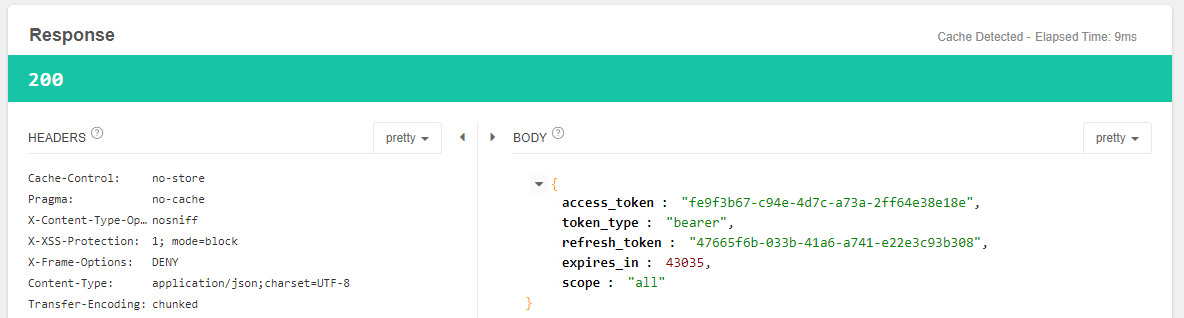
点击send发送POST请求,获得如下响应结果:
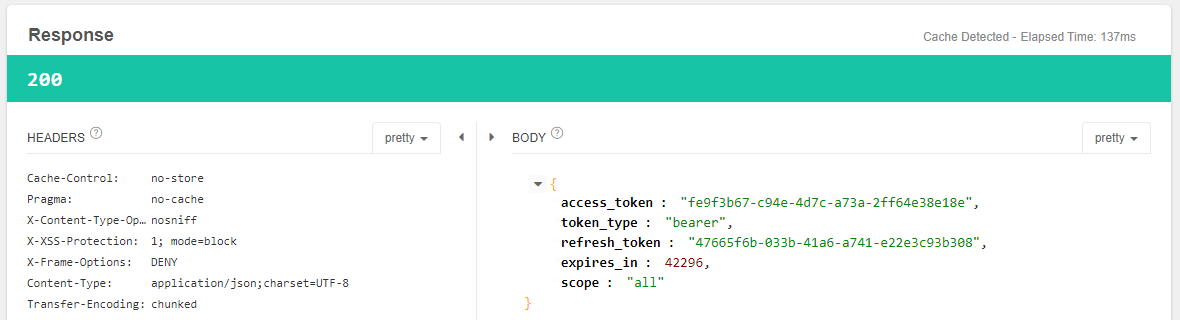
注意观察,授权码模式和密码模式下,同一个用户(test)重复获取token时,只要token没有过期,获取的是一致。
构建资源服务器
在zhqx-security-app项目中,com.zhqx.security.app包下新建ZhqxResourceServerConfig类:
package com.zhqx.security.app;

import org.springframework.context.annotation.Configuration;
import org.springframework.security.oauth2.config.annotation.web.configuration.EnableResourceServer;

@Configuration
@EnableResourceServer
public class ZhqxResourceServerConfig {

}
启动服务,因为默认情况下,所有token信息都是保存在内存中的,我们已经重启服务了,所以我们需要重新用密码模式获取token。
假设此时获取的token是:81b37438-21aa-4a97-9dce-124d297065d9。
我们利用Talend API Tester,发送如下get请求。
测试界面图如下:
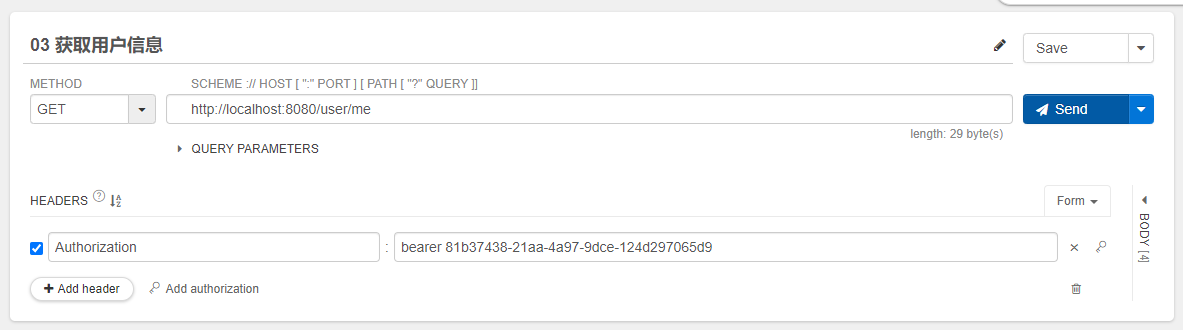
点击send发送GET请求,获得如下响应结果:
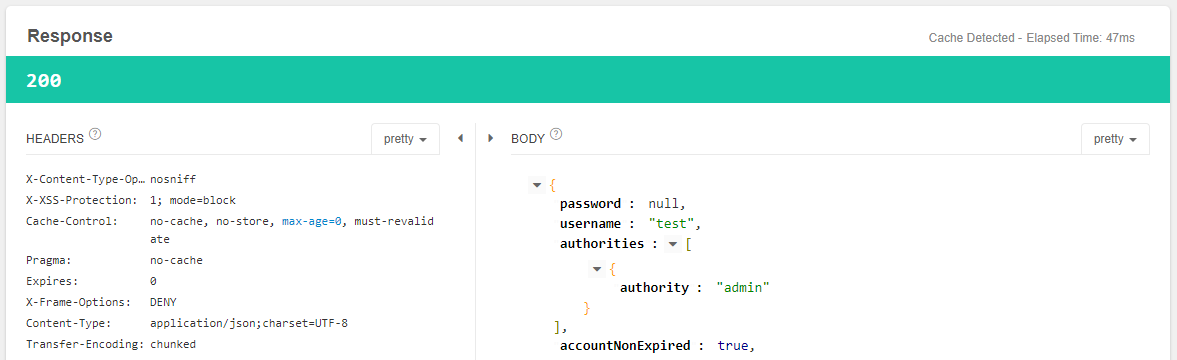
这种方式与我们之前通过保存信息到session中判断用户登录来获取访问权限的方式不同。
重构之前的三种认证方式的代码,使其支持Token
A.重构用户名和密码登录
修改zhqx-security-app项目中com.zhqx.security.app.authentication包下的ZhqxAuthenticationSuccessHandler类:
package com.zhqx.security.app.authentication;

import java.io.IOException;
import java.util.Base64;

import javax.servlet.ServletException;
import javax.servlet.http.HttpServletRequest;
import javax.servlet.http.HttpServletResponse;

import org.apache.commons.collections.MapUtils;
import org.apache.commons.lang.StringUtils;
import org.slf4j.Logger;
import org.slf4j.LoggerFactory;
import org.springframework.beans.factory.annotation.Autowired;
import org.springframework.security.authentication.BadCredentialsException;
import org.springframework.security.core.Authentication;
import org.springframework.security.oauth2.common.OAuth2AccessToken;
import org.springframework.security.oauth2.common.exceptions.UnapprovedClientAuthenticationException;
import org.springframework.security.oauth2.provider.ClientDetails;
import org.springframework.security.oauth2.provider.ClientDetailsService;
import org.springframework.security.oauth2.provider.OAuth2Authentication;
import org.springframework.security.oauth2.provider.OAuth2Request;
import org.springframework.security.oauth2.provider.TokenRequest;
import org.springframework.security.oauth2.provider.token.AuthorizationServerTokenServices;
import org.springframework.security.web.authentication.SavedRequestAwareAuthenticationSuccessHandler;
import org.springframework.stereotype.Component;

import com.fasterxml.jackson.databind.ObjectMapper;

//这里不再是实现AuthenticationSuccessHandler接口,而是继承默认的处理类SavedRequestAwareAuthenticationSuccessHandler
@Component("zhqxAuthenticationSuccessHandler")
public class ZhqxAuthenticationSuccessHandler extends SavedRequestAwareAuthenticationSuccessHandler {

	private Logger logger = LoggerFactory.getLogger(getClass());

	@Autowired
	private ObjectMapper objectMapper;

	@Autowired
	private ClientDetailsService clientDetailsService;

	@Autowired
	private AuthorizationServerTokenServices authorizationServerTokenServices;

	//Authentication封装认证信息
	@Override
	public void onAuthenticationSuccess(HttpServletRequest request, HttpServletResponse response,
			Authentication authentication) throws IOException, ServletException {
		logger.info("登录成功");

		String header = request.getHeader("Authorization");

		if (header == null || !header.toLowerCase().startsWith("basic ")) {
			throw new UnapprovedClientAuthenticationException("请求头中无client信息");
		}

		String[] tokens = extractAndDecodeHeader(header, request);
		assert tokens.length == 2;

		String clientId = tokens[0];
		String clientSecret = tokens[1];

		ClientDetails clientDetails = clientDetailsService.loadClientByClientId(clientId);

		if (clientDetails == null) {
			throw new UnapprovedClientAuthenticationException("clientId对应的配置信息不存在:" + clientId);
		} else if (!StringUtils.equals(clientDetails.getClientSecret(), clientSecret)) {
			throw new UnapprovedClientAuthenticationException("clientSecret不匹配:" + clientSecret);
		}

		TokenRequest tokenRequest = new TokenRequest(MapUtils.EMPTY_MAP, clientId, clientDetails.getScope(), "custom");

		OAuth2Request oAuth2Request = tokenRequest.createOAuth2Request(clientDetails);

		OAuth2Authentication oAuth2Authentication = new OAuth2Authentication(oAuth2Request, authentication);

		OAuth2AccessToken token = authorizationServerTokenServices.createAccessToken(oAuth2Authentication);

		response.setContentType("application/json;charset=UTF-8");
		response.getWriter().write(objectMapper.writeValueAsString(token));
	}

	//base64解码请求头 Basic aW1vb2M6aW1vb2NzZWNyZXQ=
	private String[] extractAndDecodeHeader(String header, HttpServletRequest request)
			throws IOException {

		byte[] base64Token = header.substring(6).getBytes("UTF-8");
		byte[] decoded;
		try {
			//解码后格式   用户名:密码
			decoded = Base64.getDecoder().decode(base64Token);
		}
		catch (IllegalArgumentException e) {
			throw new BadCredentialsException(
					"Failed to decode basic authentication token");
		}

		String token = new String(decoded, "UTF-8");

		int delim = token.indexOf(":");

		if (delim == -1) {
			throw new BadCredentialsException("Invalid basic authentication token");
		}
		//返回的数组是   [用户名(就是client_id),clientSecret] 其实就是配置的
		return new String[] { token.substring(0, delim), token.substring(delim + 1) };
	}

}
修改zhqx-security-app项目中,com.zhqx.security.app包下的ZhqxResourceServerConfig类:
package com.zhqx.security.app;

import org.springframework.beans.factory.annotation.Autowired;
import org.springframework.context.annotation.Configuration;
import org.springframework.security.config.annotation.web.builders.HttpSecurity;
import org.springframework.security.oauth2.config.annotation.web.configuration.EnableResourceServer;
import org.springframework.security.oauth2.config.annotation.web.configuration.ResourceServerConfigurerAdapter;
import org.springframework.security.web.authentication.AuthenticationFailureHandler;
import org.springframework.security.web.authentication.AuthenticationSuccessHandler;
import org.springframework.social.security.SpringSocialConfigurer;

import com.zhqx.security.core.authentication.mobile.SmsCodeAuthenticationSecurityConfig;
import com.zhqx.security.core.properties.SecurityConstants;
import com.zhqx.security.core.properties.SecurityProperties;
import com.zhqx.security.core.validate.code.ValidateCodeSecurityConfig;

@Configuration
@EnableResourceServer
public class ZhqxResourceServerConfig extends ResourceServerConfigurerAdapter {

	@Autowired
	private SecurityProperties securityProperties;

	@Autowired
	protected AuthenticationSuccessHandler zhqxAuthenticationSuccessHandler;

	@Autowired
	protected AuthenticationFailureHandler zhqxAuthenticationFailureHandler;

	@Autowired
	private SmsCodeAuthenticationSecurityConfig smsCodeAuthenticationSecurityConfig;

	@Autowired
	private ValidateCodeSecurityConfig validateCodeSecurityConfig;

	@Autowired
	private SpringSocialConfigurer zhqxSocialSecurityConfig;

	@Override
	public void configure(HttpSecurity http) throws Exception {

		http.formLogin()
		.loginPage(SecurityConstants.DEFAULT_UNAUTHENTICATION_URL)
		.loginProcessingUrl(SecurityConstants.DEFAULT_LOGIN_PROCESSING_URL_FORM)
		.successHandler(zhqxAuthenticationSuccessHandler)
		.failureHandler(zhqxAuthenticationFailureHandler);

		http.apply(validateCodeSecurityConfig)
				.and()
			.apply(smsCodeAuthenticationSecurityConfig)
				.and()
			.apply(zhqxSocialSecurityConfig)
				.and()
			.authorizeRequests()
				.antMatchers(
					SecurityConstants.DEFAULT_UNAUTHENTICATION_URL,
					SecurityConstants.DEFAULT_LOGIN_PROCESSING_URL_MOBILE,
					securityProperties.getBrowser().getLoginPage(),
					SecurityConstants.DEFAULT_VALIDATE_CODE_URL_PREFIX + "/*",
					"/error", securityProperties.getBrowser().getSignUpUrl(),
					"/user/regist")
					.permitAll()
				.anyRequest()
				.authenticated()
				.and()
			.csrf().disable();
	}
}
启动服务,使用插件Talend API Tester。帮助我们测试和发送请求。
测试界面图如下:
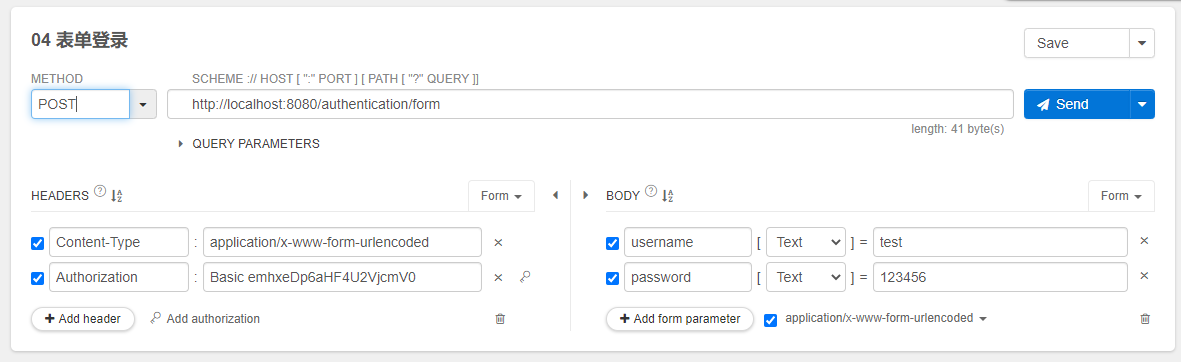
点击send发送POST请求,获得如下响应结果:
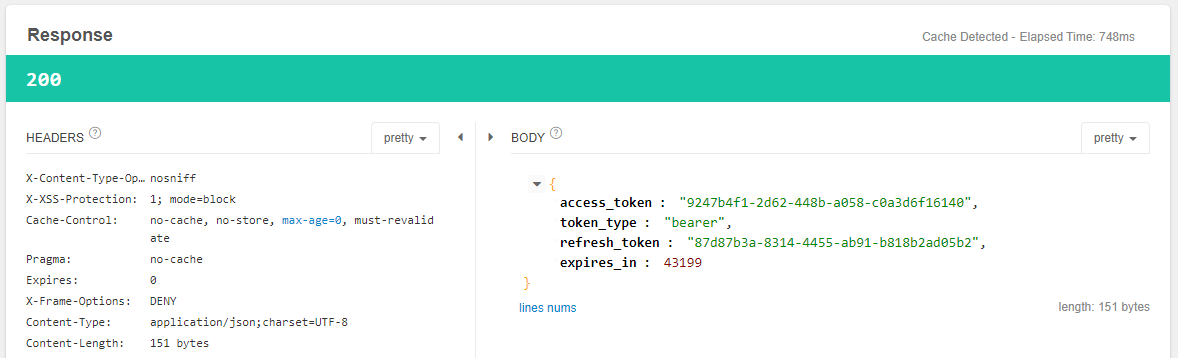
使用获取的token:9247b4f1-2d62-448b-a058-c0a3d6f16140。访问当前用户信息:
测试界面图如下:注意bearer 9247b4f1-2d62-448b-a058-c0a3d6f16140使用的是上面获取的token信息。
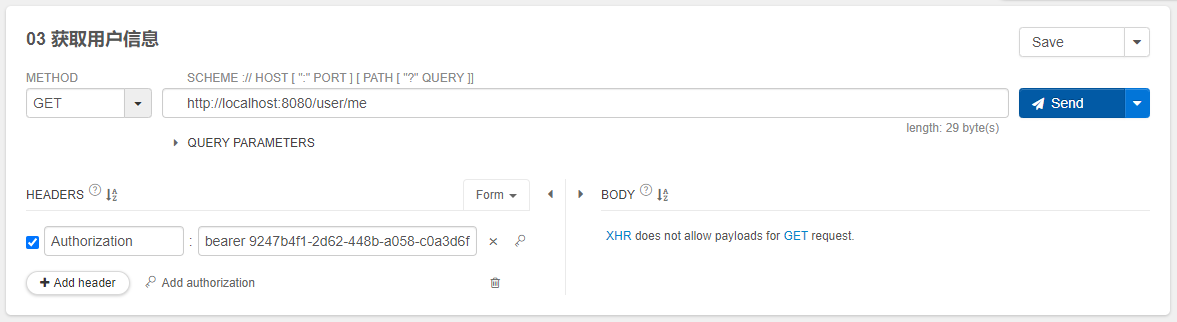
点击send发送GET请求,获得如下响应结果:
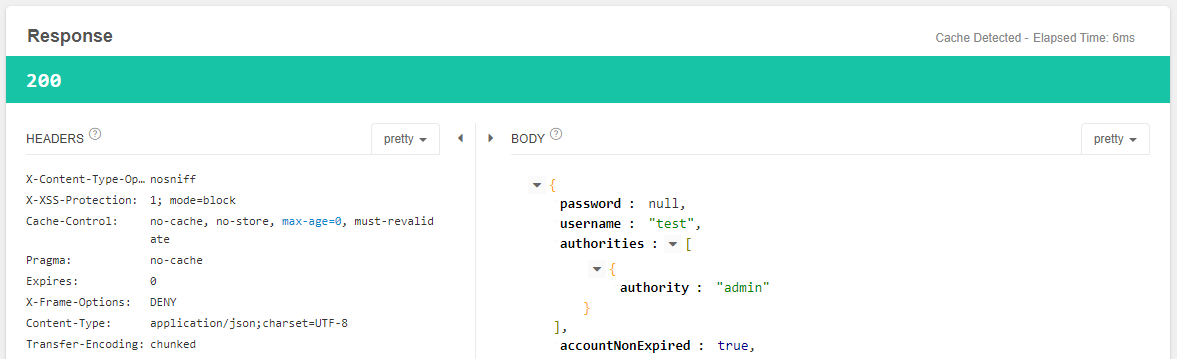
现在我们已经实现了用户访问APP时,app访问一个oauth协议的表单登录来获取token,用户通过获取token来访问资源。
B.重构短信验证码登录
启动服务,使用插件Talend API Tester。帮助我们测试和发送请求。
测试界面图如下:
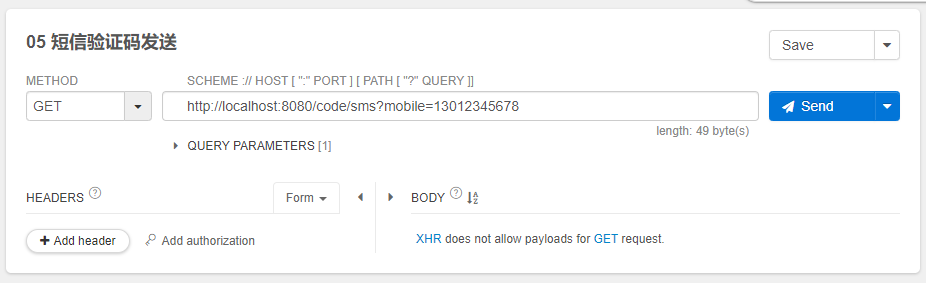
点击send发送GET请求,后台获取到验证码,假设验证码是2659。
此时我们可以模拟从APP发送请求,使用上面获取的验证码,来访问http://localhost:8080/authentication/mobile。
访问代码请求如下,在linux终端运行:
curl -i -X POST 'http://localhost:8080/authentication/mobile'\
 -H "Content-Type:application/x-www-form-urlencoded"\
 -H "Authorization:Basic emhxeDp6aHF4U2VjcmV0"\
 -d "mobile=13012345678"\
 -d "smsCode=2659"
得到返回结果如下:
>  -H "Content-Type:application/x-www-form-urlencoded"\
>  -H "Authorization:Basic emhxeDp6aHF4U2VjcmV0"\
>  -d "mobile=13012345678"\
>  -d "smsCode=2659"
HTTP/1.1 500
X-Content-Type-Options: nosniff
X-XSS-Protection: 1; mode=block
Cache-Control: no-cache, no-store, max-age=0, must-revalidate
Pragma: no-cache
Expires: 0
X-Frame-Options: DENY
Content-Type: application/json;charset=UTF-8
Content-Length: 35
Date: Thu, 24 Sep 2019 03:13:34 GMT
Connection: close

{"content":"SMS验证码不存在"}
这个原因是,当我们从APP发请求时,和浏览器不同,APP是不携带任何session以及cookie信息的,而我们的服务器的验证码存储在session中。没有办法做对比。
所以需要重构验证码的功能,让APP访问和浏览器访问时,验证码的存储方式不同。当APP发送给时,额外携带参数deviceId(设备id)。
在zhqx-security-core项目的com.zhqx.security.core.validate.code包下新增ValidateCodeRepository接口。
package com.zhqx.security.core.validate.code;

import org.springframework.web.context.request.ServletWebRequest;

//验证码存储策略
public interface ValidateCodeRepository {

	//保存验证码
	void save(ServletWebRequest request , ValidateCode code , ValidateCodeType validateCodeType);

	//获取验证码
	ValidateCode get(ServletWebRequest request ,ValidateCodeType validateCodeType);

	//移除验证码
	void remove(ServletWebRequest request , ValidateCodeType validateCodeType);
}
修改zhqx-security-core项目的com.zhqx.security.core.validate.code.impl包下的AbstractValidateCodeProcessor:
package com.zhqx.security.core.validate.code.impl;

import java.util.Map;

import org.apache.commons.lang.StringUtils;
import org.springframework.beans.factory.annotation.Autowired;
import org.springframework.social.connect.web.HttpSessionSessionStrategy;
import org.springframework.social.connect.web.SessionStrategy;
import org.springframework.web.bind.ServletRequestBindingException;
import org.springframework.web.bind.ServletRequestUtils;
import org.springframework.web.context.request.ServletWebRequest;

import com.zhqx.security.core.validate.code.ValidateCode;
import com.zhqx.security.core.validate.code.ValidateCodeException;
import com.zhqx.security.core.validate.code.ValidateCodeGenerator;
import com.zhqx.security.core.validate.code.ValidateCodeGeneratorNotExist;
import com.zhqx.security.core.validate.code.ValidateCodeProcessor;
import com.zhqx.security.core.validate.code.ValidateCodeRepository;
import com.zhqx.security.core.validate.code.ValidateCodeType;

public abstract class AbstractValidateCodeProcessor<C extends ValidateCode> implements ValidateCodeProcessor {

	// 操作session的工具类
	private SessionStrategy sessionStrategy = new HttpSessionSessionStrategy();

	// 收集系统中所有的 {@link ValidateCodeGenerator} 接口的实现。
	@Autowired
	private Map<String, ValidateCodeGenerator> validateCodeGenerators;

	@Autowired
	private ValidateCodeRepository validateCodeRepository;

	@Override
	public void create(ServletWebRequest request) throws Exception {
		C validateCode = generate(request);
		save(request, validateCode);
		send(request, validateCode);
	}

	// 生成校验码
	@SuppressWarnings("unchecked")
	private C generate(ServletWebRequest request) {
		String type = getValidateCodeType(request).toString().toLowerCase();
		String generatorName = type + ValidateCodeGenerator.class.getSimpleName();
		ValidateCodeGenerator validateCodeGenerator = validateCodeGenerators.get(generatorName);
		if (validateCodeGenerator == null) {
			throw new ValidateCodeGeneratorNotExist("验证码生成器" + generatorName + "不存在");
		}
		return (C) validateCodeGenerator.generate(request);
	}

	// 保存校验码
	private void save(ServletWebRequest request, C validateCode) {
		//只要图片验证码内容以及过期时间...假如是ImageCode,就避免放入BufferedImage到session里了
		ValidateCode code = new ValidateCode(validateCode.getCode(), validateCode.getExpireTime());
		//sessionStrategy.setAttribute(request, getSessionKey(request), code);
		//根据不同实现,调用不同的验证码存储方式
		validateCodeRepository.save(request, code, getValidateCodeType(request));
	}

	// 构建验证码放入session时的key
	private String getSessionKey(ServletWebRequest request) {
		return SESSION_KEY_PREFIX + getValidateCodeType(request).toString().toUpperCase();
	}

	// 发送校验码,由子类实现
	protected abstract void send(ServletWebRequest request, C validateCode) throws Exception;

	// 根据请求的url获取校验码的类型
	private ValidateCodeType getValidateCodeType(ServletWebRequest request) {
		String type = StringUtils.substringBefore(getClass().getSimpleName(), "CodeProcessor");
		return ValidateCodeType.valueOf(type.toUpperCase());
	}

	@SuppressWarnings("unchecked")
	@Override
	public void validate(ServletWebRequest request) {

		ValidateCodeType processorType = getValidateCodeType(request);
		//String sessionKey = getSessionKey(request);

		//C codeInSession = (C) sessionStrategy.getAttribute(request, sessionKey);
		//根据不同实现,调用不同的验证码获取方式
		C codeInSession = (C) validateCodeRepository.get(request, processorType);

		String codeInRequest;
		try {
			codeInRequest = ServletRequestUtils.getStringParameter(request.getRequest(),
					processorType.getParamNameOnValidate());
		} catch (ServletRequestBindingException e) {
			throw new ValidateCodeException("获取验证码的值失败");
		}

		if (StringUtils.isBlank(codeInRequest)) {
			throw new ValidateCodeException(processorType + "验证码的值不能为空");
		}

		if (codeInSession == null) {
			throw new ValidateCodeException(processorType + "验证码不存在");
		}

		if (codeInSession.isExpried()) {
			//sessionStrategy.removeAttribute(request, sessionKey);
			//根据不同实现,调用不同的验证码移除方式
			validateCodeRepository.remove(request, processorType);
			throw new ValidateCodeException(processorType + "验证码已过期");
		}

		if (!StringUtils.equals(codeInSession.getCode(), codeInRequest)) {
			throw new ValidateCodeException(processorType + "验证码不匹配");
		}

		//sessionStrategy.removeAttribute(request, sessionKey);
		//根据不同实现,调用不同的验证码移除方式
		validateCodeRepository.remove(request, processorType);
	}

}
针对浏览器部分和APP部分分别对ValidateCodeRepository接口做实现。
在zhqx-security-browser项目,新增包com.zhqx.security.browser.validate.code.impl。在其中新增类SessionValidateCodeRepository:
package com.zhqx.security.browser.validate.code.impl;

import org.slf4j.Logger;
import org.slf4j.LoggerFactory;
import org.springframework.social.connect.web.HttpSessionSessionStrategy;
import org.springframework.social.connect.web.SessionStrategy;
import org.springframework.stereotype.Component;
import org.springframework.web.context.request.ServletWebRequest;

import com.zhqx.security.core.validate.code.ValidateCode;
import com.zhqx.security.core.validate.code.ValidateCodeRepository;
import com.zhqx.security.core.validate.code.ValidateCodeType;

//以session方式存储验证码信息
@Component
public class SessionValidateCodeRepository implements ValidateCodeRepository {

	private Logger logger = LoggerFactory.getLogger(getClass());

	// 验证码放入session时的前缀
	String SESSION_KEY_PREFIX = "SESSION_KEY_FOR_CODE_";

	// 操作session的工具类
	private SessionStrategy sessionStrategy = new HttpSessionSessionStrategy();

	//构建验证码放入session时的key
	private String getSessionKey(ServletWebRequest request, ValidateCodeType validateCodeType) {
		return SESSION_KEY_PREFIX + validateCodeType.toString().toUpperCase();
	}

	@Override
	public void save(ServletWebRequest request, ValidateCode code, ValidateCodeType validateCodeType) {
		sessionStrategy.setAttribute(request, getSessionKey(request, validateCodeType), code);
		logger.info("------->session存进验证码,session key:" + getSessionKey(request, validateCodeType) + " ,code:"
				+ code.getCode());
	}

	@Override
	public ValidateCode get(ServletWebRequest request, ValidateCodeType validateCodeType) {
		ValidateCode validateCode = (ValidateCode) sessionStrategy.getAttribute(request,
				getSessionKey(request, validateCodeType));
		logger.info("------->获取到session验证码,session key:" + getSessionKey(request, validateCodeType) + ",code:"
				+ validateCode.getCode());
		return validateCode;
	}

	@Override
	public void remove(ServletWebRequest request, ValidateCodeType validateCodeType) {
		sessionStrategy.removeAttribute(request, getSessionKey(request, validateCodeType));
		logger.info("------->移除session验证码,session key:" + getSessionKey(request, validateCodeType));
	}

}
在zhqx-security-app项目,新增包com.zhqx.security.app.validate.code.impl。在其中新增类RedisValidateCodeRepository :
package com.zhqx.security.app.validate.code.impl;

import java.util.concurrent.TimeUnit;

import org.apache.commons.lang.StringUtils;
import org.slf4j.Logger;
import org.slf4j.LoggerFactory;
import org.springframework.beans.factory.annotation.Autowired;
import org.springframework.data.redis.core.RedisTemplate;
import org.springframework.stereotype.Component;
import org.springframework.web.context.request.ServletWebRequest;

import com.zhqx.security.core.validate.code.ValidateCode;
import com.zhqx.security.core.validate.code.ValidateCodeException;
import com.zhqx.security.core.validate.code.ValidateCodeRepository;
import com.zhqx.security.core.validate.code.ValidateCodeType;

//redis验证码存取策略
@Component
public class RedisValidateCodeRepository implements ValidateCodeRepository {
	private Logger logger = LoggerFactory.getLogger(getClass());

	@Autowired
	private RedisTemplate<Object, Object> redisTemplate;

	@Override
	public void save(ServletWebRequest request, ValidateCode code, ValidateCodeType validateCodeType) {
		String key = buildKey(request, validateCodeType);
		logger.info("--------->redis存进去了一个新的key:" + key + ",value:" + code + "<-----------");
		redisTemplate.opsForValue().set(key, code, 30, TimeUnit.MINUTES);
	}

	@Override
	public ValidateCode get(ServletWebRequest request, ValidateCodeType validateCodeType) {
		Object value = redisTemplate.opsForValue().get(buildKey(request, validateCodeType));
		if (value == null) {
			return null;
		}
		return (ValidateCode) value;
	}

	@Override
	public void remove(ServletWebRequest request, ValidateCodeType validateCodeType) {
		String key = buildKey(request, validateCodeType);
		logger.info("--------->redis删除了一个key:" + key + "<-----------");
		redisTemplate.delete(key);
	}

	//构建验证码在redis中的key
	private String buildKey(ServletWebRequest request, ValidateCodeType validateCodeType) {
		// 获取设备id
		String deviceId = request.getHeader("deviceId");
		if (StringUtils.isBlank(deviceId)) {
			throw new ValidateCodeException("deviceId为空,请求头中未携带deviceId参数");
		}
		return "code:" + validateCodeType.toString().toLowerCase() + ":" + deviceId;
	}
}
启动服务之前,我们确保redis服务是打开的。启动服务后,使用插件Talend API Tester。帮助我们测试和发送请求。
测试界面图如下:
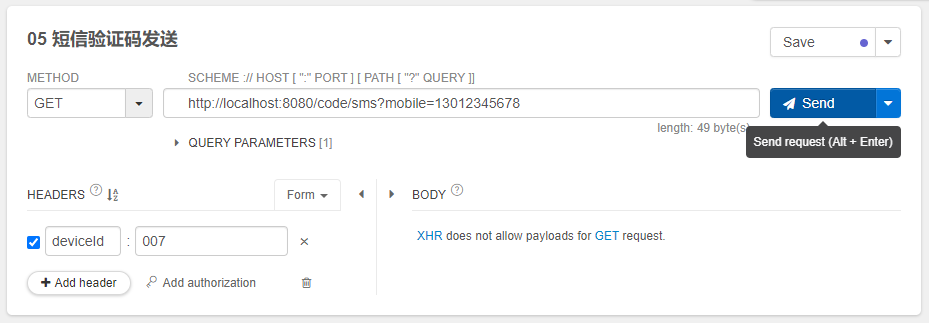
发送通过后,后台打印结果:
向手机13012345678发送短信验证码9299
我们打开redis-cli,输入keys *,可以返回如下结果:
127.0.0.1:6379> keys *
1) "\xac\xed\x00\x05t\x00\x0ccode:sms:007"
127.0.0.1:6379>
说明007这个设备的短信验证码已经存放到redis中了。
这个时候我们再次使用linux终端发送curl请求:
curl -i -X POST 'http://localhost:8080/authentication/mobile'\
 -H "Content-Type:application/x-www-form-urlencoded"\
 -H "Authorization:Basic emhxeDp6aHF4U2VjcmV0"\
 -H "deviceId:007"\
 -d "mobile=13012345678"\
 -d "smsCode=9299"
返回结果如下:
[root@VM-0-70-centos ~]# curl -i -X POST 'http://localhost:8080/authentication/mobile'\
>  -H "Content-Type:application/x-www-form-urlencoded"\
>  -H "Authorization:Basic emhxeDp6aHF4U2VjcmV0"\
>  -H "deviceId:007"\
>  -d "mobile=13012345678"\
>  -d "smsCode=9299"
HTTP/1.1 200
X-Content-Type-Options: nosniff
X-XSS-Protection: 1; mode=block
Cache-Control: no-cache, no-store, max-age=0, must-revalidate
Pragma: no-cache
Expires: 0
X-Frame-Options: DENY
Content-Type: application/json;charset=UTF-8
Content-Length: 151
Date: Thu, 24 Sep 2019 07:21:05 GMT

{"access_token":"465bbd41-749c-44a4-afa4-13586e896643","token_type":"bearer","refresh_token":"ce56e9ce-b853-4dc1-93ba-cace0de0ffca","expires_in":43199}[root@VM-0-70-centos ~]#
说明此时,我们没有使用传统的session存储方式,也成功验证了验证码,并成功获取到token。
我们打开redis-cli,输入keys *,可以返回如下结果:
127.0.0.1:6379> keys *
1) "\xac\xed\x00\x05t\x00\x0ccode:sms:007"
127.0.0.1:6379> keys *
(empty list or set)
127.0.0.1:6379>
因为登录过后,设备的验证码就被清空了。所以redis中此时没有key了。
使用插件Talend API Tester。帮助我们测试和发送请求,测试界面图如下:
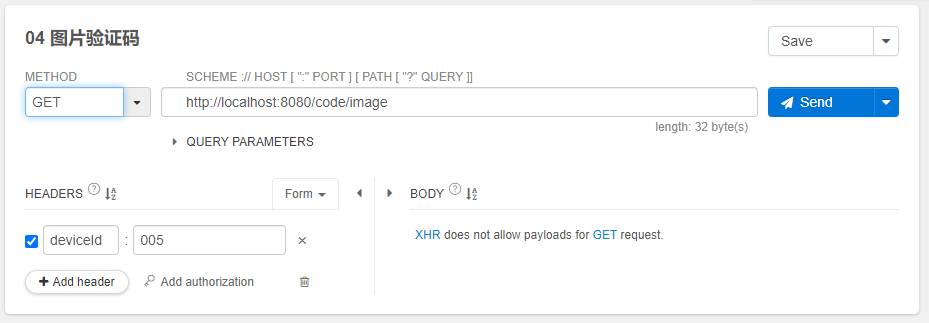
点击send发送通过,此时后台图片验证码的结果是:816102。
这个时候我们再次使用linux终端发送curl请求:
curl -i -X POST 'http://localhost:8080/authentication/form'\
 -H "Content-Type:application/x-www-form-urlencoded"\
 -H "Authorization:Basic emhxeDp6aHF4U2VjcmV0"\
 -H "deviceId:005"\
 -d "username=test"\
 -d "password=123456"\
 -d "imageCode=816102"
返回结果如下:
[root@VM-0-70-centos ~]# curl -i -X POST 'http://localhost:8080/authentication/form'\
>  -H "Content-Type:application/x-www-form-urlencoded"\
>  -H "Authorization:Basic emhxeDp6aHF4U2VjcmV0"\
>  -H "deviceId:005"\
>  -d "username=test"\
>  -d "password=123456"\
>  -d "imageCode=816102"
HTTP/1.1 200
X-Content-Type-Options: nosniff
X-XSS-Protection: 1; mode=block
Cache-Control: no-cache, no-store, max-age=0, must-revalidate
Pragma: no-cache
Expires: 0
X-Frame-Options: DENY
Content-Type: application/json;charset=UTF-8
Content-Length: 151
Date: Thu, 24 Sep 2019 07:49:40 GMT

{"access_token":"c0183782-cab9-4e08-8d13-191dbb43b0d0","token_type":"bearer","refresh_token":"c581ab95-2986-447d-9e56-c101fcf378bc","expires_in":42691}[root@VM-0-70-centos ~]#
说明使用用户名-密码-验证码的方式是正常。
C.重构社交登录
a.使用openId登录
在zhqx-security-app项目中新建包com.zhqx.security.app.social.openid。
新建类OpenIdAuthenticationToken:
package com.zhqx.security.app.social.openid;

import java.util.Collection;

import org.springframework.security.authentication.AbstractAuthenticationToken;
import org.springframework.security.core.GrantedAuthority;
import org.springframework.security.core.SpringSecurityCoreVersion;

public class OpenIdAuthenticationToken extends AbstractAuthenticationToken {
	private static final long serialVersionUID = SpringSecurityCoreVersion.SERIAL_VERSION_UID;

	// ~ Instance fields
	// ================================================================================================

	private final Object principal;
	private String providerId;

	// ~ Constructors
	// ===================================================================================================

	/**
	 * This constructor can be safely used by any code that wishes to create a
	 * <code>UsernamePasswordAuthenticationToken</code>, as the
	 * {@link #isAuthenticated()} will return <code>false</code>.
	 *
	 */
	public OpenIdAuthenticationToken(String openId, String providerId) {
		super(null);
		this.principal = openId;
		this.providerId = providerId;
		setAuthenticated(false);
	}

	/**
	 * This constructor should only be used by <code>AuthenticationManager</code> or
	 * <code>AuthenticationProvider</code> implementations that are satisfied with
	 * producing a trusted (i.e. {@link #isAuthenticated()} = <code>true</code>)
	 * authentication token.
	 *
	 * @param principal
	 * @param credentials
	 * @param authorities
	 */
	public OpenIdAuthenticationToken(Object principal, Collection<? extends GrantedAuthority> authorities) {
		super(authorities);
		this.principal = principal;
		super.setAuthenticated(true); // must use super, as we override
	}

	public Object getCredentials() {
		return null;
	}

	public Object getPrincipal() {
		return principal;
	}

	public String getProviderId() {
		return providerId;
	}

	public void setAuthenticated(boolean isAuthenticated) throws IllegalArgumentException {
		if (isAuthenticated) {
			throw new IllegalArgumentException(
					"Cannot set this token to trusted - use constructor which takes a GrantedAuthority list instead");
		}

		super.setAuthenticated(false);
	}

	@Override
	public void eraseCredentials() {
		super.eraseCredentials();
	}
}
修改zhqx-security-core项目中com.zhqx.security.core.properties包下的SecurityConstants接口,新增如下配置:
public interface SecurityConstants {

	//只显示新增部分,其余代码省略

	//openid参数名
	String DEFAULT_PARAMETER_NAME_OPENID = "openId";

	//providerId参数名/
	String DEFAULT_PARAMETER_NAME_PROVIDERID = "providerId";

	//默认的OPENID登录请求处理url
	public static final String DEFAULT_LOGIN_PROCESSING_URL_OPENID = "/authentication/openid";
}
新建类OpenIdAuthenticationFilter:
package com.zhqx.security.app.social.openid;

import javax.servlet.http.HttpServletRequest;
import javax.servlet.http.HttpServletResponse;

import org.springframework.security.authentication.AuthenticationServiceException;
import org.springframework.security.core.Authentication;
import org.springframework.security.core.AuthenticationException;
import org.springframework.security.web.authentication.AbstractAuthenticationProcessingFilter;
import org.springframework.security.web.util.matcher.AntPathRequestMatcher;
import org.springframework.util.Assert;

import com.zhqx.security.core.properties.SecurityConstants;

public class OpenIdAuthenticationFilter extends AbstractAuthenticationProcessingFilter {
	// ~ Static fields/initializers
	// =====================================================================================

	private String openIdParameter = SecurityConstants.DEFAULT_PARAMETER_NAME_OPENID;
	private String providerIdParameter = SecurityConstants.DEFAULT_PARAMETER_NAME_PROVIDERID;
	private boolean postOnly = true;

	// ~ Constructors
	// ===================================================================================================

	public OpenIdAuthenticationFilter() {
		super(new AntPathRequestMatcher(SecurityConstants.DEFAULT_LOGIN_PROCESSING_URL_OPENID, "POST"));
	}

	// ~ Methods
	// ========================================================================================================

	public Authentication attemptAuthentication(HttpServletRequest request, HttpServletResponse response)
			throws AuthenticationException {
		if (postOnly && !request.getMethod().equals("POST")) {
			throw new AuthenticationServiceException("Authentication method not supported: " + request.getMethod());
		}

		String openid = obtainOpenId(request);
		String providerId = obtainProviderId(request);

		if (openid == null) {
			openid = "";
		}
		if (providerId == null) {
			providerId = "";
		}

		openid = openid.trim();
		providerId = providerId.trim();

		OpenIdAuthenticationToken authRequest = new OpenIdAuthenticationToken(openid, providerId);

		// Allow subclasses to set the "details" property
		setDetails(request, authRequest);

		return this.getAuthenticationManager().authenticate(authRequest);
	}

	//获取openId
	protected String obtainOpenId(HttpServletRequest request) {
		return request.getParameter(openIdParameter);
	}

	//获取提供商id
	protected String obtainProviderId(HttpServletRequest request) {
		return request.getParameter(providerIdParameter);
	}

	/**
	 * Provided so that subclasses may configure what is put into the authentication
	 * request's details property.
	 *
	 * @param request     that an authentication request is being created for
	 * @param authRequest the authentication request object that should have its
	 *                    details set
	 */
	protected void setDetails(HttpServletRequest request, OpenIdAuthenticationToken authRequest) {
		authRequest.setDetails(authenticationDetailsSource.buildDetails(request));
	}

	/**
	 * Sets the parameter name which will be used to obtain the username from the
	 * login request.
	 *
	 * @param usernameParameter the parameter name. Defaults to "username".
	 */
	public void setOpenIdParameter(String openIdParameter) {
		Assert.hasText(openIdParameter, "Username parameter must not be empty or null");
		this.openIdParameter = openIdParameter;
	}

	/**
	 * Defines whether only HTTP POST requests will be allowed by this filter. If
	 * set to true, and an authentication request is received which is not a POST
	 * request, an exception will be raised immediately and authentication will not
	 * be attempted. The <tt>unsuccessfulAuthentication()</tt> method will be called
	 * as if handling a failed authentication.
	 * <p>
	 * Defaults to <tt>true</tt> but may be overridden by subclasses.
	 */
	public void setPostOnly(boolean postOnly) {
		this.postOnly = postOnly;
	}

	public final String getOpenIdParameter() {
		return openIdParameter;
	}

	public String getProviderIdParameter() {
		return providerIdParameter;
	}

	public void setProviderIdParameter(String providerIdParameter) {
		this.providerIdParameter = providerIdParameter;
	}
}
新建类OpenIdAuthenticationProvider。
package com.zhqx.security.app.social.openid;

import java.util.HashSet;
import java.util.Set;

import org.springframework.security.authentication.AuthenticationProvider;
import org.springframework.security.authentication.InternalAuthenticationServiceException;
import org.springframework.security.core.Authentication;
import org.springframework.security.core.AuthenticationException;
import org.springframework.security.core.userdetails.UserDetails;
import org.springframework.social.connect.UsersConnectionRepository;
import org.springframework.social.security.SocialUserDetailsService;
import org.springframework.util.CollectionUtils;

public class OpenIdAuthenticationProvider implements AuthenticationProvider {

	private SocialUserDetailsService userDetailsService;

	private UsersConnectionRepository usersConnectionRepository;

	@Override
	public Authentication authenticate(Authentication authentication) throws AuthenticationException {

		OpenIdAuthenticationToken authenticationToken = (OpenIdAuthenticationToken) authentication;

		Set<String> providerUserIds = new HashSet<>();
		providerUserIds.add((String) authenticationToken.getPrincipal());
		Set<String> userIds = usersConnectionRepository.findUserIdsConnectedTo(authenticationToken.getProviderId(),
				providerUserIds);

		if (CollectionUtils.isEmpty(userIds) || userIds.size() != 1) {
			throw new InternalAuthenticationServiceException("无法获取用户信息");
		}

		String userId = userIds.iterator().next();

		UserDetails user = userDetailsService.loadUserByUserId(userId);

		if (user == null) {
			throw new InternalAuthenticationServiceException("无法获取用户信息");
		}

		OpenIdAuthenticationToken authenticationResult = new OpenIdAuthenticationToken(user, user.getAuthorities());

		authenticationResult.setDetails(authenticationToken.getDetails());

		return authenticationResult;
	}

	@Override
	public boolean supports(Class<?> authentication) {
		return OpenIdAuthenticationToken.class.isAssignableFrom(authentication);
	}

	public SocialUserDetailsService getUserDetailsService() {
		return userDetailsService;
	}

	public void setUserDetailsService(SocialUserDetailsService userDetailsService) {
		this.userDetailsService = userDetailsService;
	}

	public UsersConnectionRepository getUsersConnectionRepository() {
		return usersConnectionRepository;
	}

	public void setUsersConnectionRepository(UsersConnectionRepository usersConnectionRepository) {
		this.usersConnectionRepository = usersConnectionRepository;
	}
}
新建类OpenIdAuthenticationSecurityConfig。
package com.zhqx.security.app.social.openid;

import org.springframework.beans.factory.annotation.Autowired;
import org.springframework.security.authentication.AuthenticationManager;
import org.springframework.security.config.annotation.SecurityConfigurerAdapter;
import org.springframework.security.config.annotation.web.builders.HttpSecurity;
import org.springframework.security.web.DefaultSecurityFilterChain;
import org.springframework.security.web.authentication.AuthenticationFailureHandler;
import org.springframework.security.web.authentication.AuthenticationSuccessHandler;
import org.springframework.security.web.authentication.UsernamePasswordAuthenticationFilter;
import org.springframework.social.connect.UsersConnectionRepository;
import org.springframework.social.security.SocialUserDetailsService;

@Component
public class OpenIdAuthenticationSecurityConfig extends SecurityConfigurerAdapter<DefaultSecurityFilterChain, HttpSecurity> {
	@Autowired
	private AuthenticationSuccessHandler imoocAuthenticationSuccessHandler;

	@Autowired
	private AuthenticationFailureHandler imoocAuthenticationFailureHandler;

	@Autowired
	private SocialUserDetailsService userDetailsService;

	@Autowired
	private UsersConnectionRepository usersConnectionRepository;

	@Override
	public void configure(HttpSecurity http) throws Exception {

		OpenIdAuthenticationFilter openIdAuthenticationFilter = new OpenIdAuthenticationFilter();
		openIdAuthenticationFilter.setAuthenticationManager(http.getSharedObject(AuthenticationManager.class));
		openIdAuthenticationFilter.setAuthenticationSuccessHandler(imoocAuthenticationSuccessHandler);
		openIdAuthenticationFilter.setAuthenticationFailureHandler(imoocAuthenticationFailureHandler);

		OpenIdAuthenticationProvider openIdAuthenticationProvider = new OpenIdAuthenticationProvider();
		openIdAuthenticationProvider.setUserDetailsService(userDetailsService);
		openIdAuthenticationProvider.setUsersConnectionRepository(usersConnectionRepository);

		http.authenticationProvider(openIdAuthenticationProvider)
			.addFilterAfter(openIdAuthenticationFilter, UsernamePasswordAuthenticationFilter.class);

	}
}
修改zhqx-security-app项目的com.zhqx.security.app包下的ZhqxResourceServerConfig类。
@Configuration
@EnableResourceServer
public class ZhqxResourceServerConfig extends ResourceServerConfigurerAdapter {

	//只显示修改部分代码,其余省略

	@Autowired
	private OpenIdAuthenticationSecurityConfig openIdAuthenticationSecurityConfig;

	@Override
	public void configure(HttpSecurity http) throws Exception {

		http.formLogin()
		.loginPage(SecurityConstants.DEFAULT_UNAUTHENTICATION_URL)
		.loginProcessingUrl(SecurityConstants.DEFAULT_LOGIN_PROCESSING_URL_FORM)
		.successHandler(zhqxAuthenticationSuccessHandler)
		.failureHandler(zhqxAuthenticationFailureHandler);

		http.apply(validateCodeSecurityConfig)
				.and()
			.apply(smsCodeAuthenticationSecurityConfig)
				.and()
			.apply(zhqxSocialSecurityConfig)
				.and()
			.apply(openIdAuthenticationSecurityConfig)
				.and()
			.authorizeRequests()
				.antMatchers(
					SecurityConstants.DEFAULT_UNAUTHENTICATION_URL,
					SecurityConstants.DEFAULT_LOGIN_PROCESSING_URL_MOBILE,
					SecurityConstants.DEFAULT_LOGIN_PROCESSING_URL_OPENID,
					securityProperties.getBrowser().getLoginPage(),
					SecurityConstants.DEFAULT_VALIDATE_CODE_URL_PREFIX + "/*",
					"/error", securityProperties.getBrowser().getSignUpUrl(),
					"/user/regist")
					.permitAll()
				.anyRequest()
				.authenticated()
				.and()
			.csrf().disable();
	}
}
使用插件Talend API Tester。帮助我们测试和发送请求,测试界面图如下:

这里HEADERS内容与之前的测试相同。providerId和openId是之前web社交登录时,保存在数据库中的内容。
使用这个获取的access_token": "12f87632-7c81-4360-b047-042c5c2abe75"。进行获取用户信息的测试。
测试界面图如下:
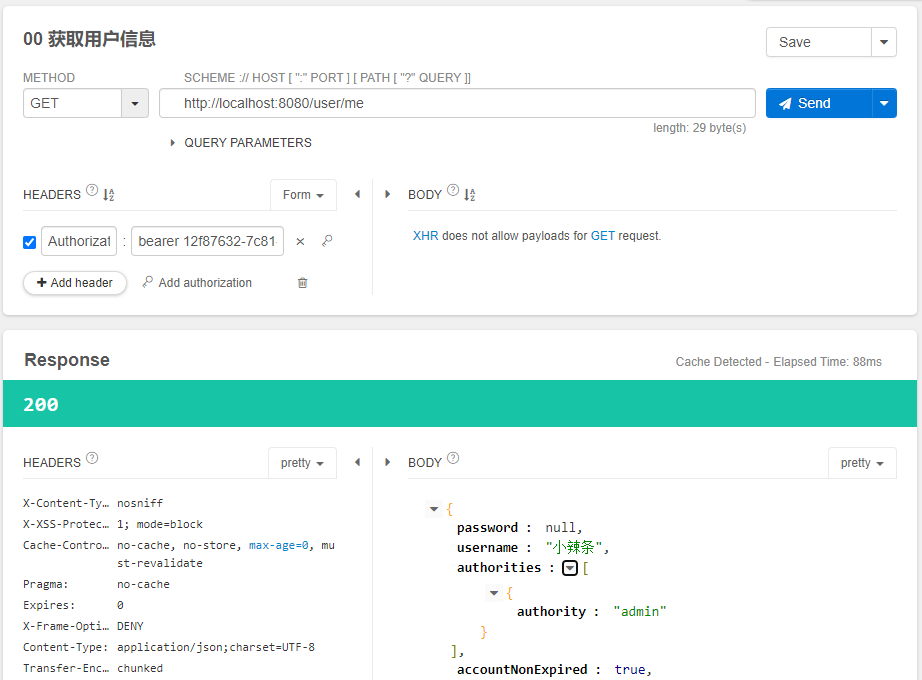
能够正确获取用户信息。
b.使用授权码模式的社交登录。
1.首先修改zhqx-security-demo项目的POM文件,重新依赖浏览器模块。注释掉APP模块。只显示修改部分。将配置文件端口改为80
<dependency>
	<groupId>com.zhqx.security</groupId>
	<artifactId>zhqx-security-browser</artifactId>
	<version>${zhqx.security.version}</version>
</dependency>
 	<!-- <dependency>
	<groupId>com.zhqx.security</groupId>
	<artifactId>zhqx-security-app</artifactId>
	<version>${zhqx.security.version}</version>
</dependency> -->
application.yml文件修改
server:
  port: 80
  servlet:
    session:
      timeout: PT15m
#      cookie:
#        max-age: PT30s
2.在类OAuth2AuthenticationService的如下代码处打断点。
AccessGrant accessGrant = getConnectionFactory().getOAuthOperations().exchangeForAccess(code, returnToUrl, null);
debug模式下启动项目,浏览器访问:http://www.test.com/zhqx-login.html(www.test.com是你配置的域名)。点击微信登录。
扫码,确认登录,此时把服务器停掉。浏览器地址栏显示如下地址:
http://www.test.com/qqLogin/weixin?code=031fQ30w3K3E2V2bnt2w3gHkBv2fQ30L&state=cae2ddef-d205-4574-a484-b9f669f06dad
3.修改zhqx-security-demo项目的POM文件,重新依赖APP模块。注释掉浏览器模块。只显示修改部分。
<!-- <dependency>
	<groupId>com.zhqx.security</groupId>
	<artifactId>zhqx-security-browser</artifactId>
	<version>${zhqx.security.version}</version>
</dependency> -->
 	<dependency>
	<groupId>com.zhqx.security</groupId>
	<artifactId>zhqx-security-app</artifactId>
	<version>${zhqx.security.version}</version>
</dependency>
4.debug模式下启动服务,复制浏览器中的地址。
使用插件Talend API Tester。帮助我们测试和发送请求,我们进一步测试一下用户名-密码-图片验证码登录。
测试界面图如下:
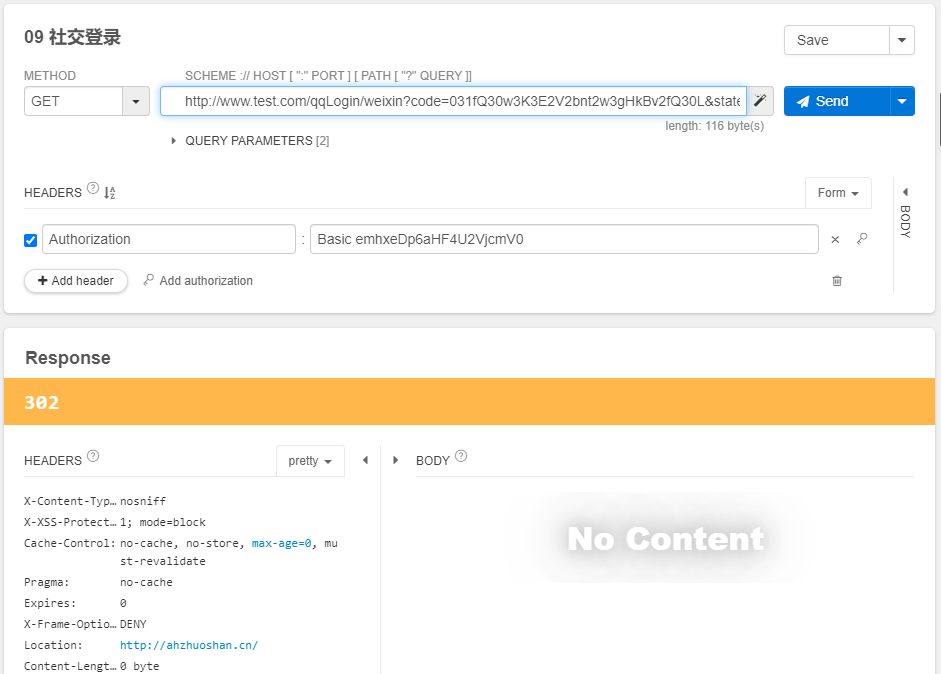
点击发送,再次进入断点位置,直接通过。发现返回结果是302,并没有返回一个令牌。
这是因为,在zhqx-security-core项目中的com.zhqx.security.core.social包下的ZhqxSpringSocialConfigurer类中如下代码:
//object代表将要放到security过滤器链上的filter
@Override
protected <T> T postProcess(T object) {
	SocialAuthenticationFilter filter = (SocialAuthenticationFilter) super.postProcess(object);
	filter.setFilterProcessesUrl(filterProcessesUrl);
	return (T) filter;
}
指定的成功处理器是默认的成功处理器,而不是我们在zhqx-security-app项目中com.zhqx.security.app.authentication包下设置的成功处理器ZhqxAuthenticationSuccessHandler。
在浏览器模式下,扫码登录后,直接进入了系统。而在APP模式下,我们要求的是获取一个令牌。我们要求重构代码,实现在浏览器和APP模式下返回不同的结果。
5.在zhqx-security-core项目的com.zhqx.security.core.social包下新增接口SocialAuthenticationFilterPostProcessor:
package com.zhqx.security.core.social;

import org.springframework.social.security.SocialAuthenticationFilter;

public interface SocialAuthenticationFilterPostProcessor {
	void process(SocialAuthenticationFilter socialAuthenticationFilter);
}
6.修改zhqx-security-core项目的com.zhqx.security.core.social包下的ZhqxSpringSocialConfigurer类
package com.zhqx.security.core.social;

import org.springframework.social.security.SocialAuthenticationFilter;
import org.springframework.social.security.SpringSocialConfigurer;

//修改默认拦截请求/auth
public class ZhqxSpringSocialConfigurer extends SpringSocialConfigurer {

	private String filterProcessesUrl;

	private SocialAuthenticationFilterPostProcessor socialAuthenticationFilterPostProcessor;

	public ZhqxSpringSocialConfigurer(String filterProcessesUrl) {
		this.filterProcessesUrl = filterProcessesUrl;
	}

	//object代表将要放到security过滤器链上的filter
	@Override
	protected <T> T postProcess(T object) {
		SocialAuthenticationFilter filter = (SocialAuthenticationFilter) super.postProcess(object);
		filter.setFilterProcessesUrl(filterProcessesUrl);
		if (socialAuthenticationFilterPostProcessor != null) {
			socialAuthenticationFilterPostProcessor.process(filter);
		}
		return (T) filter;
	}

	public String getFilterProcessesUrl() {
		return filterProcessesUrl;
	}

	public void setFilterProcessesUrl(String filterProcessesUrl) {
		this.filterProcessesUrl = filterProcessesUrl;
	}

	public SocialAuthenticationFilterPostProcessor getSocialAuthenticationFilterPostProcessor() {
		return socialAuthenticationFilterPostProcessor;
	}

	public void setSocialAuthenticationFilterPostProcessor(
			SocialAuthenticationFilterPostProcessor socialAuthenticationFilterPostProcessor) {
		this.socialAuthenticationFilterPostProcessor = socialAuthenticationFilterPostProcessor;
	}
}
7.修改zhqx-security-core项目的com.zhqx.security.core.social包下的SocialConfig类:
@Configuration
@EnableSocial
public class SocialConfig extends SocialConfigurerAdapter {

	//只显示修改部分代码,其余省略。

	@Autowired(required = false)
	private SocialAuthenticationFilterPostProcessor socialAuthenticationFilterPostProcessor;

	//过滤器
	@Bean(name = "zhqxSocialSecurityConfig")
	public SpringSocialConfigurer zhqxSocialSecurityConfig() {
		//return new SpringSocialConfigurer();
		String filterProcessesUrl = securityProperties.getSocial().getFilterProcessesUrl();
		ZhqxSpringSocialConfigurer configure = new ZhqxSpringSocialConfigurer(filterProcessesUrl);
		//将默认注册页替换成我们自定义的注册页面
		configure.signupUrl(securityProperties.getBrowser().getSignUpUrl());
		//设置成功处理
		configure.setSocialAuthenticationFilterPostProcessor(socialAuthenticationFilterPostProcessor);
		return configure;
	}

}
在zhqx-security-app项目中新增包com.zhqx.security.app.social.impl,在包下新增类:AppSocialAuthenticationFilterPostProcessor
package com.zhqx.security.app.social.impl;

import org.springframework.beans.factory.annotation.Autowired;
import org.springframework.security.web.authentication.AuthenticationSuccessHandler;
import org.springframework.social.security.SocialAuthenticationFilter;
import org.springframework.stereotype.Component;

import com.zhqx.security.core.social.SocialAuthenticationFilterPostProcessor;

@Component
public class AppSocialAuthenticationFilterPostProcessor implements SocialAuthenticationFilterPostProcessor {

	@Autowired
	private AuthenticationSuccessHandler zhqxAuthenticationSuccessHandler;

	@Override
	public void process(SocialAuthenticationFilter socialAuthenticationFilter) {
		socialAuthenticationFilter.setAuthenticationSuccessHandler(zhqxAuthenticationSuccessHandler);
	}

}
启动服务,再次重复1-4的步骤。此时在第四步中,测试结果如下图:
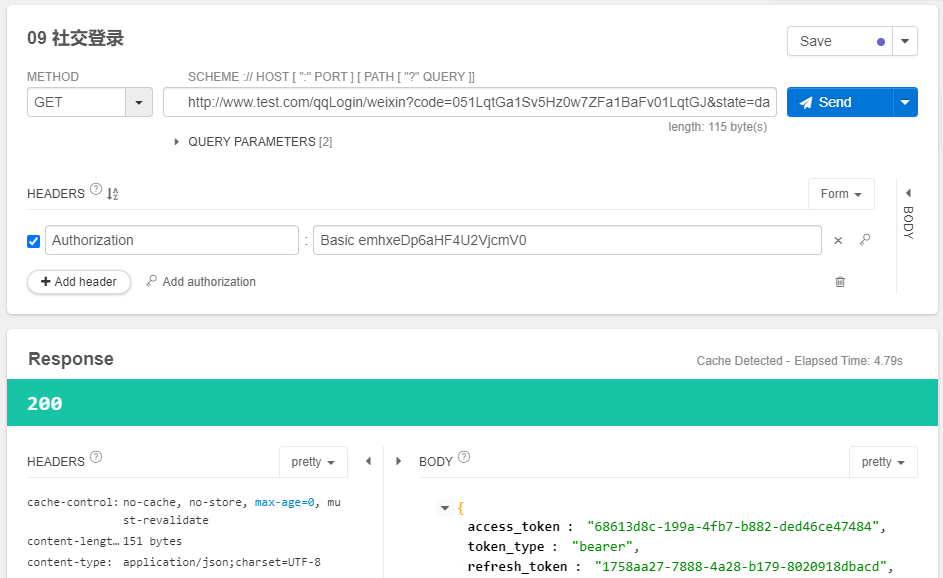
能正常的拿到结果了。因为,没有办法开发一个APP,所以用请求的形式,来代替APP客户端发送。正常情况下,如果有APP客户端时,在APP客户端完成1-2步骤。我们是通过截获服务的授权码,再通过APP发送请求的方式来实现的。
D.重构用户注册
在zhqx-security-app项目的在com.zhqx.security.app包下新增类AppSecretException。
package com.zhqx.security.app;

public class AppSecretException extends RuntimeException {

	private static final long serialVersionUID = 1L;

	public AppSecretException(String msg) {
		super(msg);
	}

}
在zhqx-security-app项目的com.zhqx.security.app.social包下新增类AppSignUpUtils。
package com.zhqx.security.app.social;

import java.util.concurrent.TimeUnit;

import org.apache.commons.lang.StringUtils;
import org.springframework.beans.factory.annotation.Autowired;
import org.springframework.data.redis.core.RedisTemplate;
import org.springframework.social.connect.Connection;
import org.springframework.social.connect.ConnectionData;
import org.springframework.social.connect.ConnectionFactoryLocator;
import org.springframework.social.connect.UsersConnectionRepository;
import org.springframework.stereotype.Component;
import org.springframework.web.context.request.WebRequest;

import com.zhqx.security.app.AppSecretException;

@Component
public class AppSignUpUtils {

	@Autowired
	private RedisTemplate<Object, Object> redisTemplate;

	@Autowired
	private UsersConnectionRepository usersConnectionRepository;

	@Autowired
	private ConnectionFactoryLocator connectionFactoryLocator;

	public void saveConnectionData(WebRequest request, ConnectionData connectionData) {
		redisTemplate.opsForValue().set(getKey(request), connectionData, 10, TimeUnit.MINUTES);
	}

	private String getKey(WebRequest request) {
		String deviceId = request.getHeader("deviceId");
		if (StringUtils.isBlank(deviceId)) {
			throw new AppSecretException("设备id参数不能为空");
		}
		return "zhqx:security:social.connect." + deviceId;
	}

	public void doPostSignUp(WebRequest request, String userId) {
		String key = getKey(request);
		if (!redisTemplate.hasKey(key)) {
			throw new AppSecretException("无法找到缓存的用户社交账号信息");
		}
		ConnectionData connectionData = (ConnectionData) redisTemplate.opsForValue().get(key);
		Connection<?> connection = connectionFactoryLocator.getConnectionFactory(connectionData.getProviderId())
				.createConnection(connectionData);
		usersConnectionRepository.createConnectionRepository(userId).addConnection(connection);

		redisTemplate.delete(key);
	}

}
在zhqx-security-app项目的com.zhqx.security.app包下新增类SpringSocialConfigurerPostProcessor。
package com.zhqx.security.app;

import org.apache.commons.lang.StringUtils;
import org.springframework.beans.BeansException;
import org.springframework.beans.factory.config.BeanPostProcessor;
import org.springframework.stereotype.Component;

import com.zhqx.security.core.social.ZhqxSpringSocialConfigurer;

@Component
public class SpringSocialConfigurerPostProcessor implements BeanPostProcessor {

	@Override
	public Object postProcessBeforeInitialization(Object bean, String beanName) throws BeansException {
		return bean;
	}

	@Override
	public Object postProcessAfterInitialization(Object bean, String beanName) throws BeansException {
		if (StringUtils.equals(beanName, "zhqxSocialSecurityConfig")) {
			ZhqxSpringSocialConfigurer configurer = (ZhqxSpringSocialConfigurer) bean;
			//APP环境下,社交登录注册时跳转请求
			configurer.signupUrl("/social/signUp");
			return configurer;
		}
		return bean;
	}
}
将zhqx-security-browser项目中com.zhqx.security.browser.support包下的SocialUserInfo类移动到(并删除原来的)
zhqx-security-core项目的com.zhqx.security.core.support包下。解决引入错误。
在zhqx-security-app项目的com.zhqx.security.app包下新增类AppSecurityController。
package com.zhqx.security.app;

import javax.servlet.http.HttpServletRequest;

import org.springframework.beans.factory.annotation.Autowired;
import org.springframework.http.HttpStatus;
import org.springframework.social.connect.Connection;
import org.springframework.social.connect.web.ProviderSignInUtils;
import org.springframework.web.bind.annotation.GetMapping;
import org.springframework.web.bind.annotation.ResponseStatus;
import org.springframework.web.bind.annotation.RestController;
import org.springframework.web.context.request.ServletWebRequest;

import com.zhqx.security.app.social.AppSignUpUtils;
import com.zhqx.security.core.support.SocialUserInfo;

@RestController
public class AppSecurityController {

	@Autowired
	private ProviderSignInUtils providerSignInUtils;

	@Autowired
	private AppSignUpUtils appSignUpUtils;

	@GetMapping("/social/signUp")
	@ResponseStatus(HttpStatus.UNAUTHORIZED)
	public SocialUserInfo getSocialUserInfo(HttpServletRequest request) {
		SocialUserInfo userInfo = new SocialUserInfo();
		Connection<?> connection = providerSignInUtils.getConnectionFromSession(new ServletWebRequest(request));
		userInfo.setProviderId(connection.getKey().getProviderId());
		userInfo.setProviderUserId(connection.getKey().getProviderUserId());
		userInfo.setNickname(connection.getDisplayName());
		userInfo.setHeadimg(connection.getImageUrl());

		appSignUpUtils.saveConnectionData(new ServletWebRequest(request), connection.createData());
		return userInfo;
	}
}
修改zhqx-security-app项目com.zhqx.security.app包下的ZhqxResourceServerConfig类,放行/social/signUp
@Configuration
@EnableResourceServer
public class ZhqxResourceServerConfig extends ResourceServerConfigurerAdapter {
	//只显示修改部分代码

	@Override
	public void configure(HttpSecurity http) throws Exception {

		http.formLogin()
		.loginPage(SecurityConstants.DEFAULT_UNAUTHENTICATION_URL)
		.loginProcessingUrl(SecurityConstants.DEFAULT_LOGIN_PROCESSING_URL_FORM)
		.successHandler(zhqxAuthenticationSuccessHandler)
		.failureHandler(zhqxAuthenticationFailureHandler);

		http.apply(validateCodeSecurityConfig)
				.and()
			.apply(smsCodeAuthenticationSecurityConfig)
				.and()
			.apply(zhqxSocialSecurityConfig)
				.and()
			.apply(openIdAuthenticationSecurityConfig)
				.and()
			.authorizeRequests()
				.antMatchers(
					SecurityConstants.DEFAULT_UNAUTHENTICATION_URL,
					SecurityConstants.DEFAULT_LOGIN_PROCESSING_URL_MOBILE,
					SecurityConstants.DEFAULT_LOGIN_PROCESSING_URL_OPENID,
					securityProperties.getBrowser().getLoginPage(),
					SecurityConstants.DEFAULT_VALIDATE_CODE_URL_PREFIX + "/*",
					"/error", securityProperties.getBrowser().getSignUpUrl(),
					"/user/regist", "/social/signUp")
					.permitAll()
				.anyRequest()
				.authenticated()
				.and()
			.csrf().disable();
	}
}
修改zhqx-security-demo项目中的com.zhqx.web.controller包下的UserController类:
@RestController
@RequestMapping("/user")
public class UserController {
	//只显示修改部分代码,其余省略

	@Autowired
	private ProviderSignInUtils providerSignInUtils;

	@Autowired
	private AppSignUpUtils appSignUpUtils;

	@PostMapping("/regist")
	public void regist(User user, HttpServletRequest request) {
		//不管是注册用户还是绑定用户,都会拿到一个用户唯一标识。
		//省略注册或者绑定的业务逻辑
		String userId = user.getUsername();
		//providerSignInUtils.doPostSignUp(userId, new ServletWebRequest(request));
		appSignUpUtils.doPostSignUp(new ServletWebRequest(request), userId);
	}
}
【切换引入zhqx-security-browser时注意解决UserController中的错误,引入zhqx-security-app时换回上面的修改】
在进行测试之前,记得将我们之前在zhqx-security-demo项目的com.zhqx.security包下配置的DemoConnectionSignUp静默注册给注释掉!
debug模式启动服务,删除数据库中原来的微信绑定账号。重复使用授权码模式登录的1-2步骤,拿到浏览器中的授权码。
拿到授权码后,使用插件Talend API Tester。帮助我们测试和发送请求,测试界面结果图如下:
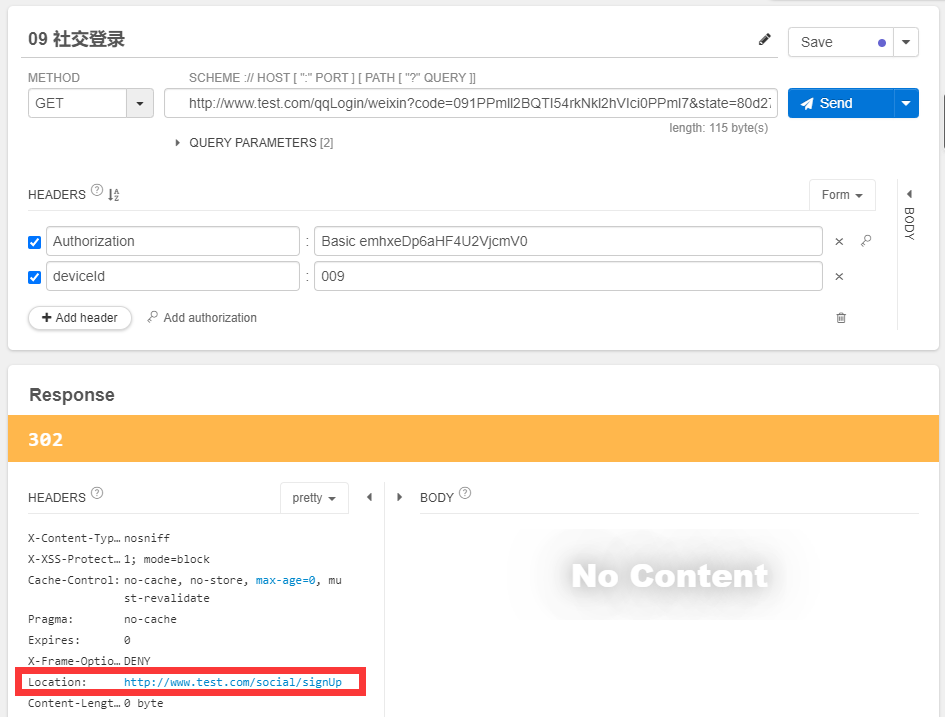
这个时候,我们再次测试请求,测试界面结果图如下:
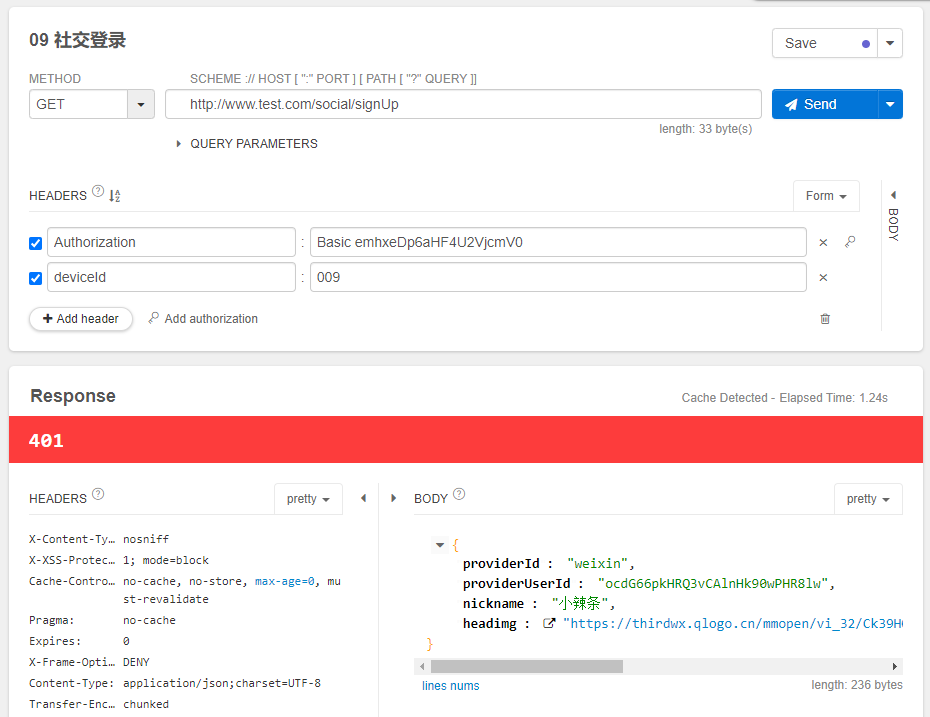
这个时候,我们就拿到了相关用户信息,当做APP开发时,在这个过程中,拿到401状态码时,APP可以用这些信息进一步引导用户注册。
在进行进一步测试前,我们使用redis-cli。
127.0.0.1:6379> keys *
1) "\xac\xed\x00\x05t\x00 zhqx:security:social.connect.009"
127.0.0.1:6379>
可以发现数据库中已经有了009设备ID对应的缓存。
使用获得用户信息,再次测试请求,测试界面结果图如下:
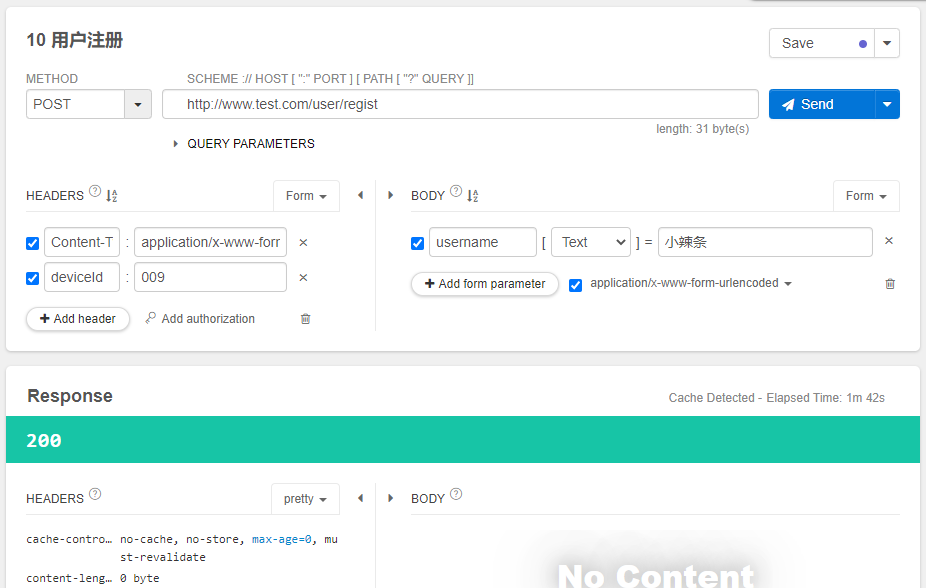
返回200的状态码,此时查看数据库,发现已经注册成功了。
令牌配置
处理Token的三个要点:基本的Token参数配置,使用JWT替换默认的Token,扩展和解析JWT的信息。
1.基本的Token参数配置
默认的认证服务器流程已经不起作用了,我们需要通过自定义的方式来获取token。为了方便后面的测试,我们对项目代码略作改动。
在zhqx-security-app项目的com.zhqx.security.app包下新增NewZhqxAuthorizationServerConfig类。
package com.zhqx.security.app;

import org.springframework.security.config.annotation.web.configuration.WebSecurityConfigurerAdapter;
import org.springframework.stereotype.Component;

@Component
public class NewZhqxAuthorizationServerConfig extends WebSecurityConfigurerAdapter {

}
修改com.zhqx.security.app包下的ZhqxAuthorizationServerConfig类。
package com.zhqx.security.app;

import org.springframework.beans.factory.annotation.Autowired;
import org.springframework.context.annotation.Configuration;
import org.springframework.security.authentication.AuthenticationManager;
import org.springframework.security.core.userdetails.UserDetailsService;
import org.springframework.security.oauth2.config.annotation.configurers.ClientDetailsServiceConfigurer;
import org.springframework.security.oauth2.config.annotation.web.configuration.AuthorizationServerConfigurerAdapter;
import org.springframework.security.oauth2.config.annotation.web.configuration.EnableAuthorizationServer;
import org.springframework.security.oauth2.config.annotation.web.configurers.AuthorizationServerEndpointsConfigurer;

@Configuration
@EnableAuthorizationServer
public class ZhqxAuthorizationServerConfig extends AuthorizationServerConfigurerAdapter {

	@Autowired
	private AuthenticationManager authenticationManager;

	@Autowired
	private UserDetailsService userDetailsService;

	@Override
	public void configure(AuthorizationServerEndpointsConfigurer endpoints) throws Exception {
		endpoints.authenticationManager(authenticationManager)
			.userDetailsService(userDetailsService);
	}

	//这里与配置文件中配置client-id和client-secret、registered-redirect-uri效果是一样的
	@Override
	public void configure(ClientDetailsServiceConfigurer clients) throws Exception {
		clients.inMemory().withClient("zhqx")
			.secret("zhqxSecret")
			.redirectUris("http://example.com")
			.accessTokenValiditySeconds(7200)//token过期时间,单位是秒
			.authorizedGrantTypes("refresh_token", "password")//授权模式
			.scopes("all", "read", "write");//scope参数,权限类型
	}

}
修改zhqx-security-demo项目中,src/main/resources文件夹下的配置文件application.yml,注释掉如下代码部分。
#security:
#  oauth2:
#    client:
#      client-id: zhqx
#      client-secret: zhqxSecret
#      registered-redirect-uri:
#      - http://example.com
启动服务,这个时候,发现服务无法启动,【Springboot2.x版本带来的版本差异】。控制台报错,其中包含如下错误信息:
No qualifying bean of type 'org.springframework.security.authentication.AuthenticationManager' available:
意思是说AuthenticationManager没能自动注入,找不到默认实例。
修改com.zhqx.security.app包下的NewZhqxAuthorizationServerConfig类。
@Component
public class NewZhqxAuthorizationServerConfig extends WebSecurityConfigurerAdapter {

	@Bean(name = BeanIds.AUTHENTICATION_MANAGER)
	@Override
	public AuthenticationManager authenticationManagerBean() throws Exception {
		return super.authenticationManagerBean();
	}
}
启动服务,服务正常启动了。使用插件Talend API Tester。帮助我们测试和发送请求,测试界面结果图如下:
点击send后,界面弹出登录弹框。并且后台提示如下信息:
Encoded password does not look like BCrypt
这个错误的原因是因为我们配置客户端的secret没有使用BCrypt方式加密,而我们前台传送的是加密的。
修改com.zhqx.security.app包下的ZhqxAuthorizationServerConfig类。
@Configuration
@EnableAuthorizationServer
public class ZhqxAuthorizationServerConfig extends AuthorizationServerConfigurerAdapter {
	//只显示修改后的代码,其余代码省略

	//这里与配置文件中配置client-id和client-secret、registered-redirect-uri效果是一样的
	@Override
	public void configure(ClientDetailsServiceConfigurer clients) throws Exception {
		String secret = new BCryptPasswordEncoder().encode("zhqxSecret");
		clients.inMemory().withClient("zhqx")
			.secret(secret)
			.redirectUris("http://example.com")
			.accessTokenValiditySeconds(7200)//token过期时间,单位是秒
			.authorizedGrantTypes("refresh_token", "password")//授权模式,刷新令牌和密码模式,此时不支持授权码模式
			.scopes("all", "read", "write");//scope参数,权限类型
	}

}
修改后,再次启动服务。使用插件Talend API Tester。帮助我们测试和发送请求,测试界面结果图如下:

当我们输入一个错误的scope时,测试界面结果图如下:

实现客户端配置,由用户自定义有哪些客户端。
在zhqx-security-core项目的com.zhqx.security.core.properties包下新增OAuth2Properties和OAuth2ClientProperties类。
OAuth2ClientProperties类:
package com.zhqx.security.core.properties;

public class OAuth2ClientProperties {

	private String clientId;

	private String clientSecret;

	private int accessTokenValidateSeconds = 7200;

	public String getClientId() {
		return clientId;
	}

	public void setClientId(String clientId) {
		this.clientId = clientId;
	}

	public String getClientSecret() {
		return clientSecret;
	}

	public void setClientSecret(String clientSecret) {
		this.clientSecret = clientSecret;
	}

	public int getAccessTokenValidateSeconds() {
		return accessTokenValidateSeconds;
	}

	public void setAccessTokenValidateSeconds(int accessTokenValidateSeconds) {
		this.accessTokenValidateSeconds = accessTokenValidateSeconds;
	}

}
OAuth2Properties类:
package com.zhqx.security.core.properties;

public class OAuth2Properties {

	private OAuth2ClientProperties[] clients = {};

	public OAuth2ClientProperties[] getClients() {
		return clients;
	}

	public void setClients(OAuth2ClientProperties[] clients) {
		this.clients = clients;
	}
}
修改com.zhqx.security.core.properties包下的SecurityProperties类:
@ConfigurationProperties(prefix = "zhqx.security")
public class SecurityProperties {

	//只显示修改部分代码,其余代码省略...

	private OAuth2Properties oauth2 = new OAuth2Properties();

	public OAuth2Properties getOauth2() {
		return oauth2;
	}

	public void setOauth2(OAuth2Properties oauth2) {
		this.oauth2 = oauth2;
	}

}
修改zhqx-security-app项目的com.zhqx.security.app包下的ZhqxAuthorizationServerConfig类:
@Configuration
@EnableAuthorizationServer
public class ZhqxAuthorizationServerConfig extends AuthorizationServerConfigurerAdapter {

	@Override
	public void configure(AuthorizationServerSecurityConfigurer security) throws Exception {
		security.allowFormAuthenticationForClients();
	}

	@Autowired
	private AuthenticationManager authenticationManager;

	@Autowired
	private UserDetailsService userDetailsService;

	@Autowired
	private SecurityProperties securityProperties;

	@Override
	public void configure(AuthorizationServerEndpointsConfigurer endpoints) throws Exception {
		endpoints.authenticationManager(authenticationManager)
			.userDetailsService(userDetailsService);
	}

	/*
	@Override
	public void configure(ClientDetailsServiceConfigurer clients) throws Exception {
		String secret = new BCryptPasswordEncoder().encode("zhqxSecret");
		clients.inMemory().withClient("zhqx")
			.secret(new BCryptPasswordEncoder().encode(config.getClientSecret()))
			.redirectUris("http://example.com")
			.authorizedGrantTypes("refresh_token", "authorization_code", "password")
			//token失效时间
			.accessTokenValiditySeconds(config.getAccessTokenValidateSeconds())
			//刷新码失效时间
			.refreshTokenValiditySeconds(2592000)
			.scopes("all", "read", "write");
	}
	*/

	//这里与配置文件中配置client-id和client-secret、registered-redirect-uri效果是一样的
	@Override
	public void configure(ClientDetailsServiceConfigurer clients) throws Exception {
		InMemoryClientDetailsServiceBuilder builder = clients.inMemory();
		if (ArrayUtils.isNotEmpty(securityProperties.getOauth2().getClients())) {
			for (OAuth2ClientProperties config : securityProperties.getOauth2().getClients()) {
				builder.withClient(config.getClientId())
				.secret(new BCryptPasswordEncoder().encode(config.getClientSecret()))
				.redirectUris("http://example.com")
				.accessTokenValiditySeconds(config.getAccessTokenValidateSeconds())
				.authorizedGrantTypes("refresh_token", "password")
				.scopes("all", "read", "write");
			}
		}
	}

}
修改zhqx-security-demo项目中src/main/resources文件夹下的application.yml,增加Client相关配置:
#只显示修改部分代码,其余部分省略...

zhqx:
  security:
    browser:
#      loginPage: /demo-login.html
#      loginResponseType: REDIRECT
      signUpUrl: /demo-regist.html
      sign-out-url: /demo-logout.html
    code:
      image:
        length: 6
        width: 100
        url:
      sms:
        length: 4
        url:
    social:
      qq:
        appId: 101902472
        appSecret: 15abc3e3ce6f8cc0b76a618f6eaebf44
        providerId: callback.do
      filterProcessesUrl: /qqLogin
      weixin:
        appId: wx75fa4fdcd885b013
        appSecret: 22bee9a81af337376c32773de0ef870f
        providerId: weixin
    oauth2:
      clients:
        - clients[0]:
          clientId: zhqx
          clientSecret: zhqxSecret
          accessTokenValidateSeconds: 3600
        - clients[1]:
          clientId: test
          clientSecret: test
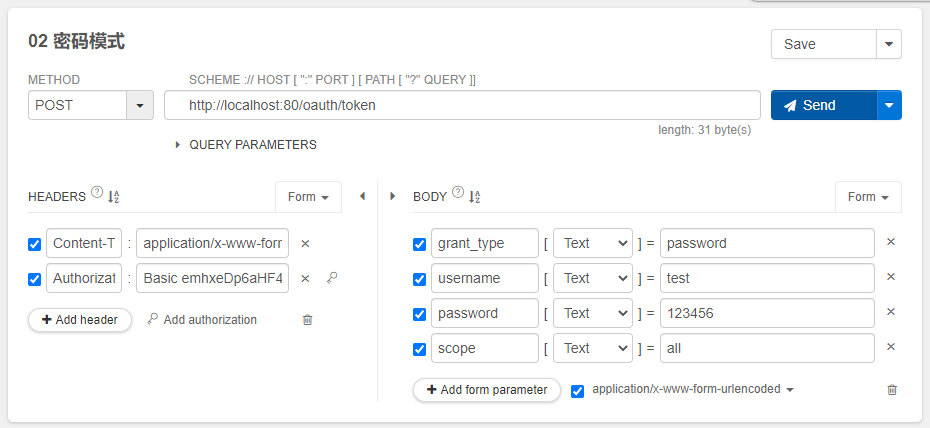
启动服务,使用插件Talend API Tester。帮助我们测试和发送请求,分别使用zhqx和test进行测试,测试界面结果图如下:
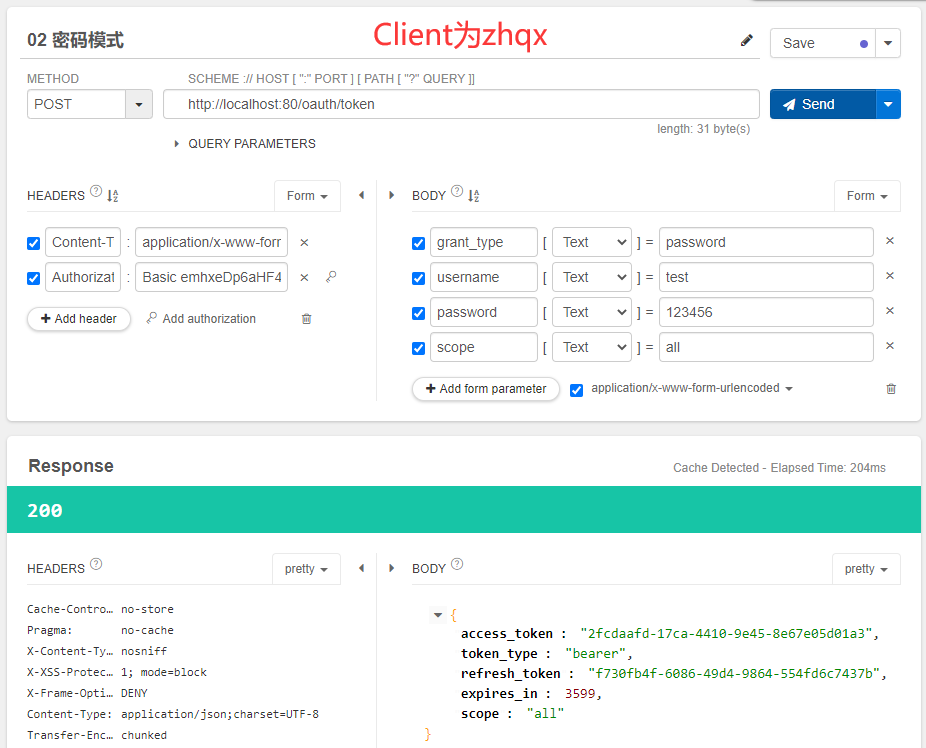
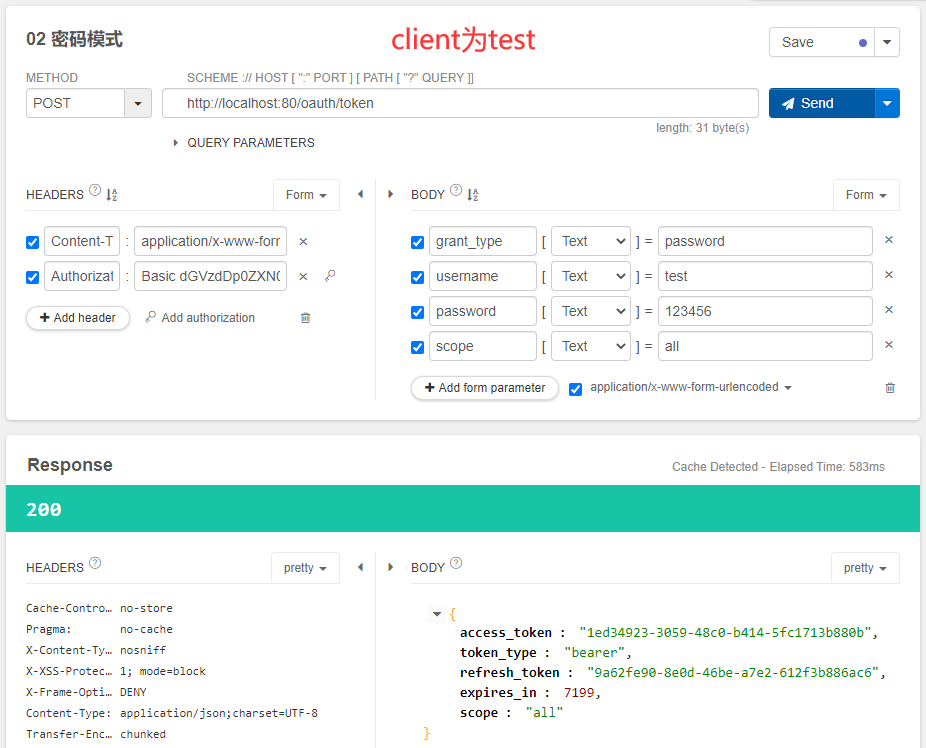
因为,我们当前令牌的存储方式内存方式,一旦服务重启之后,令牌就会消失。我们可以将令牌配置到redis中。这样尽管服务重启,只要令牌在
有效期内,我们仍然可以访问。
在zhqx-security-app项目的com.zhqx.security.app包下新增类TokenStoreConfig:
package com.zhqx.security.app;

import org.springframework.beans.factory.annotation.Autowired;
import org.springframework.boot.autoconfigure.condition.ConditionalOnProperty;
import org.springframework.context.annotation.Bean;
import org.springframework.context.annotation.Configuration;
import org.springframework.data.redis.connection.RedisConnectionFactory;
import org.springframework.security.oauth2.provider.token.TokenStore;
import org.springframework.security.oauth2.provider.token.store.redis.RedisTokenStore;

@Configuration
public class TokenStoreConfig {

	@Autowired
	private RedisConnectionFactory redisConnectionFactory;

	@Bean
	public TokenStore redisTokenStore() {
		return new RedisTokenStore(redisConnectionFactory);
	}
}
修改zhqx-security-app项目的com.zhqx.security.app包下的ZhqxAuthorizationServerConfig类:
@Configuration
@EnableAuthorizationServer
public class ZhqxAuthorizationServerConfig extends AuthorizationServerConfigurerAdapter {
	//只显示修改部分的类...

	@Autowired
	private TokenStore tokenStore;

	@Override
	public void configure(AuthorizationServerEndpointsConfigurer endpoints) throws Exception {
		endpoints
			.tokenStore(tokenStore)
			.authenticationManager(authenticationManager)
			.userDetailsService(userDetailsService);
	}

}
启动服务,此时我们先不做任何访问,使用redis-cli输入如下命令:
127.0.0.1:6379> keys *
(empty list or set)
127.0.0.1:6379>
此时,redis中是没有任何数据的。当我们使用插件Talend API Tester。帮助我们测试和发送请求,发现没有获得token,同时后台提示如下错误:
org.springframework.data.redis.connection.RedisConnection.set([B[B)V
这个错误是因为历史版本带来的错误,spring-security-oauth2-2.2.3.RELEASE.jar案例使用的是这个版本。网上给出了解决方案,但是以为大体上来说,换整个项目版本的代价是比较大的。所以我们采用重写TokenStore的实现来解决。
在zhqx-security-app项目的com.zhqx.security.app包下新增MyRedisTokenStore类来实现。
package com.zhqx.security.app;

import java.util.ArrayList;
import java.util.Collection;
import java.util.Collections;
import java.util.Date;
import java.util.List;

import org.springframework.data.redis.connection.RedisConnection;
import org.springframework.data.redis.connection.RedisConnectionFactory;
import org.springframework.security.oauth2.common.ExpiringOAuth2RefreshToken;
import org.springframework.security.oauth2.common.OAuth2AccessToken;
import org.springframework.security.oauth2.common.OAuth2RefreshToken;
import org.springframework.security.oauth2.provider.OAuth2Authentication;
import org.springframework.security.oauth2.provider.token.AuthenticationKeyGenerator;
import org.springframework.security.oauth2.provider.token.DefaultAuthenticationKeyGenerator;
import org.springframework.security.oauth2.provider.token.TokenStore;
import org.springframework.security.oauth2.provider.token.store.redis.JdkSerializationStrategy;
import org.springframework.security.oauth2.provider.token.store.redis.RedisTokenStoreSerializationStrategy;

public class MyRedisTokenStore implements TokenStore{


    private static final String ACCESS = "access:";
    private static final String AUTH_TO_ACCESS = "auth_to_access:";
    private static final String AUTH = "auth:";
    private static final String REFRESH_AUTH = "refresh_auth:";
    private static final String ACCESS_TO_REFRESH = "access_to_refresh:";
    private static final String REFRESH = "refresh:";
    private static final String REFRESH_TO_ACCESS = "refresh_to_access:";
    private static final String CLIENT_ID_TO_ACCESS = "client_id_to_access:";
    private static final String UNAME_TO_ACCESS = "uname_to_access:";

    private final RedisConnectionFactory connectionFactory;
    private AuthenticationKeyGenerator authenticationKeyGenerator = new DefaultAuthenticationKeyGenerator();
    private RedisTokenStoreSerializationStrategy serializationStrategy = new JdkSerializationStrategy();

    private String prefix = "";

    public MyRedisTokenStore(RedisConnectionFactory connectionFactory) {
        this.connectionFactory = connectionFactory;
    }

    public void setAuthenticationKeyGenerator(AuthenticationKeyGenerator authenticationKeyGenerator) {
        this.authenticationKeyGenerator = authenticationKeyGenerator;
    }

    public void setSerializationStrategy(RedisTokenStoreSerializationStrategy serializationStrategy) {
        this.serializationStrategy = serializationStrategy;
    }

    public void setPrefix(String prefix) {
        this.prefix = prefix;
    }

    private RedisConnection getConnection() {
        return connectionFactory.getConnection();
    }

    private byte[] serialize(Object object) {
        return serializationStrategy.serialize(object);
    }

    private byte[] serializeKey(String object) {
        return serialize(prefix + object);
    }

    private OAuth2AccessToken deserializeAccessToken(byte[] bytes) {
        return serializationStrategy.deserialize(bytes, OAuth2AccessToken.class);
    }

    private OAuth2Authentication deserializeAuthentication(byte[] bytes) {
        return serializationStrategy.deserialize(bytes, OAuth2Authentication.class);
    }

    private OAuth2RefreshToken deserializeRefreshToken(byte[] bytes) {
        return serializationStrategy.deserialize(bytes, OAuth2RefreshToken.class);
    }

    private byte[] serialize(String string) {
        return serializationStrategy.serialize(string);
    }

    private String deserializeString(byte[] bytes) {
        return serializationStrategy.deserializeString(bytes);
    }

    @Override
    public OAuth2AccessToken getAccessToken(OAuth2Authentication authentication) {
        String key = authenticationKeyGenerator.extractKey(authentication);
        byte[] serializedKey = serializeKey(AUTH_TO_ACCESS + key);
        byte[] bytes = null;
        RedisConnection conn = getConnection();
        try {
            bytes = conn.get(serializedKey);
        } finally {
            conn.close();
        }
        OAuth2AccessToken accessToken = deserializeAccessToken(bytes);
        if (accessToken != null
                && !key.equals(authenticationKeyGenerator.extractKey(readAuthentication(accessToken.getValue())))) {
            // Keep the stores consistent (maybe the same user is
            // represented by this authentication but the details have
            // changed)
            storeAccessToken(accessToken, authentication);
        }
        return accessToken;
    }

    @Override
    public OAuth2Authentication readAuthentication(OAuth2AccessToken token) {
        return readAuthentication(token.getValue());
    }

    @Override
    public OAuth2Authentication readAuthentication(String token) {
        byte[] bytes = null;
        RedisConnection conn = getConnection();
        try {
            bytes = conn.get(serializeKey(AUTH + token));
        } finally {
            conn.close();
        }
        OAuth2Authentication auth = deserializeAuthentication(bytes);
        return auth;
    }

    @Override
    public OAuth2Authentication readAuthenticationForRefreshToken(OAuth2RefreshToken token) {
        return readAuthenticationForRefreshToken(token.getValue());
    }

    public OAuth2Authentication readAuthenticationForRefreshToken(String token) {
        RedisConnection conn = getConnection();
        try {
            byte[] bytes = conn.get(serializeKey(REFRESH_AUTH + token));
            OAuth2Authentication auth = deserializeAuthentication(bytes);
            return auth;
        } finally {
            conn.close();
        }
    }

    @Override
    public void storeAccessToken(OAuth2AccessToken token, OAuth2Authentication authentication) {
        byte[] serializedAccessToken = serialize(token);
        byte[] serializedAuth = serialize(authentication);
        byte[] accessKey = serializeKey(ACCESS + token.getValue());
        byte[] authKey = serializeKey(AUTH + token.getValue());
        byte[] authToAccessKey = serializeKey(AUTH_TO_ACCESS + authenticationKeyGenerator.extractKey(authentication));
        byte[] approvalKey = serializeKey(UNAME_TO_ACCESS + getApprovalKey(authentication));
        byte[] clientId = serializeKey(CLIENT_ID_TO_ACCESS + authentication.getOAuth2Request().getClientId());

        RedisConnection conn = getConnection();
        try {
            conn.openPipeline();
            conn.stringCommands().set(accessKey, serializedAccessToken);
            conn.stringCommands().set(authKey, serializedAuth);
            conn.stringCommands().set(authToAccessKey, serializedAccessToken);
            if (!authentication.isClientOnly()) {
                conn.rPush(approvalKey, serializedAccessToken);
            }
            conn.rPush(clientId, serializedAccessToken);
            if (token.getExpiration() != null) {
                int seconds = token.getExpiresIn();
                conn.expire(accessKey, seconds);
                conn.expire(authKey, seconds);
                conn.expire(authToAccessKey, seconds);
                conn.expire(clientId, seconds);
                conn.expire(approvalKey, seconds);
            }
            OAuth2RefreshToken refreshToken = token.getRefreshToken();
            if (refreshToken != null && refreshToken.getValue() != null) {
                byte[] refresh = serialize(token.getRefreshToken().getValue());
                byte[] auth = serialize(token.getValue());
                byte[] refreshToAccessKey = serializeKey(REFRESH_TO_ACCESS + token.getRefreshToken().getValue());
                conn.stringCommands().set(refreshToAccessKey, auth);
                byte[] accessToRefreshKey = serializeKey(ACCESS_TO_REFRESH + token.getValue());
                conn.stringCommands().set(accessToRefreshKey, refresh);
                if (refreshToken instanceof ExpiringOAuth2RefreshToken) {
                    ExpiringOAuth2RefreshToken expiringRefreshToken = (ExpiringOAuth2RefreshToken) refreshToken;
                    Date expiration = expiringRefreshToken.getExpiration();
                    if (expiration != null) {
                        int seconds = Long.valueOf((expiration.getTime() - System.currentTimeMillis()) / 1000L)
                                .intValue();
                        conn.expire(refreshToAccessKey, seconds);
                        conn.expire(accessToRefreshKey, seconds);
                    }
                }
            }
            conn.closePipeline();
        } finally {
            conn.close();
        }
    }

    private static String getApprovalKey(OAuth2Authentication authentication) {
        String userName = authentication.getUserAuthentication() == null ? ""
                : authentication.getUserAuthentication().getName();
        return getApprovalKey(authentication.getOAuth2Request().getClientId(), userName);
    }

    private static String getApprovalKey(String clientId, String userName) {
        return clientId + (userName == null ? "" : ":" + userName);
    }

    @Override
    public void removeAccessToken(OAuth2AccessToken accessToken) {
        removeAccessToken(accessToken.getValue());
    }

    @Override
    public OAuth2AccessToken readAccessToken(String tokenValue) {
        byte[] key = serializeKey(ACCESS + tokenValue);
        byte[] bytes = null;
        RedisConnection conn = getConnection();
        try {
            bytes = conn.get(key);
        } finally {
            conn.close();
        }
        OAuth2AccessToken accessToken = deserializeAccessToken(bytes);
        return accessToken;
    }

    public void removeAccessToken(String tokenValue) {
        byte[] accessKey = serializeKey(ACCESS + tokenValue);
        byte[] authKey = serializeKey(AUTH + tokenValue);
        byte[] accessToRefreshKey = serializeKey(ACCESS_TO_REFRESH + tokenValue);
        RedisConnection conn = getConnection();
        try {
            conn.openPipeline();
            conn.get(accessKey);
            conn.get(authKey);
            conn.del(accessKey);
            conn.del(accessToRefreshKey);
            // Don't remove the refresh token - it's up to the caller to do that
            conn.del(authKey);
            List<Object> results = conn.closePipeline();
            byte[] access = (byte[]) results.get(0);
            byte[] auth = (byte[]) results.get(1);

            OAuth2Authentication authentication = deserializeAuthentication(auth);
            if (authentication != null) {
                String key = authenticationKeyGenerator.extractKey(authentication);
                byte[] authToAccessKey = serializeKey(AUTH_TO_ACCESS + key);
                byte[] unameKey = serializeKey(UNAME_TO_ACCESS + getApprovalKey(authentication));
                byte[] clientId = serializeKey(CLIENT_ID_TO_ACCESS + authentication.getOAuth2Request().getClientId());
                conn.openPipeline();
                conn.del(authToAccessKey);
                conn.lRem(unameKey, 1, access);
                conn.lRem(clientId, 1, access);
                conn.del(serialize(ACCESS + key));
                conn.closePipeline();
            }
        } finally {
            conn.close();
        }
    }

    @Override
    public void storeRefreshToken(OAuth2RefreshToken refreshToken, OAuth2Authentication authentication) {
        byte[] refreshKey = serializeKey(REFRESH + refreshToken.getValue());
        byte[] refreshAuthKey = serializeKey(REFRESH_AUTH + refreshToken.getValue());
        byte[] serializedRefreshToken = serialize(refreshToken);
        RedisConnection conn = getConnection();
        try {
            conn.openPipeline();
            conn.stringCommands().set(refreshKey, serializedRefreshToken);
            conn.stringCommands().set(refreshAuthKey, serialize(authentication));
            if (refreshToken instanceof ExpiringOAuth2RefreshToken) {
                ExpiringOAuth2RefreshToken expiringRefreshToken = (ExpiringOAuth2RefreshToken) refreshToken;
                Date expiration = expiringRefreshToken.getExpiration();
                if (expiration != null) {
                    int seconds = Long.valueOf((expiration.getTime() - System.currentTimeMillis()) / 1000L)
                            .intValue();
                    conn.expire(refreshKey, seconds);
                    conn.expire(refreshAuthKey, seconds);
                }
            }
            conn.closePipeline();
        } finally {
            conn.close();
        }
    }

    @Override
    public OAuth2RefreshToken readRefreshToken(String tokenValue) {
        byte[] key = serializeKey(REFRESH + tokenValue);
        byte[] bytes = null;
        RedisConnection conn = getConnection();
        try {
            bytes = conn.get(key);
        } finally {
            conn.close();
        }
        OAuth2RefreshToken refreshToken = deserializeRefreshToken(bytes);
        return refreshToken;
    }

    @Override
    public void removeRefreshToken(OAuth2RefreshToken refreshToken) {
        removeRefreshToken(refreshToken.getValue());
    }

    public void removeRefreshToken(String tokenValue) {
        byte[] refreshKey = serializeKey(REFRESH + tokenValue);
        byte[] refreshAuthKey = serializeKey(REFRESH_AUTH + tokenValue);
        byte[] refresh2AccessKey = serializeKey(REFRESH_TO_ACCESS + tokenValue);
        byte[] access2RefreshKey = serializeKey(ACCESS_TO_REFRESH + tokenValue);
        RedisConnection conn = getConnection();
        try {
            conn.openPipeline();
            conn.del(refreshKey);
            conn.del(refreshAuthKey);
            conn.del(refresh2AccessKey);
            conn.del(access2RefreshKey);
            conn.closePipeline();
        } finally {
            conn.close();
        }
    }

    @Override
    public void removeAccessTokenUsingRefreshToken(OAuth2RefreshToken refreshToken) {
        removeAccessTokenUsingRefreshToken(refreshToken.getValue());
    }

    private void removeAccessTokenUsingRefreshToken(String refreshToken) {
        byte[] key = serializeKey(REFRESH_TO_ACCESS + refreshToken);
        List<Object> results = null;
        RedisConnection conn = getConnection();
        try {
            conn.openPipeline();
            conn.get(key);
            conn.del(key);
            results = conn.closePipeline();
        } finally {
            conn.close();
        }
        if (results == null) {
            return;
        }
        byte[] bytes = (byte[]) results.get(0);
        String accessToken = deserializeString(bytes);
        if (accessToken != null) {
            removeAccessToken(accessToken);
        }
    }

    @Override
    public Collection<OAuth2AccessToken> findTokensByClientIdAndUserName(String clientId, String userName) {
        byte[] approvalKey = serializeKey(UNAME_TO_ACCESS + getApprovalKey(clientId, userName));
        List<byte[]> byteList = null;
        RedisConnection conn = getConnection();
        try {
            byteList = conn.lRange(approvalKey, 0, -1);
        } finally {
            conn.close();
        }
        if (byteList == null || byteList.size() == 0) {
            return Collections.<OAuth2AccessToken> emptySet();
        }
        List<OAuth2AccessToken> accessTokens = new ArrayList<OAuth2AccessToken>(byteList.size());
        for (byte[] bytes : byteList) {
            OAuth2AccessToken accessToken = deserializeAccessToken(bytes);
            accessTokens.add(accessToken);
        }
        return Collections.<OAuth2AccessToken> unmodifiableCollection(accessTokens);
    }

    @Override
    public Collection<OAuth2AccessToken> findTokensByClientId(String clientId) {
        byte[] key = serializeKey(CLIENT_ID_TO_ACCESS + clientId);
        List<byte[]> byteList = null;
        RedisConnection conn = getConnection();
        try {
            byteList = conn.lRange(key, 0, -1);
        } finally {
            conn.close();
        }
        if (byteList == null || byteList.size() == 0) {
            return Collections.<OAuth2AccessToken> emptySet();
        }
        List<OAuth2AccessToken> accessTokens = new ArrayList<OAuth2AccessToken>(byteList.size());
        for (byte[] bytes : byteList) {
            OAuth2AccessToken accessToken = deserializeAccessToken(bytes);
            accessTokens.add(accessToken);
        }
        return Collections.<OAuth2AccessToken> unmodifiableCollection(accessTokens);
    }
}
因为我们重写了TokenStore的实现。所以我们需要修改TokenStoreConfig类:
package com.zhqx.security.app;

import org.springframework.beans.factory.annotation.Autowired;
import org.springframework.context.annotation.Bean;
import org.springframework.context.annotation.Configuration;
import org.springframework.data.redis.connection.RedisConnectionFactory;
import org.springframework.security.oauth2.provider.token.TokenStore;

@Configuration
public class TokenStoreConfig {

	@Autowired
	private RedisConnectionFactory redisConnectionFactory;

	@Bean
	public TokenStore redisTokenStore() {
		return new MyRedisTokenStore(redisConnectionFactory);
	}
}
错误解决完成后,我们再次进行测试,测试界面结果图如下:
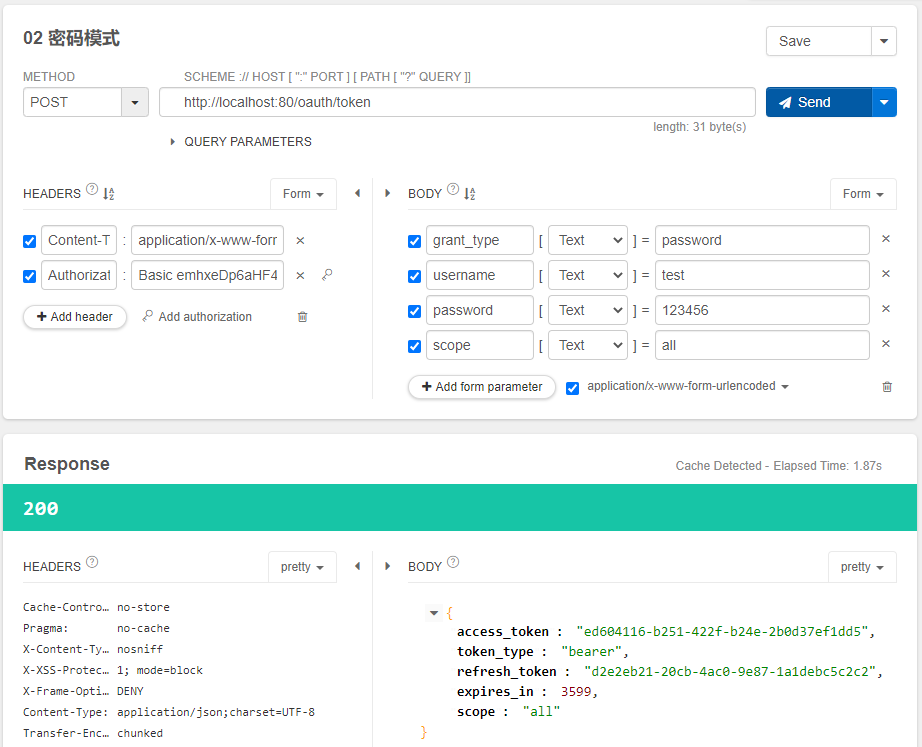
成功获得了token,此时,我们再次使用redis-cli输入如下命令:
127.0.0.1:6379> keys *
(empty list or set)
127.0.0.1:6379> keys *
1) "client_id_to_access:zhqx"
2) "uname_to_access:zhqx:test"
3) "refresh_to_access:d2e2eb21-20cb-4ac0-9e87-1a1debc5c2c2"
4) "refresh:d2e2eb21-20cb-4ac0-9e87-1a1debc5c2c2"
5) "access_to_refresh:ed604116-b251-422f-b24e-2b0d37ef1dd5"
6) "auth_to_access:1e1475eded0273c9d2967a303245f785"
7) "access:ed604116-b251-422f-b24e-2b0d37ef1dd5"
8) "refresh_auth:d2e2eb21-20cb-4ac0-9e87-1a1debc5c2c2"
9) "auth:ed604116-b251-422f-b24e-2b0d37ef1dd5"
127.0.0.1:6379>
可以发现,我们的token信息成功存储到redis中了。当我们关闭服务,再次启动时,因为token是存储在redis中的,所以使用上面图中获取的token仍然能够正常获取用户信息。
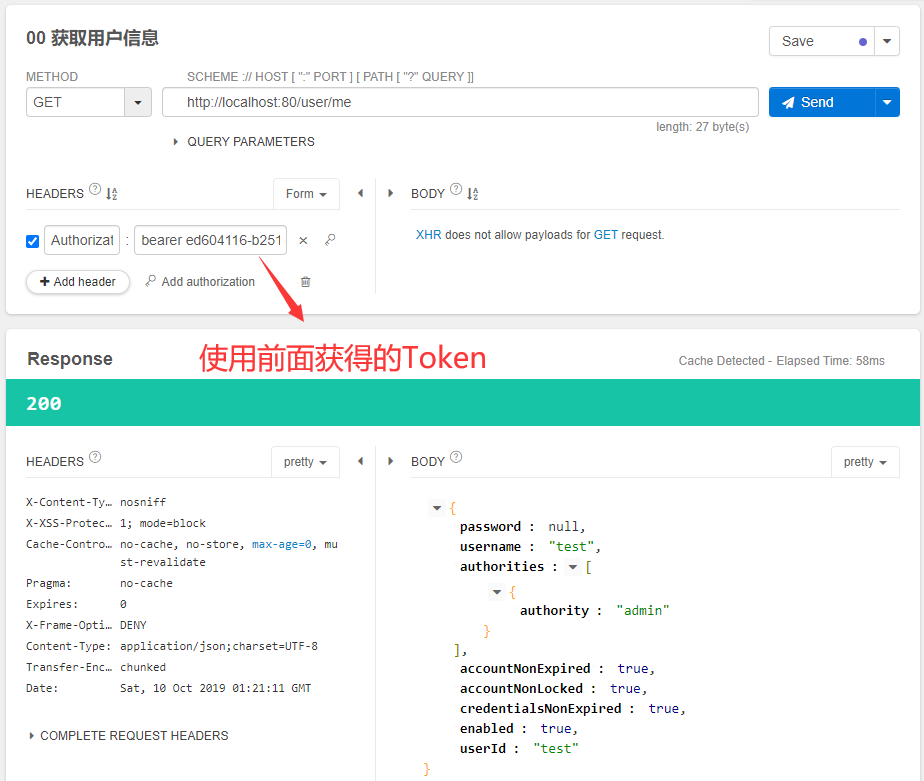
2.使用JWT替换默认的Token
修改zhqx-security-core项目的com.zhqx.security.core.properties包下的OAuth2Properties类:
public class OAuth2Properties {

	//只显示修改部分代码,其余省略...

	private String jwtSigningKey = "zhqx";

	public String getJwtSigningKey() {
		return jwtSigningKey;
	}

	public void setJwtSigningKey(String jwtSigningKey) {
		this.jwtSigningKey = jwtSigningKey;
	}
}
修改zhqx-security-app项目的com.zhqx.security.app包下的TokenStoreConfig类:
@Configuration
public class TokenStoreConfig {

	@Autowired
	private RedisConnectionFactory redisConnectionFactory;

	@Bean
	//有这个配置,且值是redis时,这个配置是生效的
	@ConditionalOnProperty(prefix = "zhqx.security.oauth2", name = "storeType", havingValue = "redis")
	public TokenStore redisTokenStore() {
		return new MyRedisTokenStore(redisConnectionFactory);
	}

	@Configuration
	//没有这个配置,或者有这个配置,且值是jwt时,这个配置是生效的
	@ConditionalOnProperty(prefix = "zhqx.security.oauth2", name = "storeType", havingValue = "jwt", matchIfMissing = true)
	public static class JwtTokenConfig {

		@Autowired
		private SecurityProperties securityProperties;

		@Bean
		public TokenStore jwtTokenStore() {
			return new JwtTokenStore(jwtAccessTokenConverter());
		}

		@Bean
		public JwtAccessTokenConverter jwtAccessTokenConverter() {
			JwtAccessTokenConverter accessTokenConverter = new JwtAccessTokenConverter();
			accessTokenConverter.setSigningKey(securityProperties.getOauth2().getJwtSigningKey());
			return accessTokenConverter;
		}

	}
}
修改com.zhqx.security.app包下的ZhqxAuthorizationServerConfig类:
@Configuration
@EnableAuthorizationServer
public class ZhqxAuthorizationServerConfig extends AuthorizationServerConfigurerAdapter {
	//只显示修改部分代码,其余省略...

	//只有配置了jwt时才会生效
	@Autowired(required = false)
	private JwtAccessTokenConverter jwtAccessTokenConverter;

	@Override
	public void configure(AuthorizationServerEndpointsConfigurer endpoints) throws Exception {
		endpoints
			.tokenStore(tokenStore)
			.authenticationManager(authenticationManager)
			.userDetailsService(userDetailsService);
		if (jwtAccessTokenConverter != null) {
			endpoints.accessTokenConverter(jwtAccessTokenConverter);
		}
	}

}
启动服务,使用插件Talend API Tester。帮助我们测试和发送请求,测试界面结果图如下:
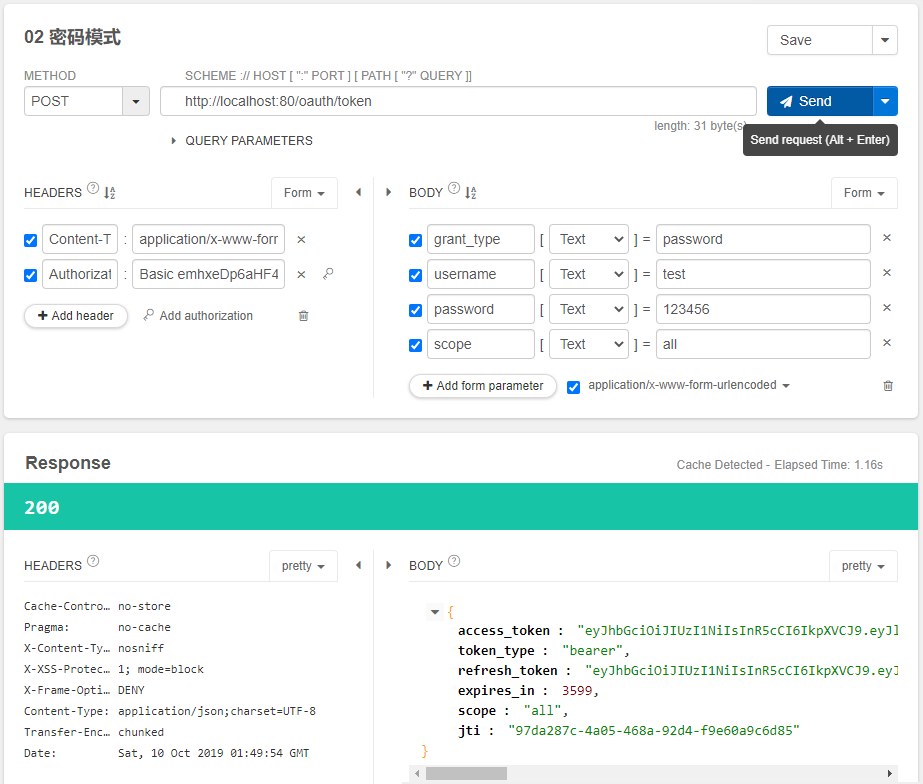
这里,我们发现因为使用了jwt,所以我们的token值已经变化了。
我们访问:https://www.jsonwebtoken.io/。将我们获取的token放入其中,可以得到如下结果:
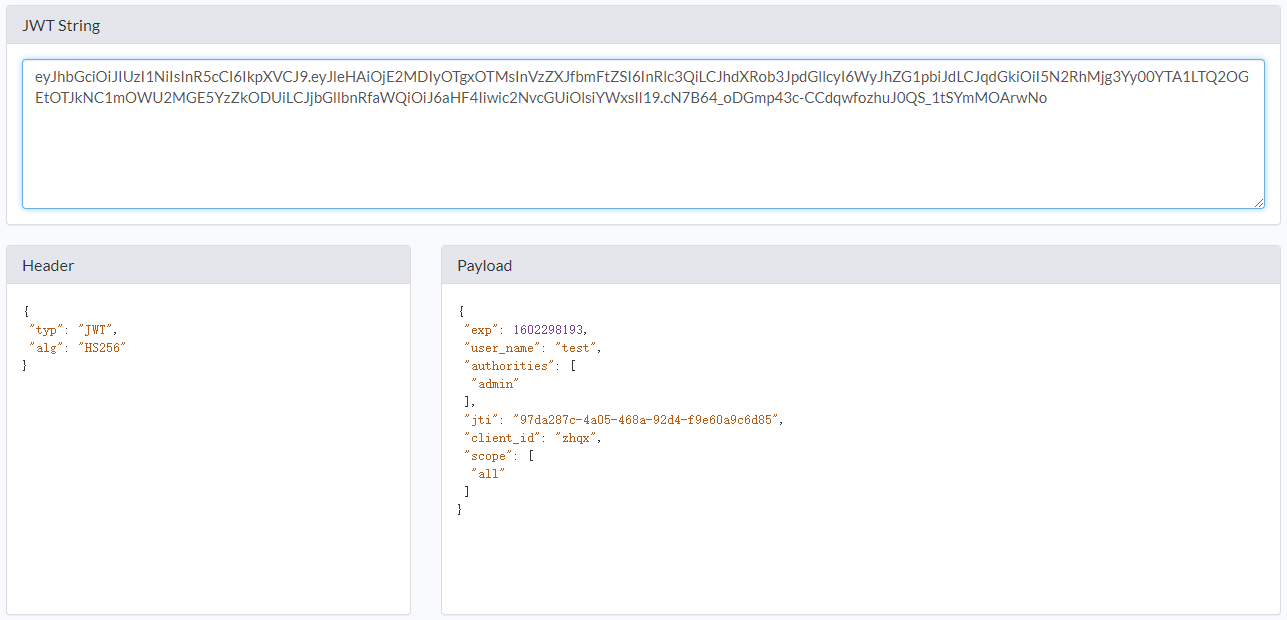
这里,我们使用jwt获取的token来访问用户详情,得到如下测试结果:
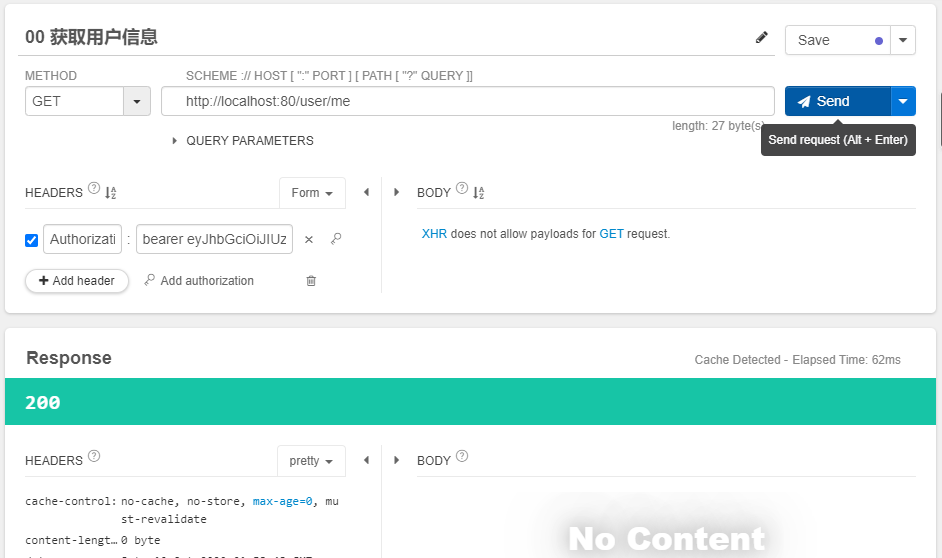
这是因为我们在zhqx-security-demo项目的UserController类中的/user/me方法的方法参数使用的是UserDetails。
我们修改该方法:
@GetMapping("/me")
public Object getCurrentUser(Authentication user,  HttpServletRequest request) {
	HttpSession session = request.getSession();
	//int maxInactiveInterval = session.getMaxInactiveInterval();
    //System.out.println(maxInactiveInterval);
	return user;
}
启动服务,再次使用jwt获取的token来访问用户详情,得到如下测试结果:
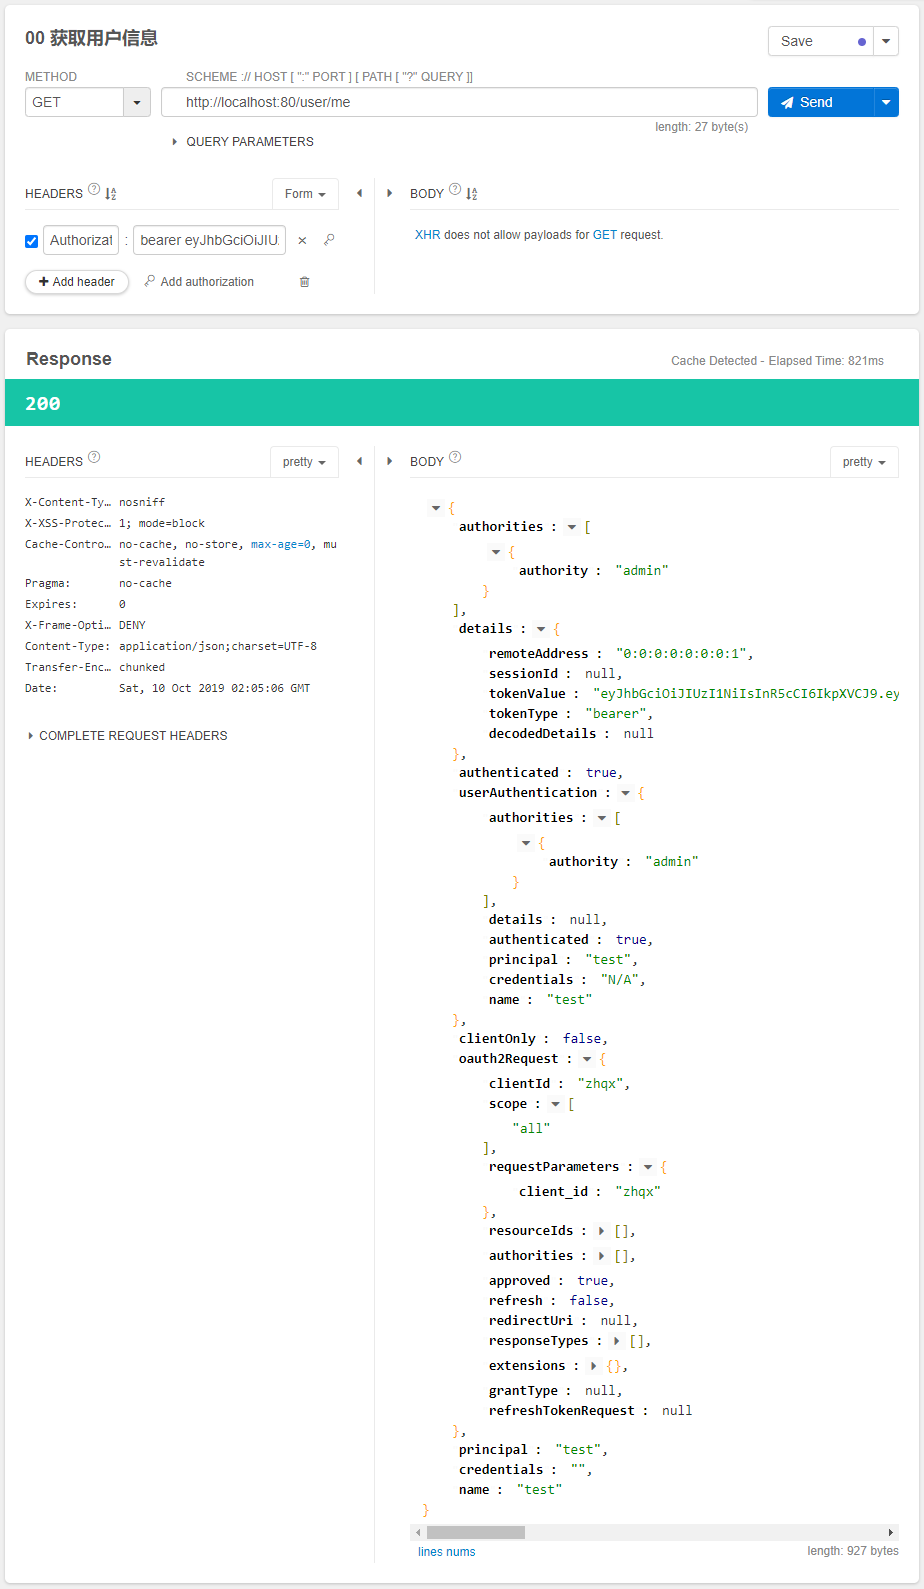
我们可以看到jwt能够正常使用,系统会将令牌中的信息自动解析,并且会将解析出的信息进行封装,封装成一个Authentication。
3.扩展和解析JWT的信息
在zhqx-security-app项目下,新增包com.zhqx.security.app.jwt。并新增类ZhqxJwtTokenEnhancer:
package com.zhqx.security.app.jwt;

import java.util.HashMap;
import java.util.Map;

import org.springframework.security.oauth2.common.DefaultOAuth2AccessToken;
import org.springframework.security.oauth2.common.OAuth2AccessToken;
import org.springframework.security.oauth2.provider.OAuth2Authentication;
import org.springframework.security.oauth2.provider.token.TokenEnhancer;

public class ZhqxJwtTokenEnhancer implements TokenEnhancer {

	@Override
	public OAuth2AccessToken enhance(OAuth2AccessToken accessToken, OAuth2Authentication authentication) {
		Map<String, Object> info = new HashMap<String, Object>();
		//向jwt-token中添加自定义信息
		info.put("company", "zhqx");

		((DefaultOAuth2AccessToken)accessToken).setAdditionalInformation(info);
		return accessToken;
	}

}
修改com.zhqx.security.app包下的TokenStoreConfig类。
@Configuration
public class TokenStoreConfig {

	//只显示修改部分代码,其余省略...

	@Configuration
	//没有这个配置,或者有这个配置,且值是jwt时,这个配置是生效的
	@ConditionalOnProperty(prefix = "zhqx.security.oauth2", name = "storeType", havingValue = "jwt", matchIfMissing = true)
	public static class JwtTokenConfig {
		//只显示修改部分代码,其余省略...

		@Bean
		@ConditionalOnMissingBean(name = "jwtTokenEnhancer")
		public TokenEnhancer jwtTokenEnhancer() {
			return new ZhqxJwtTokenEnhancer();
		}

	}
}
修改com.zhqx.security.app包下的ZhqxAuthorizationServerConfig类。
@Configuration
@EnableAuthorizationServer
public class ZhqxAuthorizationServerConfig extends AuthorizationServerConfigurerAdapter {

	//只显示修改部分代码,其余省略...

	@Autowired(required = false)
	private TokenEnhancer jwtTokenEnhancer;

	@Override
	public void configure(AuthorizationServerEndpointsConfigurer endpoints) throws Exception {
		endpoints
			.tokenStore(tokenStore)
			.authenticationManager(authenticationManager)
			.userDetailsService(userDetailsService);
		if (jwtAccessTokenConverter != null && jwtTokenEnhancer!= null) {
			TokenEnhancerChain enhancerChain = new TokenEnhancerChain();
			List<TokenEnhancer> enhancers = new ArrayList<>();
			enhancers.add(jwtTokenEnhancer);
			enhancers.add(jwtAccessTokenConverter);
			enhancerChain.setTokenEnhancers(enhancers);

			endpoints
			.tokenEnhancer(enhancerChain)
			.accessTokenConverter(jwtAccessTokenConverter);
		}
	}

}
启动服务,使用插件Talend API Tester。帮助我们测试和发送请求,测试界面结果图如下:
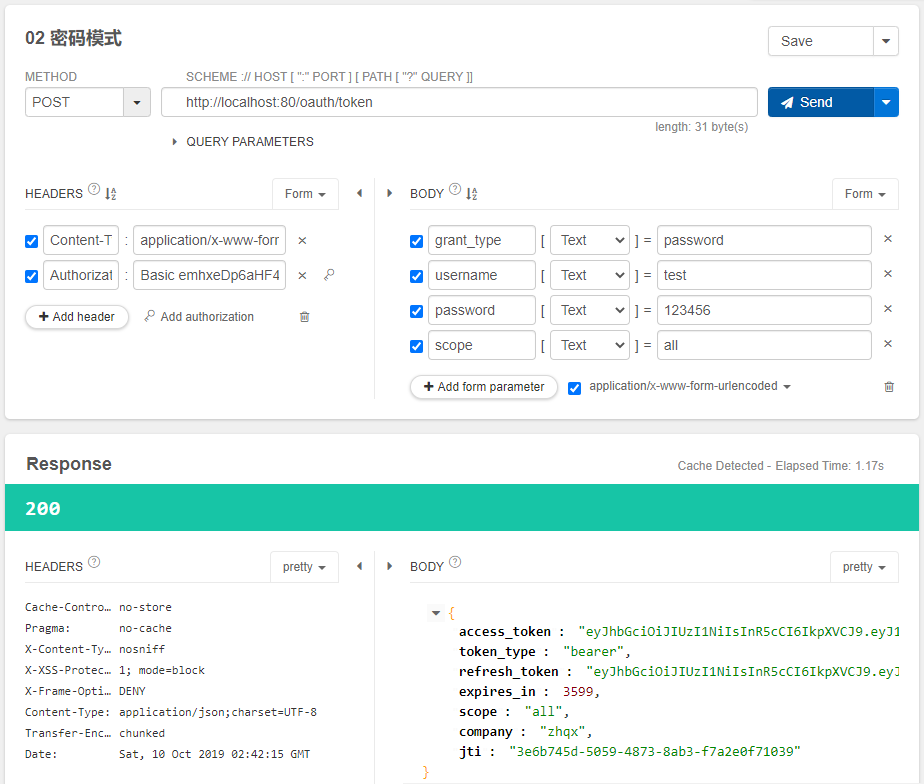
可以看到我们自定义追加的company信息已经添加上了。
我们访问:https://www.jsonwebtoken.io/。将我们获取的token放入其中,可以得到如下结果:
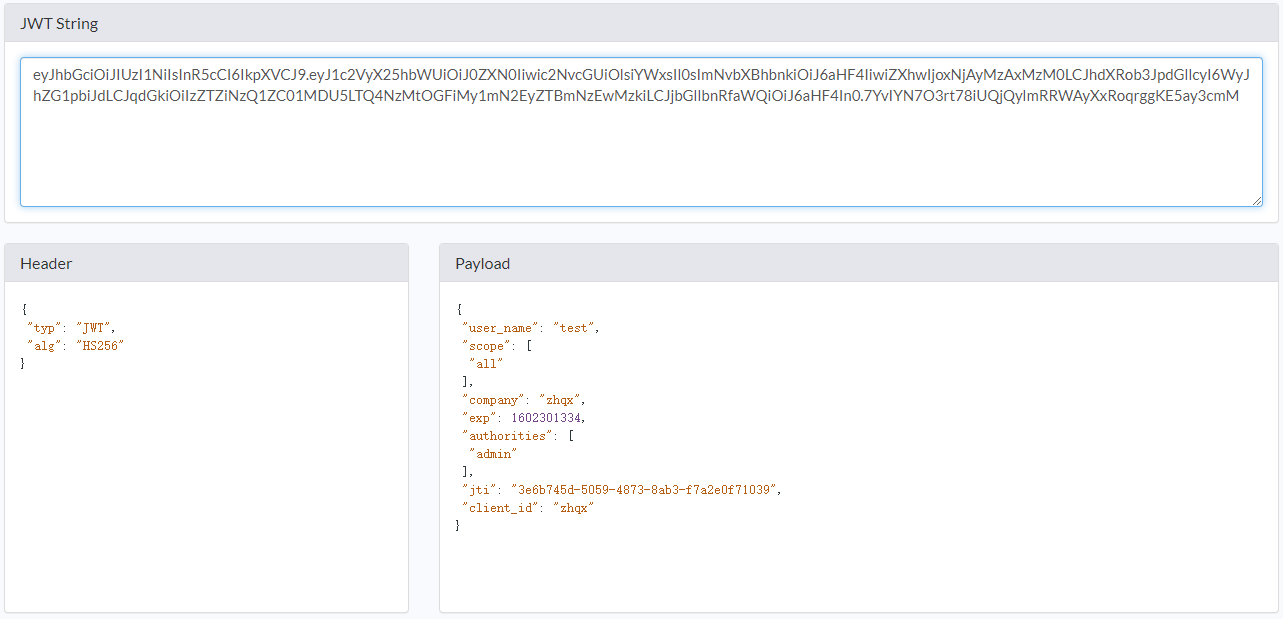
发现company信息也添加到了我们的jwt信息中。
使用插件Talend API Tester。使用jwt获取的token访问/user/me时,测试界面结果图如下:
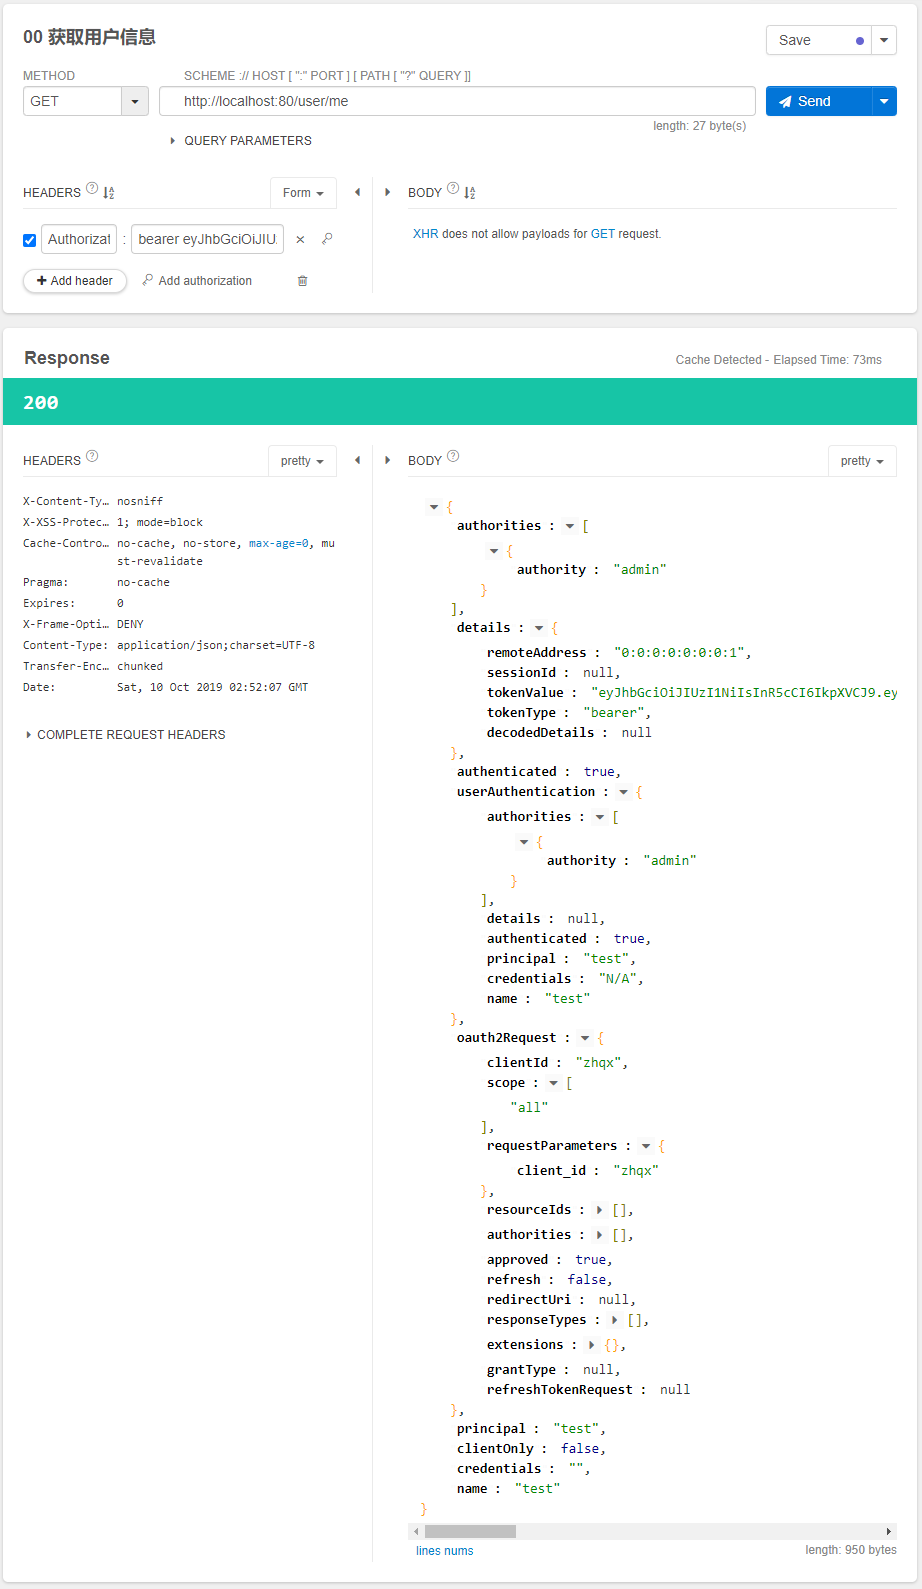
发现并没有company信息。这是因为spring的Authentication只会按照默认的jwt标准来封装信息,而我们自定义追加的信息,是不在spring默认的标准中的。
那么如何解析出,我们自定义追加到jwt中的信息呢。
在zhqx-security-demo项目的pom.xml文件中,增加如下jar包信息:
<dependency>
    <groupId>io.jsonwebtoken</groupId>
    <artifactId>jjwt</artifactId>
    <version>0.9.1</version>
</dependency>
修改zhqx-security-demo项目com.zhqx.web.controller包下的UserController类:
@RestController
@RequestMapping("/user")
public class UserController {

	//只显示修改部分代码,其余省略...

	@GetMapping("/me")
	public Object getCurrentUser(Authentication user,  HttpServletRequest request) throws Exception {
		String header = request.getHeader("Authorization");
		String token = StringUtils.substringAfter(header, "bearer ");

		Claims claims = Jwts.parser().setSigningKey(securityProperties.getOauth2().getJwtSigningKey().getBytes("UTF-8"))
		.parseClaimsJws(token).getBody();
		String company = (String)claims.get("company");

		System.out.println("company:" + company);

		return user;
	}
}
启动服务,使用插件Talend API Tester。使用jwt获取的token访问/user/me。发现控制台可以成功打印如下信息:
company:zhqx
说明,我们已经成功的从jwt中取出了我们添加的自定义信息。
刷新令牌:使用插件Talend API Tester,进行刷新令牌的测试:
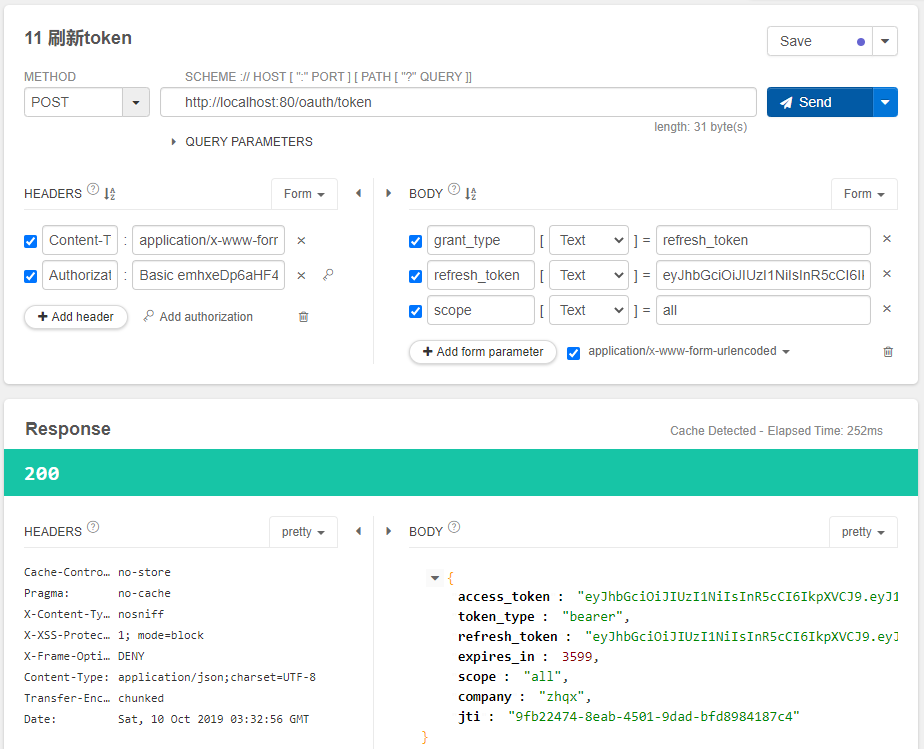
这个操作可以在用户无感知的情况下进行操作。
Spring Security OAuth 使用JWT实现单点登录SSO
新建如图所示maven项目sso-demo。
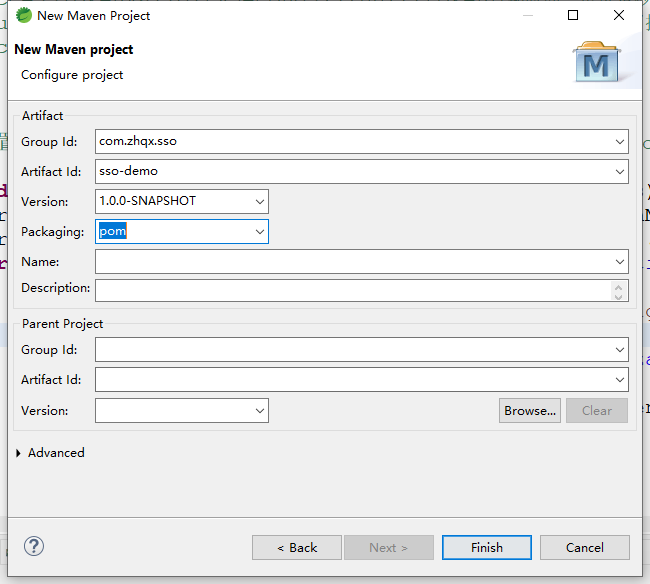
修改项目sso-demo的pom文件:
<project xmlns="http://maven.apache.org/POM/4.0.0"
	xmlns:xsi="http://www.w3.org/2001/XMLSchema-instance"
	xsi:schemaLocation="http://maven.apache.org/POM/4.0.0 https://maven.apache.org/xsd/maven-4.0.0.xsd">
	<modelVersion>4.0.0</modelVersion>
	<groupId>com.zhqx.sso</groupId>
	<artifactId>sso-demo</artifactId>
	<version>1.0.0-SNAPSHOT</version>
	<packaging>pom</packaging>

	<dependencyManagement>
		<dependencies>
			<dependency>
				<groupId>io.spring.platform</groupId>
				<artifactId>platform-bom</artifactId>
				<version>Cairo-SR7</version>
				<type>pom</type>
				<scope>import</scope>
			</dependency>
			<dependency>
				<groupId>org.springframework.cloud</groupId>
				<artifactId>spring-cloud-dependencies</artifactId>
				<version>Finchley.SR4</version>
				<type>pom</type>
				<scope>import</scope>
			</dependency>
		</dependencies>
	</dependencyManagement>

	<build>
		<plugins>
			<plugin>
				<groupId>org.apache.maven.plugins</groupId>
				<artifactId>maven-compiler-plugin</artifactId>
				<version>3.8.1</version>
				<configuration>
					<source>1.8</source>
					<target>1.8</target>
					<encoding>UTF-8</encoding>
				</configuration>
			</plugin>
		</plugins>
	</build>
</project>
新建如图所示maven项目sso-server。
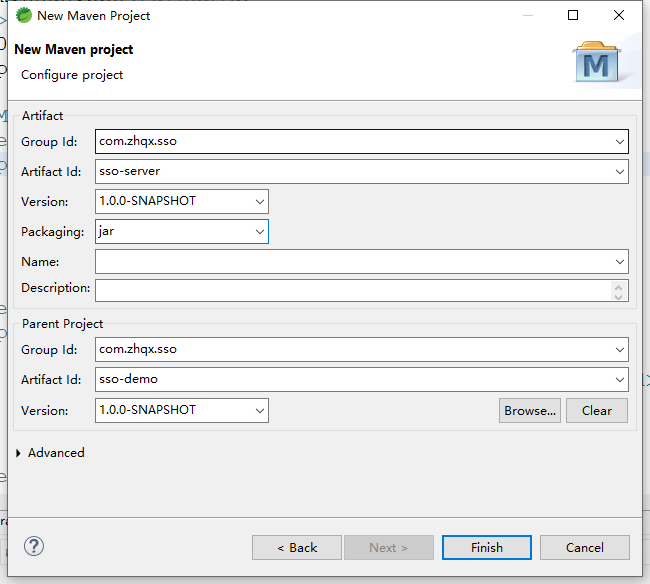
建号之后,修改项目sso-server的pom文件:
<project xmlns="http://maven.apache.org/POM/4.0.0" xmlns:xsi="http://www.w3.org/2001/XMLSchema-instance" xsi:schemaLocation="http://maven.apache.org/POM/4.0.0 https://maven.apache.org/xsd/maven-4.0.0.xsd">
  <modelVersion>4.0.0</modelVersion>
  <parent>
    <groupId>com.zhqx.sso</groupId>
    <artifactId>sso-demo</artifactId>
    <version>1.0.0-SNAPSHOT</version>
  </parent>
  <artifactId>sso-server</artifactId>
</project>
新建如图所示maven项目sso-client1。
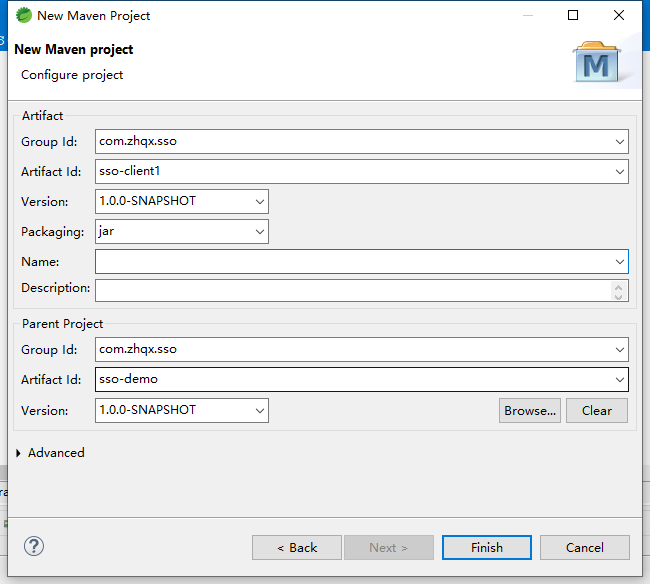
新建如图所示maven项目sso-client2。
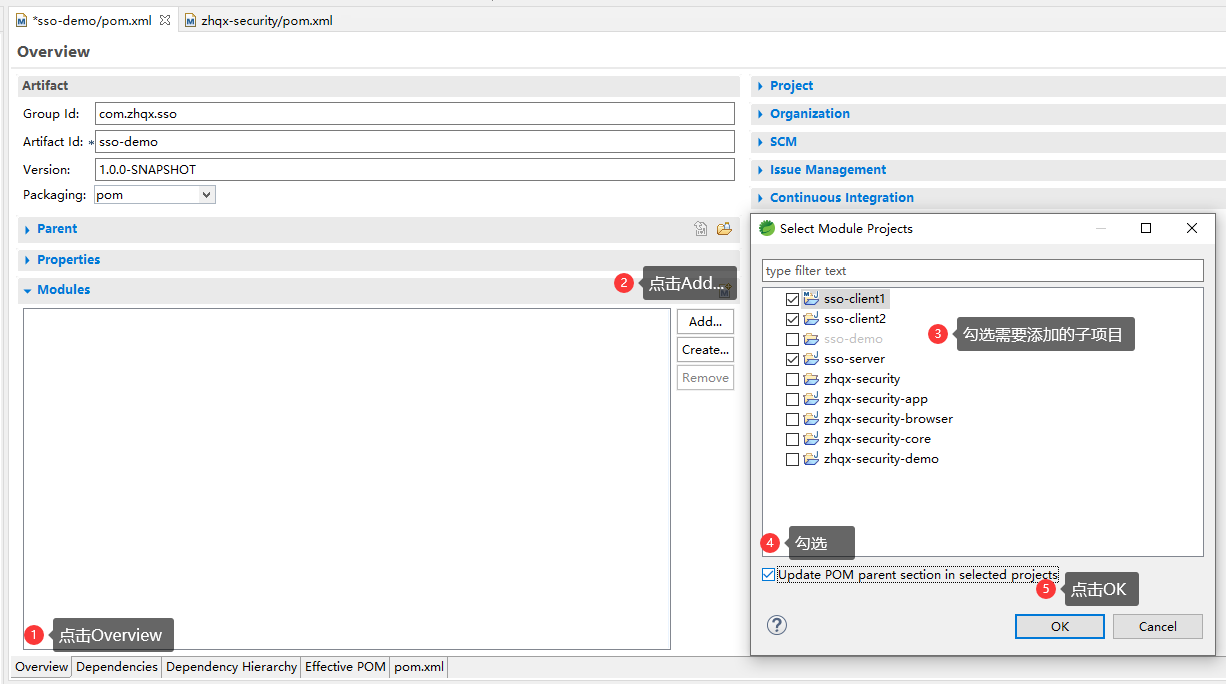
将项目sso-server、项目sso-client1、项目sso-client2添加到父项目sso-demo中,按下图操作。
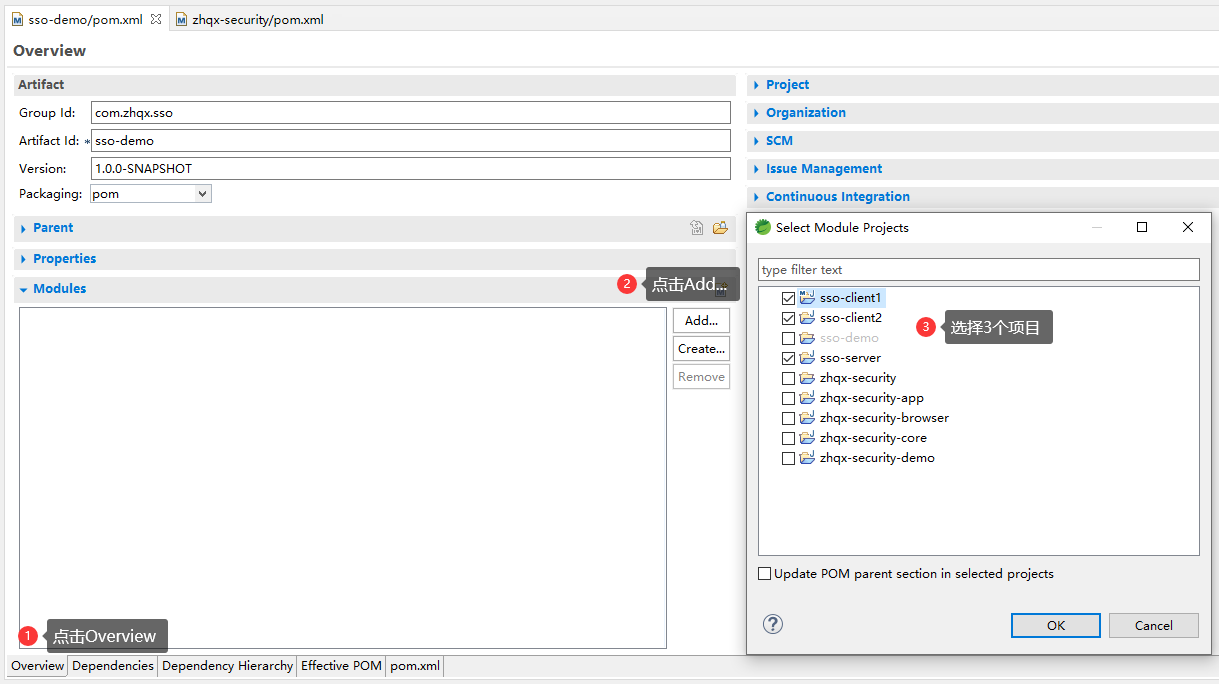
然后按CTRL+s保存操作
1.实现server端
修改项目sso-server的pom文件,添加如下依赖:
<dependencies>
	<dependency>
		<groupId>org.springframework.boot</groupId>
		<artifactId>spring-boot-starter-security</artifactId>
	</dependency>
	<dependency>
		<groupId>org.springframework.boot</groupId>
		<artifactId>spring-boot-starter-web</artifactId>
	</dependency>
	<dependency>
		<groupId>org.springframework.security.oauth</groupId>
		<artifactId>spring-security-oauth2</artifactId>
	</dependency>
	<dependency>
		<groupId>org.springframework.security</groupId>
		<artifactId>spring-security-jwt</artifactId>
	</dependency>
</dependencies>
在sso-server项目中新增包com.zhqx.sso.server。在com.zhqx包下新增类SsoServerApplication:
package com.zhqx;

import org.springframework.boot.SpringApplication;
import org.springframework.boot.autoconfigure.SpringBootApplication;

@SpringBootApplication
public class SsoServerApplication {

	public static void main(String[] args) {
		SpringApplication.run(SsoServerApplication.class, args);
	}

}
在com.zhqx.sso.server包下新增类SsoAuthorizationServerConfig:
package com.zhqx.sso.server;

import org.springframework.context.annotation.Bean;
import org.springframework.context.annotation.Configuration;
import org.springframework.security.oauth2.config.annotation.configurers.ClientDetailsServiceConfigurer;
import org.springframework.security.oauth2.config.annotation.web.configuration.AuthorizationServerConfigurerAdapter;
import org.springframework.security.oauth2.config.annotation.web.configuration.EnableAuthorizationServer;
import org.springframework.security.oauth2.config.annotation.web.configurers.AuthorizationServerEndpointsConfigurer;
import org.springframework.security.oauth2.config.annotation.web.configurers.AuthorizationServerSecurityConfigurer;
import org.springframework.security.oauth2.provider.token.TokenStore;
import org.springframework.security.oauth2.provider.token.store.JwtAccessTokenConverter;
import org.springframework.security.oauth2.provider.token.store.JwtTokenStore;

@Configuration
@EnableAuthorizationServer
public class SsoAuthorizationServerConfig extends AuthorizationServerConfigurerAdapter {

	@Override
	public void configure(ClientDetailsServiceConfigurer clients) throws Exception {
		clients.inMemory()
		.withClient("zhqx1")
		.secret("zhqxsecret1")
		.authorizedGrantTypes("authorization_code", "refresh_token")
		.scopes("all")
		.and()
		.withClient("zhqx2")
		.secret("zhqxsecret2")
		.authorizedGrantTypes("authorization_code", "refresh_token")
		.scopes("all");
	}

	@Override
	public void configure(AuthorizationServerEndpointsConfigurer endpoints) throws Exception {
		endpoints.tokenStore(jwtTokenStore()).accessTokenConverter(jwtAccessTokenConverter());
	}

	@Override
	public void configure(AuthorizationServerSecurityConfigurer security) throws Exception {
		security.tokenKeyAccess("isAuthenticated()");
	}

	@Bean
	public TokenStore jwtTokenStore() {
		return new JwtTokenStore(jwtAccessTokenConverter());
	}

	@Bean
	public JwtAccessTokenConverter jwtAccessTokenConverter() {
		JwtAccessTokenConverter accessTokenConverter = new JwtAccessTokenConverter();
		accessTokenConverter.setSigningKey("zhqx");
		return accessTokenConverter;
	}

}
在sso-server项目的src/main/resources文件夹下,新增配置文件application.properties:
server.port = 9999
server.servlet.context-path = /server
spring.security.user.password = 123456
2.实现Client1端
修改项目sso-client1的pom文件,添加如下依赖:
<dependencies>
	<dependency>
		<groupId>org.springframework.boot</groupId>
		<artifactId>spring-boot-starter-security</artifactId>
	</dependency>
	<dependency>
		<groupId>org.springframework.boot</groupId>
		<artifactId>spring-boot-starter-web</artifactId>
	</dependency>
	<dependency>
		<groupId>org.springframework.security.oauth</groupId>
		<artifactId>spring-security-oauth2</artifactId>
	</dependency>
	<dependency>
		<groupId>org.springframework.security.oauth.boot</groupId>
		<artifactId>spring-security-oauth2-autoconfigure</artifactId>
	</dependency>
	<dependency>
		<groupId>org.springframework.security</groupId>
		<artifactId>spring-security-jwt</artifactId>
	</dependency>
</dependencies>
在sso-client1项目中新增包com.zhqx.sso.client。在包下新增类SsoClient1Application:
package com.zhqx.sso.client;

import org.springframework.boot.SpringApplication;
import org.springframework.boot.autoconfigure.SpringBootApplication;
import org.springframework.boot.autoconfigure.security.oauth2.client.EnableOAuth2Sso;
import org.springframework.security.core.Authentication;
import org.springframework.web.bind.annotation.GetMapping;
import org.springframework.web.bind.annotation.RestController;

@SpringBootApplication
@RestController
@EnableOAuth2Sso
public class SsoClient1Application {

	public static void main(String[] args) {
		SpringApplication.run(SsoClient1Application.class, args);
	}

	@GetMapping("/user")
	public Authentication user(Authentication user) {
		return user;
	}
}
在sso-client1项目的src/main/resources文件夹下,新增配置文件application.properties:
server.port = 8080
server.servlet.context-path = /client1

security.oauth2.client.client-id=zhqx1
security.oauth2.client.client-secret=zhqxsecret1
security.oauth2.client.user-authorization-uri=http://127.0.0.1:9999/server/oauth/authorize
security.oauth2.client.access-token-uri=http://127.0.0.1:9999/server/oauth/token
security.oauth2.resource.jwt.key-uri=http://127.0.0.1:9999/server/oauth/token_key
在sso-client1项目的src/main/resources文件夹下,新增文件夹static,在该文件夹中新增页面index.html。
<!DOCTYPE html>
<html>
<head>
<meta charset="UTF-8">
<title>SSO Client1</title>
</head>
<body>
	<h1>SSO Demo Client1</h1>
	<a href="http://localhost:8060/client2/index.html" >访问Client2</a>
</body>
</html>
2.实现Client2端,按照Client1端,修改部分代码
修改项目sso-client2的pom文件,添加如下依赖:
<dependencies>
	<dependency>
		<groupId>org.springframework.boot</groupId>
		<artifactId>spring-boot-starter-security</artifactId>
	</dependency>
	<dependency>
		<groupId>org.springframework.boot</groupId>
		<artifactId>spring-boot-starter-web</artifactId>
	</dependency>
	<dependency>
		<groupId>org.springframework.security.oauth</groupId>
		<artifactId>spring-security-oauth2</artifactId>
	</dependency>
	<dependency>
		<groupId>org.springframework.security.oauth.boot</groupId>
		<artifactId>spring-security-oauth2-autoconfigure</artifactId>
	</dependency>
	<dependency>
		<groupId>org.springframework.security</groupId>
		<artifactId>spring-security-jwt</artifactId>
	</dependency>
</dependencies>
在sso-client2项目中新增包com.zhqx.sso.client。在包下新增类SsoClient2Application:
package com.zhqx.sso.client;

import org.springframework.boot.SpringApplication;
import org.springframework.boot.autoconfigure.SpringBootApplication;
import org.springframework.boot.autoconfigure.security.oauth2.client.EnableOAuth2Sso;
import org.springframework.security.core.Authentication;
import org.springframework.web.bind.annotation.GetMapping;
import org.springframework.web.bind.annotation.RestController;

@SpringBootApplication
@RestController
@EnableOAuth2Sso
public class SsoClient2Application {

	public static void main(String[] args) {
		SpringApplication.run(SsoClient2Application.class, args);
	}

	@GetMapping("/user")
	public Authentication user(Authentication user) {
		return user;
	}
}
在sso-client2项目的src/main/resources文件夹下,新增配置文件application.properties:
server.port = 8060
server.servlet.context-path = /client2

security.oauth2.client.client-id=zhqx2
security.oauth2.client.client-secret=zhqxsecret2
security.oauth2.client.user-authorization-uri=http://127.0.0.1:9999/server/oauth/authorize
security.oauth2.client.access-token-uri=http://127.0.0.1:9999/server/oauth/token
security.oauth2.resource.jwt.key-uri=http://127.0.0.1:9999/server/oauth/token_key
在sso-client2项目的src/main/resources文件夹下,新增文件夹static,在该文件夹中新增页面index.html。
<!DOCTYPE html>
<html>
<head>
<meta charset="UTF-8">
<title>SSO Client2</title>
</head>
<body>
	<h1>SSO Demo Client2</h1>
	<a href="http://localhost:8080/client1/index.html" >访问Client1</a>
</body>
</html>
准备进行测试,启动项目sso-server,启动项目sso-client1。这个时候,控制台报错,类似如下错误:
Factory method 'jwtTokenEnhancer' threw exception; nested exception is org.springframework.web.client.HttpServerErrorException: 500 null
这里的意思是因为我们没有配置Jwt的keyValue,所以造成初始化失败。
修改项目sso-client1和项目sso-client2的配置文件application.properties,分别追加如下配置:
security.oauth2.resource.jwt.key-value=zhqx
以sso-client1项目的配置文件application.properties为例:
server.port = 8080
server.servlet.context-path = /client1

security.oauth2.client.client-id=zhqx1
security.oauth2.client.client-secret=zhqxsecret1
security.oauth2.client.user-authorization-uri=http://127.0.0.1:9999/server/oauth/authorize
security.oauth2.client.access-token-uri=http://127.0.0.1:9999/server/oauth/token
security.oauth2.resource.jwt.key-uri=http://127.0.0.1:9999/server/oauth/token_key
security.oauth2.resource.jwt.key-value=zhqx
再次进行测试,启动项目sso-server,启动项目sso-client1。浏览器访问:http://localhost:8080/client1/index.html
这个 时候发现后台还是报错,错误如下:
User must be authenticated with Spring Security before authorization can be completed.
这个错误我们之前遇到过,解决的方式前面也提到过。在sso-server项目的com.zhqx.sso.server包下,新增类:
SsoSecurityConfig。
package com.zhqx.sso.server;

import org.springframework.context.annotation.Configuration;
import org.springframework.security.config.annotation.web.configuration.WebSecurityConfigurerAdapter;

@Configuration
public class SsoSecurityConfig extends WebSecurityConfigurerAdapter {

}
解决错误后,再次进行测试,启动项目sso-server,启动项目sso-client1。浏览器访问:http://localhost:8080/client1/index.html。
启动后,弹出登录界面,输入用户:user、输入密码:123456。页面弹出如下提示信息:
error="invalid_request", error_description="At least one redirect_uri must be registered with the client."
此时我们注意到浏览器的地址栏中有如下地址块:redirect_uri=http://localhost:8080/client1/login。
修改项目sso-server的com.zhqx.sso.server包下的SsoAuthorizationServerConfig类,配置重定向地址。
@Configuration
@EnableAuthorizationServer
public class SsoAuthorizationServerConfig extends AuthorizationServerConfigurerAdapter {

	//只显示修改的代码,其余代码省略...

	@Override
	public void configure(ClientDetailsServiceConfigurer clients) throws Exception {
		clients.inMemory()
		.withClient("zhqx1")
		.secret("zhqxsecret1")
		.authorizedGrantTypes("authorization_code", "refresh_token")
		.redirectUris("http://localhost:8080/client1/login")
		.scopes("all")
		.and()
		.withClient("zhqx2")
		.secret("zhqxsecret2")
		.authorizedGrantTypes("authorization_code", "refresh_token")
		.redirectUris("http://localhost:8060/client2/login")
		.scopes("all");
	}
}
解决错误后,再次进行测试,启动项目sso-server,启动项目sso-client1。浏览器访问:http://localhost:8080/client1/index.html。
启动后,弹出登录界面,输入用户:user、输入密码:123456。页面跳转到授权页面,如下:
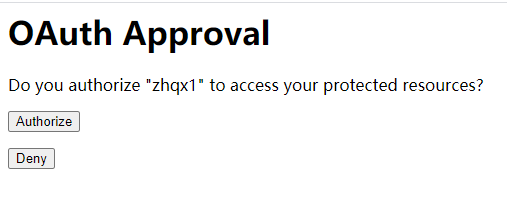
点击Authorize按钮进行授权,页面无反应,后台出现如下错误:
There is no PasswordEncoder mapped for the id "null"
在springboot2.x中,security对secret会默认加密,但是我们项目sso-client1中配置的是security.oauth2.client.client-secret=zhqxsecret1。并没有配置加密方式。
所以我们在项目sso-server中也不应该采用默认加密方式。修改com.zhqx.sso.server包下的SsoAuthorizationServerConfig类。
@Configuration
@EnableAuthorizationServer
public class SsoAuthorizationServerConfig extends AuthorizationServerConfigurerAdapter {

	//只显示修改的代码,其余代码省略...

	@Override
	public void configure(ClientDetailsServiceConfigurer clients) throws Exception {
		clients.inMemory()
		.withClient("zhqx1")
		.secret("{noop}zhqxsecret1")
		.authorizedGrantTypes("authorization_code", "refresh_token")
		.redirectUris("http://localhost:8080/client1/login")
		.scopes("all")
		.and()
		.withClient("zhqx2")
		.secret("{noop}zhqxsecret2")
		.authorizedGrantTypes("authorization_code", "refresh_token")
		.redirectUris("http://localhost:8060/client2/login")
		.scopes("all");
	}
}
解决完错误,依次启动项目sso-server,启动项目sso-client1,启动项目sso-client2。浏览器访问:http://localhost:8080/client1/index.html。
启动后,弹出登录界面,输入用户:user、输入密码:123456。页面跳转到授权页面,如下:
点击Authorize按钮进行授权,页面跳转到:http://localhost:8080/client1/index.html,如下:
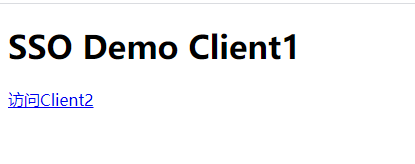
点击链接:访问Client2。浏览器跳转到如下界面:
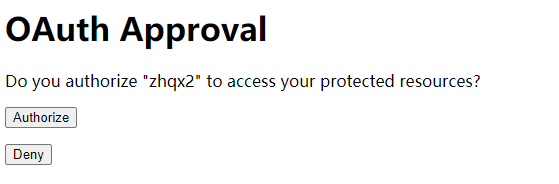
点击Authorize按钮进行授权,页面跳转到:http://localhost:8060/client2/index.html,如下:
我们注意到,在跳转到client2授权时,并没有像client1那样要求我们登录。只登录一次,用这一次的登录信息,同时访问client1和client2。
进一步优化代码,不需要用户手动点击授权(实现静默授权),并且从数据库查询用户。
在sso-server项目的com.zhqx.sso.server包下新增类SsoUserDetailsService。
package com.zhqx.sso.server;

import org.springframework.beans.factory.annotation.Autowired;
import org.springframework.security.core.authority.AuthorityUtils;
import org.springframework.security.core.userdetails.User;
import org.springframework.security.core.userdetails.UserDetails;
import org.springframework.security.core.userdetails.UserDetailsService;
import org.springframework.security.core.userdetails.UsernameNotFoundException;
import org.springframework.security.crypto.password.PasswordEncoder;
import org.springframework.stereotype.Component;

@Component
public class SsoUserDetailsService implements UserDetailsService {

	@Autowired
	private PasswordEncoder passwordEncoder;

	@Override
	public UserDetails loadUserByUsername(String username) throws UsernameNotFoundException {
		//省略数据库查询...用户名随意填,密码是123456
		String password = passwordEncoder.encode("123456");
		return new User(username, password, true, true, true, true,
				AuthorityUtils.commaSeparatedStringToAuthorityList("ROLE_USER"));
	}

}
修改com.zhqx.sso.server包下的SsoSecurityConfig类:
package com.zhqx.sso.server;

import org.springframework.beans.factory.annotation.Autowired;
import org.springframework.context.annotation.Bean;
import org.springframework.context.annotation.Configuration;
import org.springframework.security.config.annotation.authentication.builders.AuthenticationManagerBuilder;
import org.springframework.security.config.annotation.web.configuration.WebSecurityConfigurerAdapter;
import org.springframework.security.core.userdetails.UserDetailsService;
import org.springframework.security.crypto.bcrypt.BCryptPasswordEncoder;
import org.springframework.security.crypto.password.PasswordEncoder;

@Configuration
public class SsoSecurityConfig extends WebSecurityConfigurerAdapter {

	@Autowired
	private UserDetailsService userDetailsService;

	@Bean
	public PasswordEncoder passwordEncoder() {
		return new BCryptPasswordEncoder();
	}

	@Override
	protected void configure(AuthenticationManagerBuilder auth) throws Exception {
		auth.userDetailsService(userDetailsService).passwordEncoder(passwordEncoder());
	}

}
依次启动项目sso-server,启动项目sso-client1,启动项目sso-client2。浏览器访问:localhost:8060/client2/index.html。
弹出登录界面,输入用户:test、输入密码:123456。页面跳转到授权页面,如下:
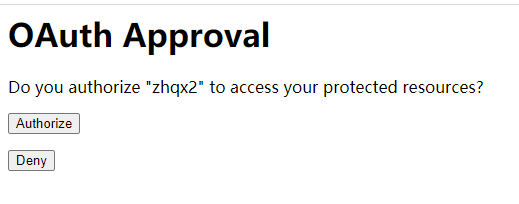
点击Authorize按钮进行授权,页面没有反应,后台出现如下信息:
Encoded password does not look like BCrypt
这是因为,当我们自定义了密码的加密方式时,我们需要对client的secret进行加密操作。
修改sso-server项目com.zhqx.sso.server包下的SsoAuthorizationServerConfig类:
@Configuration
@EnableAuthorizationServer
public class SsoAuthorizationServerConfig extends AuthorizationServerConfigurerAdapter {
	//只显示修改部分代码,其余省略...

	@Override
	public void configure(ClientDetailsServiceConfigurer clients) throws Exception {
		clients.inMemory()
		.withClient("zhqx1")
		.secret(new BCryptPasswordEncoder().encode("zhqxsecret1"))
		.authorizedGrantTypes("authorization_code", "refresh_token")
		.redirectUris("http://localhost:8080/client1/login")
		.scopes("all")
		.and()
		.withClient("zhqx2")
		.secret(new BCryptPasswordEncoder().encode("zhqxsecret2"))
		.authorizedGrantTypes("authorization_code", "refresh_token")
		.redirectUris("http://localhost:8060/client2/login")
		.scopes("all");
	}
}
修改完毕后,依次启动项目sso-server,启动项目sso-client1,启动项目sso-client2。浏览器访问:localhost:8060/client2/index.html。发现测试正常。
接着,我们来实现静默授权(自动提交授权,不需要用户点击)。
授权的页面是由WhitelabelApprovalEndpoint类决定的。在sso-server项目的com.zhqx.sso.server包下新增类SsoApprovalEndpoint。主要代码与WhitelabelApprovalEndpoint类中相同。只是增加了部分自动提交表单的代码。
package com.zhqx.sso.server;

import java.util.Map;

import javax.servlet.http.HttpServletRequest;
import javax.servlet.http.HttpServletResponse;

import org.springframework.security.oauth2.provider.AuthorizationRequest;
import org.springframework.security.web.csrf.CsrfToken;
import org.springframework.web.bind.annotation.RequestMapping;
import org.springframework.web.bind.annotation.RestController;
import org.springframework.web.bind.annotation.SessionAttributes;
import org.springframework.web.servlet.ModelAndView;
import org.springframework.web.servlet.View;
import org.springframework.web.servlet.support.ServletUriComponentsBuilder;
import org.springframework.web.util.HtmlUtils;

@RestController
@SessionAttributes("authorizationRequest")
public class SsoApprovalEndpoint {

	@RequestMapping("/oauth/confirm_access")
	public ModelAndView getAccessConfirmation(Map<String, Object> model, HttpServletRequest request) throws Exception {
		final String approvalContent = createTemplate(model, request);
		if (request.getAttribute("_csrf") != null) {
			model.put("_csrf", request.getAttribute("_csrf"));
		}
		View approvalView = new View() {
			@Override
			public String getContentType() {
				return "text/html";
			}

			@Override
			public void render(Map<String, ?> model, HttpServletRequest request, HttpServletResponse response) throws Exception {
				response.setContentType(getContentType());
				response.getWriter().append(approvalContent);
			}
		};
		return new ModelAndView(approvalView, model);
	}

	protected String createTemplate(Map<String, Object> model, HttpServletRequest request) {
		AuthorizationRequest authorizationRequest = (AuthorizationRequest) model.get("authorizationRequest");
		String clientId = authorizationRequest.getClientId();

		StringBuilder builder = new StringBuilder();
		builder.append("<html><body><div style='display:none'><h1>OAuth Approval</h1>");
		builder.append("<p>Do you authorize \"").append(HtmlUtils.htmlEscape(clientId));
		builder.append("\" to access your protected resources?</p>");
		builder.append("<form id=\"confirmationForm\" name=\"confirmationForm\" action=\"");

		String requestPath = ServletUriComponentsBuilder.fromContextPath(request).build().getPath();
		if (requestPath == null) {
			requestPath = "";
		}

		builder.append(requestPath).append("/oauth/authorize\" method=\"post\">");
		builder.append("<input name=\"user_oauth_approval\" value=\"true\" type=\"hidden\"/>");

		String csrfTemplate = null;
		CsrfToken csrfToken = (CsrfToken) (model.containsKey("_csrf") ? model.get("_csrf") : request.getAttribute("_csrf"));
		if (csrfToken != null) {
			csrfTemplate = "<input type=\"hidden\" name=\"" + HtmlUtils.htmlEscape(csrfToken.getParameterName()) +
					"\" value=\"" + HtmlUtils.htmlEscape(csrfToken.getToken()) + "\" />";
		}
		if (csrfTemplate != null) {
			builder.append(csrfTemplate);
		}

		String authorizeInputTemplate = "<label><input name=\"authorize\" value=\"Authorize\" type=\"submit\"/></label></form>";

		if (model.containsKey("scopes") || request.getAttribute("scopes") != null) {
			builder.append(createScopes(model, request));
			builder.append(authorizeInputTemplate);
		} else {
			builder.append(authorizeInputTemplate);
			builder.append("<form id=\"denialForm\" name=\"denialForm\" action=\"");
			builder.append(requestPath).append("/oauth/authorize\" method=\"post\">");
			builder.append("<input name=\"user_oauth_approval\" value=\"false\" type=\"hidden\"/>");
			if (csrfTemplate != null) {
				builder.append(csrfTemplate);
			}
			builder.append("<label><input name=\"deny\" value=\"Deny\" type=\"submit\"/></label></form>");
		}

		builder.append("<script>document.getElementById('confirmationForm').submit()</script></div></body></html>");

		return builder.toString();
	}

	private CharSequence createScopes(Map<String, Object> model, HttpServletRequest request) {
		StringBuilder builder = new StringBuilder("<ul>");
		@SuppressWarnings("unchecked")
		Map<String, String> scopes = (Map<String, String>) (model.containsKey("scopes") ?
				model.get("scopes") : request.getAttribute("scopes"));
		for (String scope : scopes.keySet()) {
			String approved = "true".equals(scopes.get(scope)) ? " checked" : "";
			String denied = !"true".equals(scopes.get(scope)) ? " checked" : "";
			scope = HtmlUtils.htmlEscape(scope);

			builder.append("<li><div class=\"form-group\">");
			builder.append(scope).append(": <input type=\"radio\" name=\"");
			builder.append(scope).append("\" value=\"true\"").append(approved).append(">Approve</input> ");
			builder.append("<input type=\"radio\" name=\"").append(scope).append("\" value=\"false\"");
			builder.append(denied).append(">Deny</input></div></li>");
		}
		builder.append("</ul>");
		return builder.toString();
	}
}
修改完毕后,依次启动项目sso-server,启动项目sso-client1,启动项目sso-client2。浏览器访问:localhost:8060/client2/index.html。登录后,发现自动提交了表单。说明代码正确。