- OAuth协议简介
- 使用SpringSocial开发第三方登录简单介绍
- 使用SpringSocial实现QQ登录
- 完成使用QQ登陆时,注册QQ用户
- 使用SpringSocial实现微信扫码登录
- 使用SpringSocial实现社交账号的绑定和解绑
- SpringSecurity–session管理
- 退出登录
OAuth协议简介
OAUTH协议为用户资源的授权提供了一个安全的、开放而又简易的标准。与以往的授权方式不同之处是OAUTH的授权不会使第三方触及到用户的帐号信息(如用户名与密码)。
即第三方无需使用用户的用户名与密码就可以申请获得该用户资源的授权,因此OAUTH是安全的。oAuth是Open Authorization的简写。 这里所学的是OAuth2协议。
文章参考内容:https://blog.csdn.net/lzf2284466/article/details/107592529
采用账号密码登录第三方流程图:
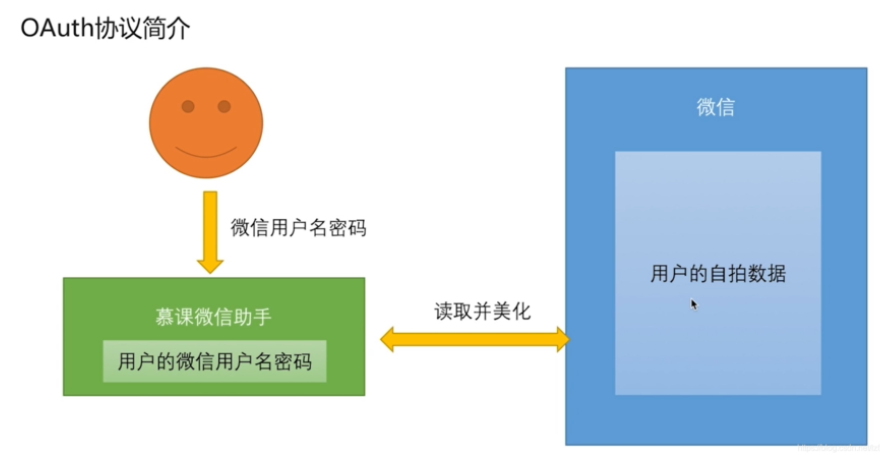
弊端:a.应用可以访问用户在微信上的所有数据;b.用户只有修改密码,才能收回权限;c.密码泄露的可能性大大提高
使用OAuth协议实现授权登录,OAuth协议有四种授权模式: 授权码模式(authorization code)、密码模式(resource owner password credentials)、简化模式(implicit)、客户端模式(client credentials)。
主要介绍OAuth协议授权码模式授权流程图如下:
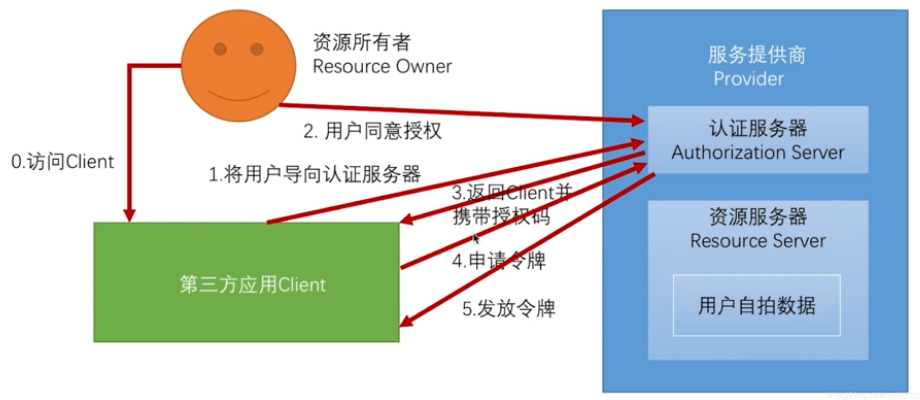
0.用户访问第三方应用。
1.第三方应用需要用户授权,将用户导向用户所属服务商的,访问服务商的认证服务器。
2.用户在所属服务商提供的认证服务器上完成是否同意授权的操作。
3.同意授权后,用户所属服务商,会将用户相关信息重新返回给用户访问的第三方应用,并且携带授权码。
4.第三方应用获取到返回的授权码,通过授权码向用户所属服务商的认证服务器发起请求,申请令牌。
5.用户所属服务商的认证服务器,检查授权码是否正确,是则会发放令牌。
使用SpringSocial开发第三方登录简单介绍
1、SpringSocial基本原理
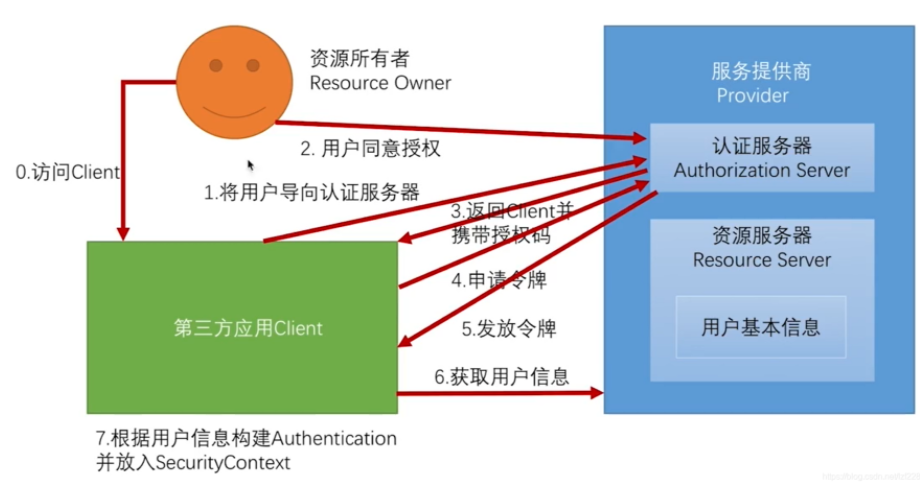
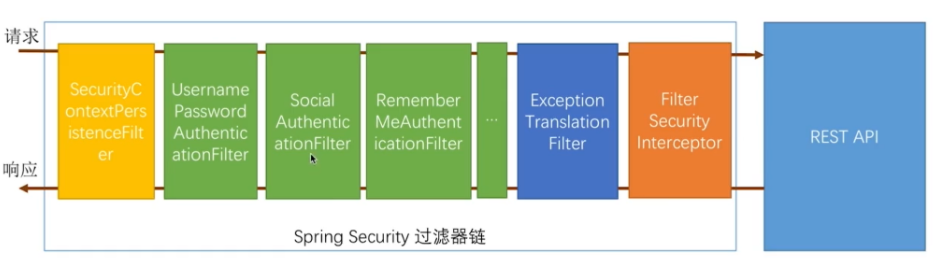
SpringSocial实际上是将OAuth协议授权码模式整个流程进行封装。将所有流程封装成socialAuthenticationFilter过滤器。
然后将过滤器添加到整个SpringSecurity验证的过滤器链中,如下图:
2、使用SpringSocial实现第三方登录
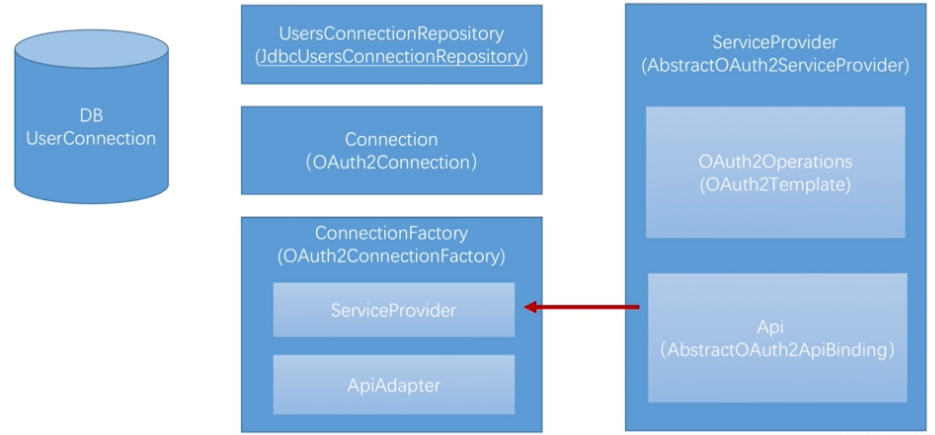
图解内容如下:
a、ConnectFactory:通过ServiceProvider、ApiAdapter创建Connection(OAuth2Connection),保存服务提供商里的用户信息
b、ServiceProvider:认证、授权,获取授权码并通过其获取令牌(assess_token),传入API实现类中,获取用户信息
c、Api(AbstractOAuth2ApiBinding)实现:通过传入的accessToken,使用restTemplate发送Http请求换取openId,两者结合appId,获取服务提供商的用户信息
d、ApiAdapter:将获取用户信息根据标准结构存储到Connection中
e、UsersConnectionRespiratory(存储器):根据connection中的openId查询对应的userId,通过userId传入SocialUserDetailsService获取SocialUserDetails,构建认证成功的token
使用SpringSocial实现QQ登录
**
在
zhqx-security-core项目中增加com.zhqx.security.core.social.qq.api包,依次增加下面三个类:**
QQUserInfo,封装的是QQ账号相关的信息:
package com.zhqx.security.core.social.qq.api;

public class QQUserInfo {
	//返回码
	private String ret;
	//如果ret<0,会有相应的错误信息提示,返回数据全部用UTF-8编码。
	private String msg;
	//
	private String openId;
	//不知道什么东西,文档上没写,但是实际api返回里有。
	private String is_lost;
	//省(直辖市)
	private String province;
	//市(直辖市区)
	private String city;
	//出生年月
	private String year;
	//用户在QQ空间的昵称。
	private String nickname;
	//大小为30×30像素的QQ空间头像URL。
	private String figureurl;
	//大小为50×50像素的QQ空间头像URL。
	private String figureurl_1;
	//大小为100×100像素的QQ空间头像URL。
	private String figureurl_2;
	//大小为40×40像素的QQ头像URL。
	private String figureurl_qq_1;
	//大小为100×100像素的QQ头像URL。需要注意,不是所有的用户都拥有QQ的100×100的头像,但40×40像素则是一定会有。
	private String figureurl_qq_2;
	//性别。 如果获取不到则默认返回”男”
	private String gender;
	//标识用户是否为黄钻用户(0:不是;1:是)。
	private String is_yellow_vip;
	//标识用户是否为VIP用户(0:不是;1:是)
	private String vip;
	//黄钻等级
	private String yellow_vip_level;
	//VIP等级
	private String level;
	//标识是否为年费黄钻用户(0:不是; 1:是)
	private String is_yellow_year_vip;

	//省略了属性的get、set方法
}
QQ接口,用来实现获取QQ信息:
package com.zhqx.security.core.social.qq.api;

public interface QQ {
	QQUserInfo getUserInfo();
}
QQImpl,实现QQ接口,实现获取QQ信息的逻辑:
package com.zhqx.security.core.social.qq.api;

import org.apache.commons.lang.StringUtils;
import org.springframework.social.oauth2.AbstractOAuth2ApiBinding;
import org.springframework.social.oauth2.TokenStrategy;

import com.fasterxml.jackson.databind.ObjectMapper;

public class QQImpl extends AbstractOAuth2ApiBinding implements QQ {
	//获取openId地址
	private static final String URL_GET_OPENID = "https://graph.qq.com/oauth2.0/me?access_token=%s";
	//获取用户信息地址
	private static final String URL_GET_USERINFO = "https://graph.qq.com/user/get_user_info?oauth_consumer_key=%s&openid=%s";
	//申请QQ登录成功后,分配给应用的appid
	private String appId;
	//用户的ID,与QQ号码一一对应。
	private String openId;
	//JSON字符串转换为对象
	private ObjectMapper objectMapper = new ObjectMapper();

	public QQImpl(String access_token, String appId) {
		//将access_token以参数形式放入请求中
		super(access_token, TokenStrategy.ACCESS_TOKEN_PARAMETER);
		this.appId = appId;

		String url = String.format(URL_GET_OPENID, access_token);
		String result = getRestTemplate().getForObject(url, String.class);

		System.out.println("result:" + result);
		//根据QQ获取openId返回结果:callback( {"client_id":"YOUR_APPID","openid":"YOUR_OPENID"} );
		this.openId = StringUtils.substringBetween(result, "\"openid\":", "}");
	}

	@Override
	public QQUserInfo getUserInfo() {
		String url = String.format(URL_GET_USERINFO, appId, openId);

		String result = getRestTemplate().getForObject(url, String.class);

		System.out.println("result:" + result);

		try {
			return objectMapper.readValue(result, QQUserInfo.class);
		} catch (Exception e) {
			throw new RuntimeException("获取用户信息失败", e);
		}
	}

}
至此,图中所示的Api部分的内容就已经实现了。继续进行后面的开发。
**
在
zhqx-security-core项目中增加com.zhqx.security.core.social.qq.connect包,依次增加下面三个类:**
1.QQServiceProvider,用来实现OAuth2Operations:
package com.zhqx.security.core.social.qq.connect;

import org.springframework.social.oauth2.AbstractOAuth2ServiceProvider;
import org.springframework.social.oauth2.OAuth2Template;

import com.zhqx.security.core.social.qq.api.QQ;
import com.zhqx.security.core.social.qq.api.QQImpl;

public class QQServiceProvider extends AbstractOAuth2ServiceProvider<QQ> {
	private String appId;
	//引导用户跳转的地址
	private static final String URL_AUTHORIZE = "https://graph.qq.com/oauth2.0/authorize";
	//获取令牌时访问的地址
	private static final String URL_ACCESS_TOKEN = "https://graph.qq.com/oauth2.0/token";

	public QQServiceProvider(String appId, String appSecret) {
		//在QQ互联平台注册应用时,会有对应的aapId和appSecret
		//OAuth2Template是OAuth2Operations的实现
		super(new OAuth2Template(appId, appSecret, URL_AUTHORIZE, URL_ACCESS_TOKEN));
	}

	@Override
	public QQ getApi(String accessToken) {
		return new QQImpl(accessToken, appId);
	}

}
至此,图中ServiceProvider模块的Api和OAuth2Operations两个功能模块就全部实现了。
2.QQAdapter,对ApiAdapter的实现:
package com.zhqx.security.core.social.qq.connect;

import org.springframework.social.connect.ApiAdapter;
import org.springframework.social.connect.ConnectionValues;
import org.springframework.social.connect.UserProfile;

import com.zhqx.security.core.social.qq.api.QQ;
import com.zhqx.security.core.social.qq.api.QQUserInfo;

public class QQAdapter implements ApiAdapter<QQ> {

	@Override
	public boolean test(QQ api) {
		//测试QQ的服务是否联通--默认true,就不用发请求判断了
		return true;
	}

	@Override
	public void setConnectionValues(QQ api, ConnectionValues values) {
		QQUserInfo userInfo = api.getUserInfo();
		//将用户信息,封装到连接信息中
		values.setDisplayName(userInfo.getNickname());
		values.setImageUrl(userInfo.getFigureurl_qq_1());
		//个人主页,QQ没有,直接为null【微博有】
		values.setProfileUrl(null);
		values.setProviderUserId(userInfo.getOpenId());

	}

	@Override
	public UserProfile fetchUserProfile(QQ api) {
		return null;
	}

	@Override
	public void updateStatus(QQ api, String message) {

	}

}
至此,图中ServiceProvider模块的Api和OAuth2Operations两个功能模块就全部实现了。
3.QQConnectionFactory,通过ServiceProvider、ApiAdapter创建Connection(OAuth2Connection),保存服务提供商里的用户信息:
package com.zhqx.security.core.social.qq.connect;

import org.springframework.social.connect.support.OAuth2ConnectionFactory;

import com.zhqx.security.core.social.qq.api.QQ;

public class QQConnectionFactory extends OAuth2ConnectionFactory<QQ> {

	public QQConnectionFactory(String providerId, String appId, String appSecret) {
		super(providerId, new QQServiceProvider(appId, appSecret), new QQAdapter());
	}

}
至此,图中的ConnectFactory模块就实现了。
package com.zhqx.security.core.social;

import javax.sql.DataSource;

import org.springframework.beans.factory.annotation.Autowired;
import org.springframework.context.annotation.Bean;
import org.springframework.context.annotation.Configuration;
import org.springframework.security.crypto.encrypt.Encryptors;
import org.springframework.social.UserIdSource;
import org.springframework.social.config.annotation.EnableSocial;
import org.springframework.social.config.annotation.SocialConfigurerAdapter;
import org.springframework.social.connect.ConnectionFactoryLocator;
import org.springframework.social.connect.UsersConnectionRepository;
import org.springframework.social.connect.jdbc.JdbcUsersConnectionRepository;
import org.springframework.social.security.AuthenticationNameUserIdSource;
import org.springframework.social.security.SpringSocialConfigurer;

@Configuration
@EnableSocial
public class SocialConfig extends SocialConfigurerAdapter {

	@Autowired
	private DataSource dataSource;

	@Override
	public UsersConnectionRepository getUsersConnectionRepository(ConnectionFactoryLocator connectionFactoryLocator) {
		//需要手动建表,建表语句在JdbcUsersConnectionRepository同目录下,JdbcUsersConnectionRepository.sql
		JdbcUsersConnectionRepository repository = new JdbcUsersConnectionRepository(
				dataSource,
				connectionFactoryLocator,
				Encryptors.noOpText());
		//使用建表语句,默认的表命是userConnection,我们可以自己修改表名,加上自己需要的前缀,如zhqx_userConnection
		//自定数据库表的前缀时,需要在代码中指定
		repository.setTablePrefix("zhqx_");
		return repository;
	}

	//过滤器
	@Bean(name = "zhqxSocialSecurityConfig")
	public SpringSocialConfigurer zhqxSocialSecurityConfig() {
		return new SpringSocialConfigurer();
	}

	//重写一个实现,否则启动会报错:One configuration class must implement getUserIdSource from SocialConfigurer
	//这里在springboot1.5.6版本中是不用配置的,在1.5.6版本中的SocialWebAutoConfiguration类中实现了
	//而在springboot2.x版本中,spring-boot-autoconfigure-2.x.RELEASE版本中已经移除了social包
	@Override
    public UserIdSource getUserIdSource() {
        return new AuthenticationNameUserIdSource();
    }
}、
**
实现图示流程将Connection信息保存到数据库userconnection表中**
在zhqx-security-core项目的com.zhqx.security.core.social包下,新增SocialConfig类,构建UsersConnectionRespiratory存储器。
package com.zhqx.security.core.social;

import javax.sql.DataSource;

import org.springframework.beans.factory.annotation.Autowired;
import org.springframework.context.annotation.Bean;
import org.springframework.context.annotation.Configuration;
import org.springframework.security.crypto.encrypt.Encryptors;
import org.springframework.social.UserIdSource;
import org.springframework.social.config.annotation.EnableSocial;
import org.springframework.social.config.annotation.SocialConfigurerAdapter;
import org.springframework.social.connect.ConnectionFactoryLocator;
import org.springframework.social.connect.UsersConnectionRepository;
import org.springframework.social.connect.jdbc.JdbcUsersConnectionRepository;
import org.springframework.social.security.AuthenticationNameUserIdSource;
import org.springframework.social.security.SpringSocialConfigurer;

@Configuration
@EnableSocial
public class SocialConfig extends SocialConfigurerAdapter {

	@Autowired
	private DataSource dataSource;

	@Override
	public UsersConnectionRepository getUsersConnectionRepository(ConnectionFactoryLocator connectionFactoryLocator) {
		//需要手动建表,建表语句在JdbcUsersConnectionRepository同目录下,JdbcUsersConnectionRepository.sql
		JdbcUsersConnectionRepository repository = new JdbcUsersConnectionRepository(
				dataSource,
				connectionFactoryLocator,
				Encryptors.noOpText());
		//使用建表语句,默认的表命是userConnection,我们可以自己修改表名,加上自己需要的前缀,如zhqx_userConnection
		//自定数据库表的前缀时,需要在代码中指定
		repository.setTablePrefix("zhqx_");
		return repository;
	}
}
将zhqx-security-browser项目中的MyUserDetailService类移入到zhqx-security-demo项目的com.zhqx.security包下。删除
原来的MyUserDetailService。
进一步修改zhqx-security-demo项目的com.zhqx.security包下的MyUserDetailService类。
构建当使用SpringSocial登录时,获取的用户信息。
package com.zhqx.security;

import org.slf4j.Logger;
import org.slf4j.LoggerFactory;
import org.springframework.beans.factory.annotation.Autowired;
import org.springframework.security.core.authority.AuthorityUtils;
import org.springframework.security.core.userdetails.UserDetails;
import org.springframework.security.core.userdetails.UserDetailsService;
import org.springframework.security.core.userdetails.UsernameNotFoundException;
import org.springframework.security.crypto.password.PasswordEncoder;
import org.springframework.social.security.SocialUser;
import org.springframework.social.security.SocialUserDetails;
import org.springframework.social.security.SocialUserDetailsService;
import org.springframework.stereotype.Component;

@Component
public class MyUserDetailService implements UserDetailsService, SocialUserDetailsService {

	private Logger logger = LoggerFactory.getLogger(getClass());

	@Autowired
	private PasswordEncoder passwordEncoder;

	@Override
	public UserDetails loadUserByUsername(String username) throws UsernameNotFoundException {
		logger.info("表单登录用户名:" + username);
		return buildUser(username);
	}

	@Override
	public SocialUserDetails loadUserByUserId(String userId) throws UsernameNotFoundException {
		logger.info("社交登录用户Id:" + userId);
		return buildUser(userId);
	}

	private SocialUserDetails buildUser(String userId) {
		// 根据用户名查找用户信息
		// 这里就是需要从本地数据库查找用户信息了

		// 校验用户信息的逻辑,实际开发过程中,我们可以让自己的实体类继承UserDetails.
		// 这里4个布尔值,分别表示用户是否失效、账号是否过期、密码是否过期、账号是否锁定
		// 默认值为:不可用、已过期、密码已过期、账号已锁定
		// passwordEncoder.encode("123456")这里需要注意的是,正常情况下,应该是在注册用户时进行的操作
		String password = passwordEncoder.encode("123456");
		SocialUser user = new SocialUser(userId, password, true, true, true, true,
				AuthorityUtils.commaSeparatedStringToAuthorityList("admin"));
		return user;
	}

}
在zhqx-security-core项目的com.zhqx.security.core.properties包下增加配置类QQProperties。
package com.zhqx.security.core.properties;

//SpringBoot2.x中 social包中已经没有了SocialProperties,不能再继承包中的SocialProperties了
//需要自己添加appId和appSecret属性
public class QQProperties {
	private String appId;

	private String appSecret;

	private String providerId="qq";

	//省略属性的get和set方法...
}
在zhqx-security-core项目的com.zhqx.security.core.properties包下增加配置类SocialProperties,用来封装QQProperties。
package com.zhqx.security.core.properties;

public class SocialProperties {

	private QQProperties qq = new QQProperties();

	public QQProperties getQq() {
		return qq;
	}

	public void setQq(QQProperties qq) {
		this.qq = qq;
	}

}
修改在zhqx-security-core项目的com.zhqx.security.core.properties包下的SecurityProperties。
package com.zhqx.security.core.properties;

import org.springframework.boot.context.properties.ConfigurationProperties;

//会读取配置文件中所有以zhqx.security开头的配置项
@ConfigurationProperties(prefix = "zhqx.security")
public class SecurityProperties {

	//所有browser配置项的内容,都会读取到BrowserProperties类中
	private BrowserProperties browser = new BrowserProperties();
	//所有类型的验证码配置项
	private ValidateCodeProperties code = new ValidateCodeProperties();
	//社交登录配置
	private SocialProperties social = new SocialProperties();

	public BrowserProperties getBrowser() {
		return browser;
	}

	public void setBrowser(BrowserProperties browser) {
		this.browser = browser;
	}

	public ValidateCodeProperties getCode() {
		return code;
	}

	public void setCode(ValidateCodeProperties code) {
		this.code = code;
	}

	public SocialProperties getSocial() {
		return social;
	}

	public void setSocial(SocialProperties social) {
		this.social = social;
	}

}
在zhqx-security-core项目的com.zhqx.security.core.social.qq.config包下新增QQAutoConfig
package com.zhqx.security.core.social.qq.config;

import org.springframework.beans.factory.annotation.Autowired;
import org.springframework.boot.autoconfigure.condition.ConditionalOnProperty;
import org.springframework.context.annotation.Configuration;
import org.springframework.core.env.Environment;
import org.springframework.social.config.annotation.ConnectionFactoryConfigurer;
import org.springframework.social.config.annotation.SocialConfigurerAdapter;
import org.springframework.social.connect.ConnectionFactory;

import com.zhqx.security.core.properties.QQProperties;
import com.zhqx.security.core.properties.SecurityProperties;
import com.zhqx.security.core.social.qq.connect.QQConnectionFactory;

//SpringBoot2.x版本中没有了SocialAutoConfigurerAdapter,
//所以我们需要自己重写SocialConfigurerAdapter中的addConnectionFactories方法实现
@Configuration
//配置文件中有appId这个配置项,则生效,没有则不生效
@ConditionalOnProperty(prefix = "zhqx.security.social.qq", name = "appId")
public class QQAutoConfig extends SocialConfigurerAdapter {

	@Autowired
	private SecurityProperties securityProperties;

	@Override
	public void addConnectionFactories(ConnectionFactoryConfigurer connectionFactoryConfigurer,
			Environment environment) {
		connectionFactoryConfigurer.addConnectionFactory(this.createConnectionFactory());
	}

	private ConnectionFactory<?> createConnectionFactory() {
		QQProperties qqConfig = securityProperties.getSocial().getQq();
		return new QQConnectionFactory(qqConfig.getProviderId(), qqConfig.getAppId(), qqConfig.getAppSecret());
	}

}
修改zhqx-security-demo项目的配置文件application.yml
spring:
  #session管理
  session:
    store-type: none
  #mysql数据库连接配置
  datasource:
    driver-class-name: com.mysql.jdbc.Driver
    url: jdbc:mysql://localhost:3306/security_demo?useUnicode=true&characterEncoding=utf8&useSSL=false&serverTimezone=UTC
    username: root
    password: 123123
zhqx:
  security:
#    browser:
#      loginPage: /demo-login.html
#      loginResponseType: REDIRECT
    code:
      image:
        length: 6
        width: 100
        url:
      sms:
        length: 4
        url:
    social:
      qq:
        appId: 修改成自己的
        appSecret: 修改成自己的
修改zhqx-security-core项目的com.zhqx.security.core.social包下的SocialConfig类,初始化过滤器:
package com.zhqx.security.core.social;

import javax.sql.DataSource;

import org.springframework.beans.factory.annotation.Autowired;
import org.springframework.context.annotation.Bean;
import org.springframework.context.annotation.Configuration;
import org.springframework.security.crypto.encrypt.Encryptors;
import org.springframework.social.UserIdSource;
import org.springframework.social.config.annotation.EnableSocial;
import org.springframework.social.config.annotation.SocialConfigurerAdapter;
import org.springframework.social.connect.ConnectionFactoryLocator;
import org.springframework.social.connect.UsersConnectionRepository;
import org.springframework.social.connect.jdbc.JdbcUsersConnectionRepository;
import org.springframework.social.security.AuthenticationNameUserIdSource;
import org.springframework.social.security.SpringSocialConfigurer;

@Configuration
@EnableSocial
public class SocialConfig extends SocialConfigurerAdapter {

	@Autowired
	private DataSource dataSource;

	@Override
	public UsersConnectionRepository getUsersConnectionRepository(ConnectionFactoryLocator connectionFactoryLocator) {
		//需要手动建表,建表语句在JdbcUsersConnectionRepository同目录下,JdbcUsersConnectionRepository.sql
		JdbcUsersConnectionRepository repository = new JdbcUsersConnectionRepository(
				dataSource,
				connectionFactoryLocator,
				Encryptors.noOpText());
		//使用建表语句,默认的表命是userConnection,我们可以自己修改表名,加上自己需要的前缀,如zhqx_userConnection
		//自定数据库表的前缀时,需要在代码中指定
		repository.setTablePrefix("zhqx_");
		return repository;
	}

	//过滤器
	@Bean(name = "zhqxSocialSecurityConfig")
	public SpringSocialConfigurer zhqxSocialSecurityConfig() {
		return new SpringSocialConfigurer();
	}

	//重写一个实现,否则启动会报错:One configuration class must implement getUserIdSource from SocialConfigurer
	//这里在springboot1.5.6版本中是不用配置的,在1.5.6版本中的SocialWebAutoConfiguration类中实现了
	//而在springboot2.x版本中,spring-boot-autoconfigure-2.x.RELEASE版本中已经移除了social包
	@Override
    public UserIdSource getUserIdSource() {
        return new AuthenticationNameUserIdSource();
    }
}
修改zhqx-security-browser项目的BrowserSecurityConfig类,将SpringSocial的过滤器添加到SpringSecurity验证流程中:
//只显示修改部分代码--其余代码未变动

@Autowired
private SpringSocialConfigurer zhqxSocialSecurityConfig;

@Override
protected void configure(HttpSecurity http) throws Exception {

	applyPasswordAuthenticationConfig(http);

	http.apply(validateCodeSecurityConfig)
			.and()
		.apply(smsCodeAuthenticationSecurityConfig)
			.and()
		.apply(zhqxSocialSecurityConfig)
			.and()
		.rememberMe()
			.tokenRepository(persistentTokenRepository())
			.tokenValiditySeconds(securityProperties.getBrowser().getRememberMeSeconds())
			.userDetailsService(userDetailsService)
			.and()
		.authorizeRequests()
			.antMatchers(
				SecurityConstants.DEFAULT_UNAUTHENTICATION_URL,
				SecurityConstants.DEFAULT_LOGIN_PROCESSING_URL_MOBILE,
				securityProperties.getBrowser().getLoginPage(),
				SecurityConstants.DEFAULT_VALIDATE_CODE_URL_PREFIX + "/*",
				"/error")
				.permitAll()
			.anyRequest()
			.authenticated()
			.and()
		.csrf().disable();

}
修改zhqx-security-browser项目中的zhqx-login.html,增加QQ登录入口:
<!DOCTYPE html>
<html>
<head>
<meta charset="UTF-8">
<title>登录</title>
</head>
<body>
	<h2>标准登录页面</h2>
	<h3>表单登录</h3>
	<form action="/authentication/form" method="post">
		<table>
			<tr>
				<td>用户名:</td>
				<td><input type="text" name="username"></td>
			</tr>
			<tr>
				<td>密码:</td>
				<td><input type="password" name="password"></td>
			</tr>
			<tr>
				<td>图形验证码:</td>
				<td>
					<input type="text" name="imageCode">
					<img src="/code/image">
				</td>
			</tr>
			<tr>
				<td colspan='2'><input name="remember-me" type="checkbox" value="true" />记住我</td>
			</tr>
			<tr>
				<td colspan="2"><button type="submit">登录</button></td>
			</tr>
		</table>
	</form>

	<h3>短信登录</h3>
	<form action="/authentication/mobile" method="post">
		<table>
			<tr>
				<td>手机号:</td>
				<td><input type="text" name="mobile" value="13012345678"></td>
			</tr>
			<tr>
				<td>短信验证码:</td>
				<td>
					<input type="text" name="smsCode">
					<a href="/code/sms?mobile=13012345678">发送验证码</a>
				</td>
			</tr>
			<tr>
				<td colspan="2"><button type="submit">登录</button></td>
			</tr>
		</table>
	</form>
	<br>
	<h3>社交登录</h3>
	<a href="/auth/qq">QQ登录</a>
</body>
</html>
这里/auth是因为所有/auth开头的请求都会被SocialAuthenticationFilter拦截。而/qq则是表示QQProperties中配置的providerId。
至此,启动服务。在浏览器中访问http://localhost:8080/zhqx-login.html。点击页面的QQ登录,页面会跳转并提示redirect uri is illegal(100010)。
错误的原因是因为我们QQ登录页面跳转的地址/auth/qq与我们在QQ登录应用平台中配置的地址不一致导致。
假设我们服务器配置的网站回调域是:http://www.test.com/qqLogin/callback.do。在本地测试时,需要进入C:\Windows\System32\drivers\etc目录下。
修改hosts文件,将127.0.0.1 www.test.com添加到文件内容中。修改zhqx-security-demo项目的配置文件application.yml。
将服务启动端口改为80,默认是8080。
在zhqx-security-core项目中com.zhqx.security.core.social包下新建ZhqxSpringSocialConfigurer类,用来修改默认的拦截请求/auth。
package com.zhqx.security.core.social;

import org.springframework.social.security.SocialAuthenticationFilter;
import org.springframework.social.security.SpringSocialConfigurer;

public class ZhqxSpringSocialConfigurer extends SpringSocialConfigurer {

	private String filterProcessesUrl;

	public ZhqxSpringSocialConfigurer(String filterProcessesUrl) {
		this.filterProcessesUrl = filterProcessesUrl;
	}

	//object代表将要放到security过滤器链上的filter
	@Override
	protected <T> T postProcess(T object) {
		SocialAuthenticationFilter filter = (SocialAuthenticationFilter) super.postProcess(object);
		filter.setFilterProcessesUrl(filterProcessesUrl);
		return (T) filter;
	}

	public String getFilterProcessesUrl() {
		return filterProcessesUrl;
	}

	public void setFilterProcessesUrl(String filterProcessesUrl) {
		this.filterProcessesUrl = filterProcessesUrl;
	}
}
修改zhqx-security-core项目中com.zhqx.security.core.properties包下的SocialProperties类。
package com.zhqx.security.core.properties;

public class SocialProperties {

	private QQProperties qq = new QQProperties();
	//默认拦截请求
	private String filterProcessesUrl = "/auth";

	public QQProperties getQq() {
		return qq;
	}

	public void setQq(QQProperties qq) {
		this.qq = qq;
	}

	public String getFilterProcessesUrl() {
		return filterProcessesUrl;
	}

	public void setFilterProcessesUrl(String filterProcessesUrl) {
		this.filterProcessesUrl = filterProcessesUrl;
	}

}
修改com.zhqx.security.core.social包下的SocialConfig类。将过滤器修改为我们自定义的ZhqxSpringSocialConfigurer。
//只显示修改部分代码

@Autowired
private SecurityProperties securityProperties;

//过滤器
@Bean(name = "zhqxSocialSecurityConfig")
public SpringSocialConfigurer zhqxSocialSecurityConfig() {
	//return new SpringSocialConfigurer();
	String filterProcessesUrl = securityProperties.getSocial().getFilterProcessesUrl();
	ZhqxSpringSocialConfigurer configure = new ZhqxSpringSocialConfigurer(filterProcessesUrl);
	return configure;
}
修改zhqx-security-demo项目的配置文件application.yml。
server:
  port: 80
spring:
  #session管理
  session:
    store-type: none
  #mysql数据库连接配置
  datasource:
    driver-class-name: com.mysql.jdbc.Driver
    url: jdbc:mysql://localhost:3306/security_demo?useUnicode=true&characterEncoding=utf8&useSSL=false&serverTimezone=UTC
    username: root
    password: 123123
zhqx:
  security:
#    browser:
#      loginPage: /demo-login.html
#      loginResponseType: REDIRECT
    code:
      image:
        length: 6
        width: 100
        url:
      sms:
        length: 4
        url:
    social:
      qq:
        appId: 你的appid
        appSecret: 你的appSecret
        providerId: callback.do
      filterProcessesUrl: /qqLogin
修改完毕后,再次启动服务器,浏览器访问:http://www.test.com/zhqx-login.html。浏览器显示正常的QQ登录界面。选择QQ登录后。出现如下提示:
{
content: "访问的服务需要身份认证,请引导用户到登录页"
}
此时后台打印出信息:引发跳转的请求是:http://www.test.com/signin。这是因为我们默认的过滤器在无法正常获取QQ返回的code时,会重定向到这个请求。
在zhqx-security-core项目的com.zhqx.security.core.social.qq.connect包下,新增QQOAuth2Template类。
package com.zhqx.security.core.social.qq.connect;

import java.nio.charset.Charset;

import org.apache.commons.lang.StringUtils;
import org.slf4j.Logger;
import org.slf4j.LoggerFactory;
import org.springframework.http.converter.StringHttpMessageConverter;
import org.springframework.social.oauth2.AccessGrant;
import org.springframework.social.oauth2.OAuth2Template;
import org.springframework.util.MultiValueMap;
import org.springframework.web.client.RestTemplate;

public class QQOAuth2Template extends OAuth2Template {

	private Logger logger = LoggerFactory.getLogger(getClass());

	public QQOAuth2Template(String clientId, String clientSecret, String authorizeUrl, String accessTokenUrl) {
		super(clientId, clientSecret, authorizeUrl, accessTokenUrl);
		setUseParametersForClientAuthentication(true);
	}

	@Override
	protected AccessGrant postForAccessGrant(String accessTokenUrl, MultiValueMap<String, String> parameters) {
		//成功登录,qq返回的信息是(详见https://wiki.connect.qq.com/使用authorization_code获取access_token)
		//access_token=FE04************************CCE2&expires_in=7776000&refresh_token=88E4************************BE14
		String responseStr = getRestTemplate().postForObject(accessTokenUrl, parameters, String.class);

		logger.info("获取accessToke的响应:"+responseStr);

		String[] items = StringUtils.splitByWholeSeparatorPreserveAllTokens(responseStr, "&");

		String accessToken = StringUtils.substringAfterLast(items[0], "=");
		Long expiresIn = new Long(StringUtils.substringAfterLast(items[1], "="));
		String refreshToken = StringUtils.substringAfterLast(items[2], "=");

		return new AccessGrant(accessToken, null, refreshToken, expiresIn);
	}

	@Override
	protected RestTemplate createRestTemplate() {
		RestTemplate restTemplate = super.createRestTemplate();
		restTemplate.getMessageConverters().add(new StringHttpMessageConverter(Charset.forName("UTF-8")));
		return restTemplate;
	}
}
修改QQServiceProvider类:
//只显示修改部分

public QQServiceProvider(String appId, String appSecret) {
	//在QQ互联平台注册应用时,会有对应的aapId和appSecret
	//OAuth2Template是OAuth2Operations的实现
	super(new QQOAuth2Template(appId, appSecret, URL_AUTHORIZE, URL_ACCESS_TOKEN));
}
此时,启动服务,浏览器访问:http://www.test.com/zhqx-login.html,点击QQ登录,控制台显示打印如下内容:
result:callback( {"client_id":"101902472","openid":"93B9C4D0685AE6D7A518D16E39AE87D2"} );

result:{"ret":100008,"msg":"client request's app is not existed"}
修改部分代码,修改com.zhqx.security.core.social.qq.api包下的QQImpl类。
//只显示修改部分代码

public QQImpl(String access_token, String appId) {
	//将access_token以参数形式放入请求中
	super(access_token, TokenStrategy.ACCESS_TOKEN_PARAMETER);
	this.appId = appId;

	String url = String.format(URL_GET_OPENID, access_token);
	String result = getRestTemplate().getForObject(url, String.class);

	System.out.println("result:" + result);
	//根据QQ获取openId返回结果:callback( {"client_id":"YOUR_APPID","openid":"YOUR_OPENID"} );
	this.openId = StringUtils.substringBetween(result, "\"openid\":\"", "\"}");
}

@Override
public QQUserInfo getUserInfo() {
	String url = String.format(URL_GET_USERINFO, appId, openId);

	String result = getRestTemplate().getForObject(url, String.class);

	System.out.println("result:" + result);

	QQUserInfo userInfo = null;
	try {
		userInfo = objectMapper.readValue(result, QQUserInfo.class);
		userInfo.setOpenId(openId);
		return userInfo;
	} catch (Exception e) {
		throw new RuntimeException("获取用户信息失败", e);
	}
}
修改com.zhqx.security.core.social.qq.connect包下的QQServiceProvider类。
//只显示修改部分代码

public QQServiceProvider(String appId, String appSecret) {
	//在QQ互联平台注册应用时,会有对应的aapId和appSecret
	//OAuth2Template是OAuth2Operations的实现
	super(new QQOAuth2Template(appId, appSecret, URL_AUTHORIZE, URL_ACCESS_TOKEN));
	this.appId = appId;
}
再次,启动服务,浏览器访问:http://www.test.com/zhqx-login.html,点击QQ登录,控制台显示错误,错误出现在
com.zhqx.security.core.social.qq.api包下的QQImpl类中的getUserInfo()方法。出现转化错误。
控制台可以打印出QQ返回的信息:
result:{
    "ret": 0,
    "msg": "",
    "is_lost":0,
    "nickname": "神奇海螺",
    "gender": "男",
    "gender_type": 1,
    "province": "安徽",
    "city": "合肥",
    "year": "1991",
    "constellation": "",
    "figureurl": "http:\/\/qzapp.qlogo.cn\/qzapp\/101902472\/93B9C4D0685AE6D7A518D16E39AE87D2\/30",
    "figureurl_1": "http:\/\/qzapp.qlogo.cn\/qzapp\/101902472\/93B9C4D0685AE6D7A518D16E39AE87D2\/50",
    "figureurl_2": "http:\/\/qzapp.qlogo.cn\/qzapp\/101902472\/93B9C4D0685AE6D7A518D16E39AE87D2\/100",
    "figureurl_qq_1": "http://thirdqq.qlogo.cn/g?b=oidb&k=teJcibtnoCBe8onibH8yYpoQ&s=40&t=1554175632",
    "figureurl_qq_2": "http://thirdqq.qlogo.cn/g?b=oidb&k=teJcibtnoCBe8onibH8yYpoQ&s=100&t=1554175632",
    "figureurl_qq": "http://thirdqq.qlogo.cn/g?b=oidb&k=teJcibtnoCBe8onibH8yYpoQ&s=640&t=1554175632",
    "figureurl_type": "1",
    "is_yellow_vip": "0",
    "vip": "0",
    "yellow_vip_level": "0",
    "level": "0",
    "is_yellow_year_vip": "0"
}
修改我们封装的com.zhqx.security.core.social.qq.api包下的QQUserInfo,让属性匹配上。
public class QQUserInfo {
	//只显示新增的属性

	//性别类型
	private String gender_type;
	//星座
	private String constellation;
	private String figureurl_qq;
	//头像类型
	private String figureurl_type;

	//添加get和set方法

}
再次,启动服务,浏览器访问:http://www.test.com/zhqx-login.html,点击QQ登录,控制台不再报错了,但是页面仍然显示:
{
content: "访问的服务需要身份认证,请引导用户到登录页"
}
控制台打印的信息是:引发跳转的请求是:http://www.test.com/signup,这是因为我们还没有完成后注册用户的内容。
完成使用QQ登陆时,注册QQ用户
在zhqx-security-browser项目中,src/main/resources/resources目录下增加zhqx-regist.html。
<!DOCTYPE html>
<html>
<head>
<meta charset="UTF-8">
<title>注册</title>
</head>
<body>
	<h2>标准注册页面</h2>
	<h3>这是系统注册页面,请配置zhqx.security.browser.signUpUrl属性来设置自己的注册页</h3>
</body>
</html>
修改zhqx-security-core项目中,com.zhqx.security.core.properties包下的BrowserProperties类。
public class BrowserProperties {

	//只显示新增的部分代码

	//默认注册页面
	private String signUpUrl = "/zhqx-regist.html";

	public String getSignUpUrl() {
		return signUpUrl;
	}

	public void setSignUpUrl(String signUpUrl) {
		this.signUpUrl = signUpUrl;
	}

}
在zhqx-security-demo项目中src/main/resources/resources目录下新增demo-regist.html页面:
<!DOCTYPE html>
<html>
<head>
<meta charset="UTF-8">
<title>登录</title>
</head>
<body>
	<h2>Demo注册页</h2>

	<form action="/user/regist" method="post">
		<table>
			<tr>
				<td>用户名:</td>
				<td><input type="text" name="username"></td>
			</tr>
			<tr>
				<td>密码:</td>
				<td><input type="password" name="password"></td>
			</tr>
			<tr>
				<td colspan="2">
					<button type="submit" name="type" value="regist">注册</button>
					<button type="submit" name="type" value="binding">绑定</button>
				</td>
			</tr>
		</table>
	</form>
</body>
</html>
修改zhqx-security-demo项目中的配置文件application.yml,新增signUpUrl的配置
server:
  port: 80
spring:
  #session管理
  session:
    store-type: none
  #mysql数据库连接配置
  datasource:
    driver-class-name: com.mysql.jdbc.Driver
    url: jdbc:mysql://localhost:3306/security_demo?useUnicode=true&characterEncoding=utf8&useSSL=false&serverTimezone=UTC
    username: root
    password: 123123
zhqx:
  security:
    browser:
#      loginPage: /demo-login.html
#      loginResponseType: REDIRECT
      signUpUrl: /demo-regist.html
    code:
      image:
        length: 6
        width: 100
        url:
      sms:
        length: 4
        url:
    social:
      qq:
        appId: 你的appId
        appSecret: 你的appSecret
        providerId: callback.do
      filterProcessesUrl: /qqLogin
修改zhqx-security-demo项目中,com.zhqx.web.controller包下的UserController类
public class UserController {
	//只显示新增的部分代码

	@PostMapping("/regist")
	public void regist(User user, HttpServletRequest request) {
		//注册用户
	}
}
修改zhqx-security-browser项目中的BrowserSecurityConfig类,放行我们的注册页面;
@Configuration
public class BrowserSecurityConfig extends AbstractChannelSecurityConfig {
	//只显示新增部分代码,放行注册页面

	@Override
	protected void configure(HttpSecurity http) throws Exception {

		applyPasswordAuthenticationConfig(http);

		http.apply(validateCodeSecurityConfig)
				.and()
			.apply(smsCodeAuthenticationSecurityConfig)
				.and()
			.apply(zhqxSocialSecurityConfig)
				.and()
			.rememberMe()
				.tokenRepository(persistentTokenRepository())
				.tokenValiditySeconds(securityProperties.getBrowser().getRememberMeSeconds())
				.userDetailsService(userDetailsService)
				.and()
			.authorizeRequests()
				.antMatchers(
					SecurityConstants.DEFAULT_UNAUTHENTICATION_URL,
					SecurityConstants.DEFAULT_LOGIN_PROCESSING_URL_MOBILE,
					securityProperties.getBrowser().getLoginPage(),
					SecurityConstants.DEFAULT_VALIDATE_CODE_URL_PREFIX + "/*",
					"/error", securityProperties.getBrowser().getSignUpUrl())
					.permitAll()
				.anyRequest()
				.authenticated()
				.and()
			.csrf().disable();

	}

}
修改zhqx-security-core项目的com.zhqx.security.core.social包下的SocialConfig类。
@Configuration
@EnableSocial
public class SocialConfig extends SocialConfigurerAdapter {

	//只显示新增的部分代码

	//过滤器
	@Bean(name = "zhqxSocialSecurityConfig")
	public SpringSocialConfigurer zhqxSocialSecurityConfig() {
		//return new SpringSocialConfigurer();
		String filterProcessesUrl = securityProperties.getSocial().getFilterProcessesUrl();
		ZhqxSpringSocialConfigurer configure = new ZhqxSpringSocialConfigurer(filterProcessesUrl);
		//将默认注册页替换成我们自定义的注册页面
		configure.signupUrl(securityProperties.getBrowser().getSignUpUrl());
		return configure;
	}
}
此时,启动服务,浏览器访问:http://www.test.com/zhqx-login.html,点击QQ登录,成功跳转到demo-regist页面。
实际开发中,我们需要在自定义页面上显示QQ信息,或者将相关用户信息回传给SpringSocial。
修改zhqx-security-core项目中,com.zhqx.security.core.social包下的SocialConfig类。
@Configuration
@EnableSocial
public class SocialConfig extends SocialConfigurerAdapter {
	//只显示修改部分内容

	//用于传递相关信息
	@Bean
	public ProviderSignInUtils providerSignInUtils(ConnectionFactoryLocator connectionFactoryLocator) {
		return new ProviderSignInUtils(connectionFactoryLocator,
				getUsersConnectionRepository(connectionFactoryLocator)) {
		};
	}
}
在zhqx-security-browser项目中的com.zhqx.security.browser包下,新增SocialUserInfo类。
package com.zhqx.security.browser.support;

public class SocialUserInfo {
	private String providerId;

	private String providerUserId;

	private String nickname;

	private String headimg;

	public String getProviderId() {
		return providerId;
	}

	public void setProviderId(String providerId) {
		this.providerId = providerId;
	}

	public String getProviderUserId() {
		return providerUserId;
	}

	public void setProviderUserId(String providerUserId) {
		this.providerUserId = providerUserId;
	}

	public String getNickname() {
		return nickname;
	}

	public void setNickname(String nickname) {
		this.nickname = nickname;
	}

	public String getHeadimg() {
		return headimg;
	}

	public void setHeadimg(String headimg) {
		this.headimg = headimg;
	}
}
修改zhqx-security-browser项目中的BrowserSecurityController类:
@RestController
public class BrowserSecurityController {
	//只显示新增的部分代码

	@Autowired
	private ProviderSignInUtils providerSignInUtils;

	@GetMapping("/social/user")
	public SocialUserInfo getSocialUserInfo(HttpServletRequest request) {
		SocialUserInfo userInfo = new SocialUserInfo();
		Connection<?> connection = providerSignInUtils.getConnectionFromSession(new ServletWebRequest(request));
		userInfo.setProviderId(connection.getKey().getProviderId());
		userInfo.setProviderUserId(connection.getKey().getProviderUserId());
		userInfo.setNickname(connection.getDisplayName());
		userInfo.setHeadimg(connection.getImageUrl());
		return userInfo;
	}
}
修改zhqx-security-demo项目的,com.zhqx.web.controller包下的UserController类:
@RestController
@RequestMapping("/user")
public class UserController {
	//只显示修改部分代码

	@Autowired
	private ProviderSignInUtils providerSignInUtils;

	@PostMapping("/regist")
	public void regist(User user, HttpServletRequest request) {
		//不管是注册用户还是绑定用户,都会拿到一个用户唯一标识。
		//省略注册或者绑定的业务逻辑
		String userId = user.getUsername();
		providerSignInUtils.doPostSignUp(userId, new ServletWebRequest(request));
	}
}
修改zhqx-security-browser项目中的BrowserSecurityConfig类,放行用户注册的请求/user/regist。
@Configuration
public class BrowserSecurityConfig extends AbstractChannelSecurityConfig {
	//只显示修改部分代码

	@Override
	protected void configure(HttpSecurity http) throws Exception {

		applyPasswordAuthenticationConfig(http);

		http.apply(validateCodeSecurityConfig)
				.and()
			.apply(smsCodeAuthenticationSecurityConfig)
				.and()
			.apply(zhqxSocialSecurityConfig)
				.and()
			.rememberMe()
				.tokenRepository(persistentTokenRepository())
				.tokenValiditySeconds(securityProperties.getBrowser().getRememberMeSeconds())
				.userDetailsService(userDetailsService)
				.and()
			.authorizeRequests()
				.antMatchers(
					SecurityConstants.DEFAULT_UNAUTHENTICATION_URL,
					SecurityConstants.DEFAULT_LOGIN_PROCESSING_URL_MOBILE,
					securityProperties.getBrowser().getLoginPage(),
					SecurityConstants.DEFAULT_VALIDATE_CODE_URL_PREFIX + "/*",
					"/error", securityProperties.getBrowser().getSignUpUrl(),
					"/user/regist")
					.permitAll()
				.anyRequest()
				.authenticated()
				.and()
			.csrf().disable();

	}

}
启动服务,浏览器访问:http://www.test.com/zhqx-login.html,选择QQ登录,确定QQ登录后,浏览器跳转到http://www.test.com/demo-regist.html。
在这个页面下,注册我们的QQ账号:输入账号test、输入密码:654321。点击注册。浏览器跳转到http://www.test.com/user/regist.
此时,我们打开数据库表zhqx_userconnection。发现里面多了一条数据,说明我们的QQ账号成功绑定了一个新的注册账号。
此时我们再次访问:http://www.test.com/zhqx-login.html,选择QQ登录,确定上面指定的QQ号,登录后,发现页面仍然跳转到了注册和绑定页面。我们期待的直接跳转到显示主页的结果没有出现。
我们通过在SocialAuthenticationProvider类的String userId = toUserId(connection);代码除打断点得知,UsersConnectionRepository初始化的是InMemoryUsersConnectionRepository实例。
而我们需要的是JdbcUsersConnectionRepository。
这里网上提供了2种解决方案:
第一种:直接在SocialConfig类上加注解@Order(10),不清楚原因,只知道是加载顺序的原理。
@Configuration
@EnableSocial
@Order(10)
public class SocialConfig extends SocialConfigurerAdapter {
第二种:在SocialConfig类的重写方法上加注解@Primary和@Bean(参考:https://blog.csdn.net/sanjun333/article/details/102715321):
@Primary
@Bean
@Override
public UsersConnectionRepository getUsersConnectionRepository(ConnectionFactoryLocator connectionFactoryLocator) {
	//需要手动建表,建表语句在JdbcUsersConnectionRepository同目录下,JdbcUsersConnectionRepository.sql
	JdbcUsersConnectionRepository repository = new JdbcUsersConnectionRepository(
			dataSource,
			connectionFactoryLocator,
			Encryptors.noOpText());
	//使用建表语句,默认的表命是userConnection,我们可以自己修改表名,加上自己需要的前缀,如zhqx_userConnection
	//自定数据库表的前缀时,需要在代码中设置
	repository.setTablePrefix("zhqx_");
	return repository;
}
第三种:在第二种方法的基础上,直接指定bean的名称。
@Bean(name = "usersConnectionRepository")
@Override
public UsersConnectionRepository getUsersConnectionRepository(ConnectionFactoryLocator connectionFactoryLocator) {
	//需要手动建表,建表语句在JdbcUsersConnectionRepository同目录下,JdbcUsersConnectionRepository.sql
	JdbcUsersConnectionRepository repository = new JdbcUsersConnectionRepository(
			dataSource,
			connectionFactoryLocator,
			Encryptors.noOpText());
	//使用建表语句,默认的表命是userConnection,我们可以自己修改表名,加上自己需要的前缀,如zhqx_userConnection
	//自定数据库表的前缀时,需要在代码中设置
	repository.setTablePrefix("zhqx_");
	return repository;
}
建表SQL:
create table UserConnection (userId varchar(255) not null,
	providerId varchar(255) not null,
	providerUserId varchar(255),
	rank int not null,
	displayName varchar(255),
	profileUrl varchar(512),
	imageUrl varchar(512),
	accessToken varchar(512) not null,
	secret varchar(512),
	refreshToken varchar(512),
	expireTime bigint,
	primary key (userId, providerId, providerUserId));
create unique index UserConnectionRank on UserConnection(userId, providerId, rank);
上面三种方法都可以解决绑定QQ账号后,再次登录依然跳转到登录页面的问题。解决后,浏览器访问:http://www.test.com/zhqx-login.html,选择QQ登录,确定QQ登录后,跳转到自定义的index界面。
**
静默注册QQ用户**
在上面的案例中,我们特意定义了一个注册页面,让用户注册,实际开发中,我们可能需要静默注册用户,不需要引导用户一步步注册。
在zhqx-security-demo项目中的com.zhqx.security包下新建DemoConnectionSignUp类。
package com.zhqx.security;

import org.springframework.social.connect.Connection;
import org.springframework.social.connect.ConnectionSignUp;
import org.springframework.stereotype.Component;

@Component
public class DemoConnectionSignUp implements ConnectionSignUp {

	@Override
	public String execute(Connection<?> connection) {
		//根据社交用户信息默认创建用户并返回用户唯一标识,这里使用的是QQ昵称
		return connection.getDisplayName();
	}

}
修改zhqx-security-core项目中的com.zhqx.security.core.social包下的SocialConfig类:
@Configuration
@EnableSocial
public class SocialConfig extends SocialConfigurerAdapter {

	//只显示修改部分代码

	@Autowired(required = false)
	private ConnectionSignUp connectionSignUp;

	@Bean(name = "usersConnectionRepository")
	@Override
	public UsersConnectionRepository getUsersConnectionRepository(ConnectionFactoryLocator connectionFactoryLocator) {
		//需要手动建表,建表语句在JdbcUsersConnectionRepository同目录下,JdbcUsersConnectionRepository.sql
		JdbcUsersConnectionRepository repository = new JdbcUsersConnectionRepository(
				dataSource,
				connectionFactoryLocator,
				Encryptors.noOpText());
		//使用建表语句,默认的表命是userConnection,我们可以自己修改表名,加上自己需要的前缀,如zhqx_userConnection
		//自定数据库表的前缀时,需要在代码中设置
		repository.setTablePrefix("zhqx_");
		if(connectionSignUp != null) {//如果配置了静默注册,则设置
			repository.setConnectionSignUp(connectionSignUp);
		}
		return repository;
	}

}
将原来数据库绑定的QQ用户清空,浏览器访问:http://www.test.com/zhqx-login.html,选择QQ登录,确定QQ登录后,自动完成注册绑定,
并跳转到index主页。
使用SpringSocial实现微信扫码登录
1.在zhqx-security-core项目中的com.zhqx.security.core.properties包下新增WeixinProperties类。
package com.zhqx.security.core.properties;

public class WeixinProperties {
	private String appId;

	private String appSecret;

	private String providerId="weixin";

	public String getAppId() {
		return appId;
	}

	public void setAppId(String appId) {
		this.appId = appId;
	}

	public String getAppSecret() {
		return appSecret;
	}

	public void setAppSecret(String appSecret) {
		this.appSecret = appSecret;
	}

	public String getProviderId() {
		return providerId;
	}

	public void setProviderId(String providerId) {
		this.providerId = providerId;
	}
}
2.修改com.zhqx.security.core.properties包下的SocialProperties类。
package com.zhqx.security.core.properties;

public class SocialProperties {
	//只显示修改的部分代码

	//新增WeixinProperties类并提供get、set方法
	private WeixinProperties weixin = new WeixinProperties();

}
3.修改zhqx-security-demo项目的配置文件application.yml,新增微信登录的appId,以及appSecret。
server:
  port: 80
spring:
  #session管理
  session:
    store-type: none
  #mysql数据库连接配置
  datasource:
    driver-class-name: com.mysql.jdbc.Driver
    url: jdbc:mysql://localhost:3306/security_demo?useUnicode=true&characterEncoding=utf8&useSSL=false&serverTimezone=UTC
    username: root
    password: 123123
zhqx:
  security:
    browser:
#      loginPage: /demo-login.html
#      loginResponseType: REDIRECT
      signUpUrl: /demo-regist.html
    code:
      image:
        length: 6
        width: 100
        url:
      sms:
        length: 4
        url:
    social:
      qq:
        appId: 你的appId
        appSecret: 你的appSecret
        providerId: callback.do
      filterProcessesUrl: /qqLogin
      weixin:
        appId: 你的appId
        appSecret: 你的appSecret
4.在zhqx-security-core项目下新增com.zhqx.security.core.social.weixin.api包、com.zhqx.security.core.social.weixin.config包、com.zhqx.security.core.social.weixin.connect包。
4.1.com.zhqx.security.core.social.weixin.api包下的类:
WeixinUserInfo类,封装微信返回信息:
package com.zhqx.security.core.social.weixin.api;

public class WeixinUserInfo {
	//普通用户的标识,对当前开发者帐号唯一
	private String openid;
	//普通用户昵称
	private String nickname;
	//语言
	private String language;
	//普通用户性别,1为男性,2为女性
	private String sex;
	//普通用户个人资料填写的省份
	private String province;
	//普通用户个人资料填写的城市
	private String city;
	//国家,如中国为CN
	private String country;
	//用户头像,最后一个数值代表正方形头像大小(有0、46、64、96、132数值可选,0代表640*640正方形头像),用户没有头像时该项为空
	private String headimgurl;
	//用户特权信息,json数组,如微信沃卡用户为(chinaunicom)
	private String[] privilege;
	//用户统一标识。针对一个微信开放平台帐号下的应用,同一用户的unionid是唯一的。
	private String unionid;
	//省略get、set方法
}
Weixin接口:
package com.zhqx.security.core.social.weixin.api;

//微信API调用接口
public interface Weixin {
	WeixinUserInfo getUserInfo(String openId);
}
Weixin接口实现类WeixinImpl:
package com.zhqx.security.core.social.weixin.api;

import java.nio.charset.Charset;
import java.util.List;

import org.apache.commons.lang.StringUtils;
import org.springframework.http.converter.HttpMessageConverter;
import org.springframework.http.converter.StringHttpMessageConverter;
import org.springframework.social.oauth2.AbstractOAuth2ApiBinding;
import org.springframework.social.oauth2.TokenStrategy;

import com.fasterxml.jackson.databind.ObjectMapper;

//Weixin API调用模板, scope为Request的Spring bean, 根据当前用户的accessToken创建。
public class WeixinImpl extends AbstractOAuth2ApiBinding implements Weixin {

	private ObjectMapper objectMapper = new ObjectMapper();
	//获取用户信息的url
	private static final String URL_GET_USER_INFO = "https://api.weixin.qq.com/sns/userinfo?openid=";

	public WeixinImpl(String accessToken) {
		super(accessToken, TokenStrategy.ACCESS_TOKEN_PARAMETER);
	}

	//默认注册的StringHttpMessageConverter字符集为ISO-8859-1,而微信返回的是UTF-8的,所以覆盖了原来的方法。
	protected List<HttpMessageConverter<?>> getMessageConverters() {
		List<HttpMessageConverter<?>> messageConverters = super.getMessageConverters();
		messageConverters.remove(0);
		messageConverters.add(new StringHttpMessageConverter(Charset.forName("UTF-8")));
		return messageConverters;
	}

	//获取微信用户信息。
	@Override
	public WeixinUserInfo getUserInfo(String openId) {
		String url = URL_GET_USER_INFO + openId;
		String response = getRestTemplate().getForObject(url, String.class);
		if(StringUtils.contains(response, "errcode")) {
			return null;
		}
		WeixinUserInfo profile = null;
		try {
			profile = objectMapper.readValue(response, WeixinUserInfo.class);
		} catch (Exception e) {
			e.printStackTrace();
		}
		return profile;
	}

}
4.2.com.zhqx.security.core.social.weixin.connect包下的类:
WeixinAdapter类:
package com.zhqx.security.core.social.weixin.connect;

import org.springframework.social.connect.ApiAdapter;
import org.springframework.social.connect.ConnectionValues;
import org.springframework.social.connect.UserProfile;

import com.zhqx.security.core.social.weixin.api.Weixin;
import com.zhqx.security.core.social.weixin.api.WeixinUserInfo;

//微信 api适配器,将微信 api的数据模型转为spring social的标准模型。
public class WeixinAdapter implements ApiAdapter<Weixin> {

	private String openId;

	public WeixinAdapter() {}

	public WeixinAdapter(String openId){
		this.openId = openId;
	}

	@Override
	public boolean test(Weixin api) {
		return true;
	}

	@Override
	public void setConnectionValues(Weixin api, ConnectionValues values) {
		WeixinUserInfo profile = api.getUserInfo(openId);
		values.setProviderUserId(profile.getOpenid());
		values.setDisplayName(profile.getNickname());
		values.setImageUrl(profile.getHeadimgurl());
	}

	@Override
	public UserProfile fetchUserProfile(Weixin api) {
		return null;
	}

	@Override
	public void updateStatus(Weixin api, String message) {
		//do nothing
	}

}
WeixinAccessGrant类:
package com.zhqx.security.core.social.weixin.connect;

import org.springframework.social.oauth2.AccessGrant;

//微信的access_token信息。与标准OAuth2协议不同,微信在获取access_token时会同时返回openId,
//并没有单独的通过accessToke换取openId的服务
//所以在这里继承了标准AccessGrant,添加了openId字段,作为对微信access_token信息的封装。
public class WeixinAccessGrant extends AccessGrant {

	private static final long serialVersionUID = 1L;

	private String openId;

	public WeixinAccessGrant() {
        super("");
    }

    public WeixinAccessGrant(String accessToken, String scope, String refreshToken, Long expiresIn) {
        super(accessToken, scope, refreshToken, expiresIn);
    }

	public String getOpenId() {
		return openId;
	}

	public void setOpenId(String openId) {
		this.openId = openId;
	}
}
WeixinOAuth2Template类:
package com.zhqx.security.core.social.weixin.connect;

import java.nio.charset.Charset;
import java.util.Map;

import org.apache.commons.collections.MapUtils;
import org.apache.commons.lang.StringUtils;
import org.slf4j.Logger;
import org.slf4j.LoggerFactory;
import org.springframework.http.converter.StringHttpMessageConverter;
import org.springframework.social.oauth2.AccessGrant;
import org.springframework.social.oauth2.OAuth2Parameters;
import org.springframework.social.oauth2.OAuth2Template;
import org.springframework.util.MultiValueMap;
import org.springframework.web.client.RestTemplate;

import com.fasterxml.jackson.databind.ObjectMapper;

//完成微信的OAuth2认证流程的模板类。国内厂商实现的OAuth2每个都不同, spring默认提供的OAuth2Template适应不了,
//只能针对每个厂商自己微调。
public class WeixinOAuth2Template extends OAuth2Template {

	private String clientId;

	private String clientSecret;

	private String accessTokenUrl;

	private static final String REFRESH_TOKEN_URL = "https://api.weixin.qq.com/sns/oauth2/refresh_token";

	private Logger logger = LoggerFactory.getLogger(getClass());

	public WeixinOAuth2Template(String clientId, String clientSecret, String authorizeUrl, String accessTokenUrl) {
		super(clientId, clientSecret, authorizeUrl, accessTokenUrl);
		setUseParametersForClientAuthentication(true);
		this.clientId = clientId;
		this.clientSecret = clientSecret;
		this.accessTokenUrl = accessTokenUrl;
	}

	@Override
	public AccessGrant exchangeForAccess(String authorizationCode, String redirectUri,
			MultiValueMap<String, String> parameters) {

		StringBuilder accessTokenRequestUrl = new StringBuilder(accessTokenUrl);

		accessTokenRequestUrl.append("?appid=" + clientId);
		accessTokenRequestUrl.append("&secret=" + clientSecret);
		accessTokenRequestUrl.append("&code=" + authorizationCode);
		accessTokenRequestUrl.append("&grant_type=authorization_code");
		accessTokenRequestUrl.append("&redirect_uri=" + redirectUri);

		return getAccessToken(accessTokenRequestUrl);
	}

	public AccessGrant refreshAccess(String refreshToken, MultiValueMap<String, String> additionalParameters) {

		StringBuilder refreshTokenUrl = new StringBuilder(REFRESH_TOKEN_URL);

		refreshTokenUrl.append("?appid=" + clientId);
		refreshTokenUrl.append("&grant_type=refresh_token");
		refreshTokenUrl.append("&refresh_token=" + refreshToken);

		return getAccessToken(refreshTokenUrl);
	}

	@SuppressWarnings("unchecked")
	private AccessGrant getAccessToken(StringBuilder accessTokenRequestUrl) {

		logger.info("获取access_token, 请求URL: " + accessTokenRequestUrl.toString());

		String response = getRestTemplate().getForObject(accessTokenRequestUrl.toString(), String.class);

		logger.info("获取access_token, 响应内容: "+response);

		Map<String, Object> result = null;
		try {
			result = new ObjectMapper().readValue(response, Map.class);
		} catch (Exception e) {
			e.printStackTrace();
		}

		//返回错误码时直接返回空
		if(StringUtils.isNotBlank(MapUtils.getString(result, "errcode"))){
			String errcode = MapUtils.getString(result, "errcode");
			String errmsg = MapUtils.getString(result, "errmsg");
			throw new RuntimeException("获取access token失败, errcode:"+errcode+", errmsg:"+errmsg);
		}

		WeixinAccessGrant accessToken = new WeixinAccessGrant(
				MapUtils.getString(result, "access_token"),
				MapUtils.getString(result, "scope"),
				MapUtils.getString(result, "refresh_token"),
				MapUtils.getLong(result, "expires_in"));

		accessToken.setOpenId(MapUtils.getString(result, "openid"));

		return accessToken;
	}

	//构建获取授权码的请求。也就是引导用户跳转到微信的地址。
	public String buildAuthenticateUrl(OAuth2Parameters parameters) {
		String url = super.buildAuthenticateUrl(parameters);
		url = url + "&appid=" + clientId + "&scope=snsapi_login";
		return url;
	}

	public String buildAuthorizeUrl(OAuth2Parameters parameters) {
		return buildAuthenticateUrl(parameters);
	}

	//微信返回的contentType是html/text,添加相应的HttpMessageConverter来处理。
	protected RestTemplate createRestTemplate() {
		RestTemplate restTemplate = super.createRestTemplate();
		restTemplate.getMessageConverters().add(new StringHttpMessageConverter(Charset.forName("UTF-8")));
		return restTemplate;
	}

}
WeixinServiceProvider类:
package com.zhqx.security.core.social.weixin.connect;

import org.springframework.social.oauth2.AbstractOAuth2ServiceProvider;

import com.zhqx.security.core.social.weixin.api.Weixin;
import com.zhqx.security.core.social.weixin.api.WeixinImpl;

//微信的OAuth2流程处理器的提供器,供spring social的connect体系调用
public class WeixinServiceProvider extends AbstractOAuth2ServiceProvider<Weixin> {

	//微信获取授权码的url
	private static final String URL_AUTHORIZE = "https://open.weixin.qq.com/connect/qrconnect";
	//微信获取accessToken的url
	private static final String URL_ACCESS_TOKEN = "https://api.weixin.qq.com/sns/oauth2/access_token";

	public WeixinServiceProvider(String appId, String appSecret) {
		super(new WeixinOAuth2Template(appId, appSecret,URL_AUTHORIZE,URL_ACCESS_TOKEN));
	}

	@Override
	public Weixin getApi(String accessToken) {
		return new WeixinImpl(accessToken);
	}

}
WeixinConnectionFactory类:
package com.zhqx.security.core.social.weixin.connect;

import org.springframework.social.connect.ApiAdapter;
import org.springframework.social.connect.Connection;
import org.springframework.social.connect.ConnectionData;
import org.springframework.social.connect.support.OAuth2Connection;
import org.springframework.social.connect.support.OAuth2ConnectionFactory;
import org.springframework.social.oauth2.AccessGrant;
import org.springframework.social.oauth2.OAuth2ServiceProvider;

import com.zhqx.security.core.social.weixin.api.Weixin;

public class WeixinConnectionFactory extends OAuth2ConnectionFactory<Weixin> {

	public WeixinConnectionFactory(String providerId, String appId, String appSecret) {
		super(providerId, new WeixinServiceProvider(appId, appSecret), new WeixinAdapter());
	}

	//由于微信的openId是和accessToken一起返回的,所以在这里直接根据accessToken设置providerUserId即可
	//不用像QQ那样通过QQAdapter来获取
	@Override
	protected String extractProviderUserId(AccessGrant accessGrant) {
		if(accessGrant instanceof WeixinAccessGrant) {
			return ((WeixinAccessGrant)accessGrant).getOpenId();
		}
		return null;
	}

	public Connection<Weixin> createConnection(AccessGrant accessGrant) {
		return new OAuth2Connection<Weixin>(getProviderId(), extractProviderUserId(accessGrant), accessGrant.getAccessToken(),
				accessGrant.getRefreshToken(), accessGrant.getExpireTime(), getOAuth2ServiceProvider(), getApiAdapter(extractProviderUserId(accessGrant)));
	}

	public Connection<Weixin> createConnection(ConnectionData data) {
		return new OAuth2Connection<Weixin>(data, getOAuth2ServiceProvider(), getApiAdapter(data.getProviderUserId()));
	}

	private ApiAdapter<Weixin> getApiAdapter(String providerUserId) {
		return new WeixinAdapter(providerUserId);
	}

	private OAuth2ServiceProvider<Weixin> getOAuth2ServiceProvider() {
		return (OAuth2ServiceProvider<Weixin>) getServiceProvider();
	}

}
4.3.com.zhqx.security.core.social.weixin.config包下的类:
package com.zhqx.security.core.social.weixin.config;

import org.springframework.beans.factory.annotation.Autowired;
import org.springframework.boot.autoconfigure.condition.ConditionalOnProperty;
import org.springframework.context.annotation.Configuration;
import org.springframework.core.env.Environment;
import org.springframework.social.config.annotation.ConnectionFactoryConfigurer;
import org.springframework.social.config.annotation.SocialConfigurerAdapter;
import org.springframework.social.connect.ConnectionFactory;

import com.zhqx.security.core.properties.SecurityProperties;
import com.zhqx.security.core.properties.WeixinProperties;
import com.zhqx.security.core.social.weixin.connect.WeixinConnectionFactory;

@Configuration
@ConditionalOnProperty(prefix = "zhqx.security.social.weixin", name = "appId")
public class WeixinAutoConfiguration extends SocialConfigurerAdapter {

	@Autowired
	private SecurityProperties securityProperties;

	@Override
	public void addConnectionFactories(ConnectionFactoryConfigurer connectionFactoryConfigurer,
			Environment environment) {
		connectionFactoryConfigurer.addConnectionFactory(this.createConnectionFactory());
	}

	protected ConnectionFactory<?> createConnectionFactory() {
		WeixinProperties weixinConfig = securityProperties.getSocial().getWeixin();
		return new WeixinConnectionFactory(weixinConfig.getProviderId(), weixinConfig.getAppId(),
				weixinConfig.getAppSecret());
	}

}
修改zhqx-security-browser项目中的zhqx-security-browser页面,新增微信登录按钮:
<!DOCTYPE html>
<html>
<head>
<meta charset="UTF-8">
<title>登录</title>
</head>
<body>
<h2>标准登录页面</h2>
<h3>表单登录</h3>
<form action="/authentication/form" method="post">
<table>
<tr>
<td>用户名:</td>
<td><input type="text" name="username"></td>
</tr>
<tr>
<td>密码:</td>
<td><input type="password" name="password"></td>
</tr>
<tr>
<td>图形验证码:</td>
<td>
<input type="text" name="imageCode">
<img src="/code/image">
</td>
</tr>
<tr>
<td colspan='2'><input name="remember-me" type="checkbox" value="true" />记住我</td>
</tr>
<tr>
<td colspan="2"><button type="submit">登录</button></td>
</tr>
</table>
</form>
<h3>短信登录</h3>
<form action="/authentication/mobile" method="post">
<table>
<tr>
<td>手机号:</td>
<td><input type="text" name="mobile" value="13012345678"></td>
</tr>
<tr>
<td>短信验证码:</td>
<td>
<input type="text" name="smsCode">
<a href="/code/sms?mobile=13012345678">发送验证码</a>
</td>
</tr>
<tr>
<td colspan="2"><button type="submit">登录</button></td>
</tr>
</table>
</form>
<br>
<h3>社交登录</h3>
<a href="/qqLogin/callback.do">QQ登录</a>
<a href="/qqLogin/weixin">微信登录</a>
</body>
</html>
配置完成后,浏览器访问:http://www.test.com/zhqx-login.html,点击微信登录,跳到扫码登录界面,因为我么之前设置了静默注册,所以此时,扫码后,会直接访问到index界面。
如果注释掉zhqx-security-demo项目中的com.zhqx.security包下的DemoConnectionSignUp。就会恢复到之前手动绑定账号的步骤。
这里与QQ登录不同的是,在微信后台中,配置的回调域只需要写域名就可以了。如:www.test.com
使用SpringSocial实现社交账号的绑定和解绑
1.查询账号是否已经绑定
在zhqx-security-browser项目中src/main/resources/resources目录下新增zhqx-banding.html绑定页面。
<!DOCTYPE html>
<html>
<head>
<meta charset="UTF-8">
<title>登录</title>
</head>
<body>
	<h2>标准绑定页面</h2>
	<form action="/connect/weixin" method="post">
		<button type="submit">绑定微信</button>
	</form>
</body>
</html>
SpringSocial默认的获取社交账号绑定信息的请求路径是http://www.test.com/connect。但是SpringSocial并没有配置视图。
默认的处理控制器是:ConnectController
这里为了方便开发,只返回一些简单的信息即可。在zhqx-security-core项目中的com.zhqx.security.core.social包下新增
ZhqxConnectionStatusView类:
package com.zhqx.security.core.social;

import java.util.HashMap;
import java.util.List;
import java.util.Map;

import javax.servlet.http.HttpServletRequest;
import javax.servlet.http.HttpServletResponse;

import org.apache.commons.collections.CollectionUtils;
import org.springframework.beans.factory.annotation.Autowired;
import org.springframework.social.connect.Connection;
import org.springframework.stereotype.Component;
import org.springframework.web.servlet.view.AbstractView;

import com.fasterxml.jackson.databind.ObjectMapper;

@Component("connect/status")
public class ZhqxConnectionStatusView extends AbstractView {

	@Autowired
	private ObjectMapper objectMapper;

	@Override
	protected void renderMergedOutputModel(Map<String, Object> model, HttpServletRequest request,
			HttpServletResponse response) throws Exception {
		//存放的是不同类型账号具体有哪些信息
		Map<String, List<Connection<?>>> connections = (Map<String, List<Connection<?>>>) model.get("connectionMap");

		Map<String, Boolean> result = new HashMap<>();
		//这里的key相当于
		for (String key : connections.keySet()) {
			result.put(key, CollectionUtils.isNotEmpty(connections.get(key)));
		}

		response.setContentType("application/json;charset=UTF-8");
		response.getWriter().write(objectMapper.writeValueAsString(result));
	}

}
修改完毕后,启动服务,浏览器访问:http://www.test.com/zhqx-login.html,跳转到登录页面,使用正常的用户名和密码登录,这里的用户名我们使用我们之前绑定的微信的昵称作为用户名。
登录成功后,浏览器访问:http://www.test.com/connect,发现返回的结果是404。
这里在Springboot2.x版本中有个坑。因为默认的Springboot启动器已经包含和Social包了,所以并不会自动加载SpringSocialweb包下的控制器ConnectController。
修改zhqx-security-core项目的com.zhqx.security.core.social包下的SocialConfig类。
@Configuration
@EnableSocial
public class SocialConfig extends SocialConfigurerAdapter {
	//只显示修改部分代码--增加ConnectController的初始化

	//https://docs.spring.io/spring-social/docs/1.1.x-SNAPSHOT/reference/htmlsingle/#creating-connections-with-connectcontroller
    @Bean
    public ConnectController connectController(
            ConnectionFactoryLocator connectionFactoryLocator,
            ConnectionRepository connectionRepository) {
        return new ConnectController(connectionFactoryLocator, connectionRepository);
    }
}
修改完之后,启动服务,浏览器访问:浏览器访问:http://www.test.com/zhqx-login.html,跳转到登录页面,使用正常的用户名和密码登录,这里的用户名我们使用我们之前绑定的微信的昵称作为用户名。
登录成功后,浏览器访问:http://www.test.com/connect,发现返回结果如下:
{
weixin: true,
callback.do: false
}
这里表示我们登录的账户绑定了weixin,但是还没有绑定QQ。
2.绑定账户
查看之前zhqx-banding.html页面。请求/connect/weixin,正是ConnectController类中@RequestMapping(value="/{providerId}", method=RequestMethod.GET)提供的方法。
删除数据库中,微信昵称绑定的用户。启动服务,浏览器访问:http://www.test.com/zhqx-login.html,跳转到登录页面,使用正常的用户名和密码登录,假设用户名是bbc吧。
登录成功后,访问:http://www.test.com/zhqx-banding.html。点击绑定微信。此时,页面发生了错误。但是数据库中已经成功绑定了信息。
这是因为,我们还没有配置绑定成功后跳转的页面。
在zhqx-security-core项目中com.zhqx.security.core.social包下新增ZhqxConnectView类
package com.zhqx.security.core.social;

import java.util.Map;

import javax.servlet.http.HttpServletRequest;
import javax.servlet.http.HttpServletResponse;

import org.springframework.web.servlet.view.AbstractView;

public class ZhqxConnectView extends AbstractView {

	@Override
	protected void renderMergedOutputModel(Map<String, Object> model, HttpServletRequest request,
			HttpServletResponse response) throws Exception {

		response.setContentType("text/html;charset=UTF-8");
		response.getWriter().write("<h3>绑定成功</h3>");
	}

}
修改zhqx-security-core项目中com.zhqx.security.core.social.weixin.config包下的WeixinAutoConfiguration类:
@Configuration
@ConditionalOnProperty(prefix = "zhqx.security.social.weixin", name = "appId")
public class WeixinAutoConfiguration extends SocialConfigurerAdapter {

	//只显示修改部分的代码

	// connect/weixinConnected绑定后跳转的视图
	@Bean("connect/weixinConnected")
	//使用者可以通过自定义这个实例,覆盖默认提供的视图
	@ConditionalOnMissingBean(name = "weixinConnectedView")
	public View wexinConnectedView() {
		return new ZhqxConnectView();
	}

}
在com.zhqx.security.core.social包下新增ZhqxConnectView类:
package com.zhqx.security.core.social;

import java.util.Map;

import javax.servlet.http.HttpServletRequest;
import javax.servlet.http.HttpServletResponse;

import org.springframework.web.servlet.view.AbstractView;

public class ZhqxConnectView extends AbstractView {

	@Override
	protected void renderMergedOutputModel(Map<String, Object> model, HttpServletRequest request,
			HttpServletResponse response) throws Exception {
		response.setContentType("text/html;charset=UTF-8");
		response.getWriter().write("<h3>绑定成功</h3>");
	}

}
修改完毕后,再次测试,发现绑定成功后,就可以跳转到绑定成功页面。
3.解绑账户
因为解绑账号,是delete请求。我们修改zhqx-security-browser项目中的zhqx-banding.html页面:
<!DOCTYPE html>
<html>
<head>
<meta charset="UTF-8">
<title>登录</title>
</head>
<body>
	<h2>标准绑定/解绑页面</h2>
	<form action="/connect/weixin" method="post">
		<button type="submit">绑定微信</button>
	</form>
	<br/>
	<form id="deleteForm" action="/connect/weixin" method="post">
		<input type="hidden" name="_method" value="delete"/>
		<button type="submit">解除绑定</button>
	</form>
</body>
</html>
修改zhqx-security-core项目中,com.zhqx.security.core.social.weixin.config包下的WeixinAutoConfiguration类:
@Configuration
@ConditionalOnProperty(prefix = "zhqx.security.social.weixin", name = "appId")
public class WeixinAutoConfiguration extends SocialConfigurerAdapter {

	//只显示修改部分的代码

	// connect/weixinConnected绑定后跳转的视图
	// connect/weixinConnect解绑后跳转的视图
	@Bean({"connect/weixinConnected", "connect/weixinConnect"})
	//使用者可以通过自定义这个实例,覆盖默认提供的视图
	@ConditionalOnMissingBean(name = "weixinConnectedView")
	public View wexinConnectedView() {
		return new ZhqxConnectView();
	}

}
修改com.zhqx.security.core.social包下的ZhqxConnectView类:
public class ZhqxConnectView extends AbstractView {

	@Override
	protected void renderMergedOutputModel(Map<String, Object> model, HttpServletRequest request,
			HttpServletResponse response) throws Exception {
		response.setContentType("text/html;charset=UTF-8");
		//这里是connections
		if (model.get("connections") == null) {//没有connections信息说明是解绑
			response.getWriter().write("<h3>解绑成功</h3>");
		} else {
			response.getWriter().write("<h3>绑定成功</h3>");
		}
	}

}
至此,登录账号绑定或者解绑社交账号就全部完成了。
SpringSecurity–session管理
1、session超时
在zhqx-security-demo项目的application.yml的配置文件
server:
  port: 80
  servlet:
    session:
      timeout: PT1m
      cookie:
        max-age: PT1m
...省略...
这里。有个需要明确的地方,如果只是单独设置timeout属性,过期时间通常是时好时坏的。经常会出现,尽管session时间超时了,没有提示需要登录,仍然可以访问服务的情况。默认最小的是1分钟。
但是大体上是能够正常失效的,但是过期时间最好不要设置太短。。。太短容易不会立即生效。
只有配合设置cookie的最大生效时间,才能让设置的session时间看起来完全生效。即使是10秒种,也能完全生效。实际开发最好不要配cookie的失效,因为cookie是存储在浏览器端的,并不会给服务器带来压力。
当session失效时,我们再次访问服务,页面会提示:
{
content: "访问的服务需要身份认证,请引导用户到登录页"
}
但是在很多时候,我们可能需要更友好的提示,比如告诉用户是因为登录失效了,可以提示让用户重新登录。
修改zhqx-security-browser项目的BrowserSecurityConfig类,增加session失效时,访问的请求,并放行该请求:
@Configuration
public class BrowserSecurityConfig extends AbstractChannelSecurityConfig {

	//只显示修改的部分代码

	@Override
	protected void configure(HttpSecurity http) throws Exception {

		applyPasswordAuthenticationConfig(http);

		http.apply(validateCodeSecurityConfig)
				.and()
			.apply(smsCodeAuthenticationSecurityConfig)
				.and()
			.apply(zhqxSocialSecurityConfig)
				.and()
			.rememberMe()
				.tokenRepository(persistentTokenRepository())
				.tokenValiditySeconds(securityProperties.getBrowser().getRememberMeSeconds())
				.userDetailsService(userDetailsService)
				.and()
			.sessionManagement()
				.invalidSessionUrl("/session/invalid")//session过期后,跳转的url
				.and()
			.authorizeRequests()
				.antMatchers(
					SecurityConstants.DEFAULT_UNAUTHENTICATION_URL,
					SecurityConstants.DEFAULT_LOGIN_PROCESSING_URL_MOBILE,
					securityProperties.getBrowser().getLoginPage(),
					SecurityConstants.DEFAULT_VALIDATE_CODE_URL_PREFIX + "/*",
					"/error", securityProperties.getBrowser().getSignUpUrl(),
					"/user/regist",
					"/session/invalid")
					.permitAll()
				.anyRequest()
				.authenticated()
				.and()
			.csrf().disable();

	}

}
修改zhqx-security-browser项目的BrowserSecurityController类,增加/session/invalid请求处理:
@RestController
public class BrowserSecurityController {

	//只显示修改的代码...

	@GetMapping("/session/invalid")
	@ResponseStatus(code= HttpStatus.UNAUTHORIZED)
	public SimpleResponse sessionInvaild() {
		String message = "session 失效,请重新登录";
		return new SimpleResponse(message);
	}
}
2、用户重复登录时,如何删除之前的登录信息(只允许一个账号登录)
设置最大session数量,且当用户重复登陆时,会有相应的提示或者进一步的操作。
在zhqx-security-browser项目中,新增com.zhqx.security.browser.session包,在该包下新增ZhqxExpiredSessionStrategy类,用来处理session失效时,给与前一个登录何种提示。
package com.zhqx.security.browser.session;

import java.io.IOException;

import javax.servlet.ServletException;

import org.springframework.security.web.session.SessionInformationExpiredEvent;
import org.springframework.security.web.session.SessionInformationExpiredStrategy;

public class ZhqxExpiredSessionStrategy implements SessionInformationExpiredStrategy {

	@Override
	public void onExpiredSessionDetected(SessionInformationExpiredEvent event) throws IOException, ServletException {
		event.getResponse().setContentType("application/json;charset=UTF-8");
		event.getResponse().getWriter().write("并发登录!");
	}

}
修改zhqx-security-browser项目中BrowserSecurityConfig类:
@Configuration
public class BrowserSecurityConfig extends AbstractChannelSecurityConfig {

	//只显示修改的部分代码

	@Override
	protected void configure(HttpSecurity http) throws Exception {

		applyPasswordAuthenticationConfig(http);

		http.apply(validateCodeSecurityConfig)
				.and()
			.apply(smsCodeAuthenticationSecurityConfig)
				.and()
			.apply(zhqxSocialSecurityConfig)
				.and()
			.rememberMe()
				.tokenRepository(persistentTokenRepository())
				.tokenValiditySeconds(securityProperties.getBrowser().getRememberMeSeconds())
				.userDetailsService(userDetailsService)
				.and()
			.sessionManagement()
				.invalidSessionUrl("/session/invalid")//session过期后,跳转的url
				.maximumSessions(1)//只在线1个账户
				.expiredSessionStrategy(new ZhqxExpiredSessionStrategy())//多次登录时,对前一个登录者的提示信息
				.and()
				.and()
			.authorizeRequests()
				.antMatchers(
					SecurityConstants.DEFAULT_UNAUTHENTICATION_URL,
					SecurityConstants.DEFAULT_LOGIN_PROCESSING_URL_MOBILE,
					securityProperties.getBrowser().getLoginPage(),
					SecurityConstants.DEFAULT_VALIDATE_CODE_URL_PREFIX + "/*",
					"/error", securityProperties.getBrowser().getSignUpUrl(),
					"/user/regist",
					"/session/invalid")
					.permitAll()
				.anyRequest()
				.authenticated()
				.and()
			.csrf().disable();

	}

}
由于后面的案例,不需要用到QQ和微信登录,我们可以将host文件中的映射以及服务端口回原来的。
修改完毕后,启动服务:现在谷歌浏览器中访问http://localhost:8080/zhqx-login.html,使用账户名和密码完成登录,随便访问一个
服务例如:http://localhost:8080/user/me。
//为/user/me请求的详细方法,写在zhqx-security-demo项目的com.zhqx.web.controller包下的UserController中。

@GetMapping("/me")
public Object getCurrentUser(@AuthenticationPrincipal UserDetails user,  HttpServletRequest request) {
	HttpSession session = request.getSession();
	int maxInactiveInterval = session.getMaxInactiveInterval();
    System.out.println(maxInactiveInterval);
	return user;
}
页面正常返回当前的用户信息。使用另一个非谷歌浏览器访问:http://localhost:8080/zhqx-login.html,使用相同的账户名和密码登录。
登录完成后,回到谷歌浏览器,刷新。则会正常显示该账号已在别处登录!(注意不要重复刷新)。
3、用户登录后,不允许再次登录
修改zhqx-security-browser项目中BrowserSecurityConfig类,设置登录后,不允许再次登录:
@Configuration
public class BrowserSecurityConfig extends AbstractChannelSecurityConfig {

	//只显示修改的部分代码

	@Override
	protected void configure(HttpSecurity http) throws Exception {

		applyPasswordAuthenticationConfig(http);

		http.apply(validateCodeSecurityConfig)
				.and()
			.apply(smsCodeAuthenticationSecurityConfig)
				.and()
			.apply(zhqxSocialSecurityConfig)
				.and()
			.rememberMe()
				.tokenRepository(persistentTokenRepository())
				.tokenValiditySeconds(securityProperties.getBrowser().getRememberMeSeconds())
				.userDetailsService(userDetailsService)
				.and()
			.sessionManagement()
				.invalidSessionUrl("/session/invalid")//session过期后,跳转的url
				.maximumSessions(1)//只在线1个账户
				.maxSessionsPreventsLogin(true)//阻止再次登录
				.expiredSessionStrategy(new ZhqxExpiredSessionStrategy())//多次登录时,对前一个登录者的提示信息
				.and()
				.and()
			.authorizeRequests()
				.antMatchers(
					SecurityConstants.DEFAULT_UNAUTHENTICATION_URL,
					SecurityConstants.DEFAULT_LOGIN_PROCESSING_URL_MOBILE,
					securityProperties.getBrowser().getLoginPage(),
					SecurityConstants.DEFAULT_VALIDATE_CODE_URL_PREFIX + "/*",
					"/error", securityProperties.getBrowser().getSignUpUrl(),
					"/user/regist",
					"/session/invalid")
					.permitAll()
				.anyRequest()
				.authenticated()
				.and()
			.csrf().disable();

	}

}
修改完毕后,重复上面在不同浏览器中登录,当在第二个浏览器中使用相同用户名和密码登录时,页面会提示如下信息:
{"content":"Maximum sessions of 1 for this principal exceeded"}
重构关于session失效的相关代码。方便不同需求的人使用。
1.修改zhqx-security-core项目com.zhqx.security.core.properties包下的SecurityConstants:
public interface SecurityConstants {

	//只显示新增部分代码,其余代码省略
	//session失效默认的跳转地址
	public static final String DEFAULT_SESSION_INVALID_URL = "/zhqx-session-invalid.html";

}
2.在zhqx-security-core项目com.zhqx.security.core.properties包下,新增SessionProperties
package com.zhqx.security.core.properties;

public class SessionProperties {
	//同一个用户在系统中的最大session数,默认1
	private int maximumSessions = 1;
	//达到最大session时是否阻止新的登录请求,默认为false,不阻止,新的登录会将老的登录失效掉
	private boolean maxSessionsPreventsLogin;
	//session失效时跳转的地址
	private String sessionInvalidUrl = SecurityConstants.DEFAULT_SESSION_INVALID_URL;

	public int getMaximumSessions() {
		return maximumSessions;
	}

	public void setMaximumSessions(int maximumSessions) {
		this.maximumSessions = maximumSessions;
	}

	public boolean isMaxSessionsPreventsLogin() {
		return maxSessionsPreventsLogin;
	}

	public void setMaxSessionsPreventsLogin(boolean maxSessionsPreventsLogin) {
		this.maxSessionsPreventsLogin = maxSessionsPreventsLogin;
	}

	public String getSessionInvalidUrl() {
		return sessionInvalidUrl;
	}

	public void setSessionInvalidUrl(String sessionInvalidUrl) {
		this.sessionInvalidUrl = sessionInvalidUrl;
	}

}
3.修改zhqx-security-core项目com.zhqx.security.core.properties包下的BrowserProperties类。
public class BrowserProperties {
	//只显示新增的部分代码,其余代码省略
	//session配置
	private SessionProperties session = new SessionProperties();

	public SessionProperties getSession() {
		return session;
	}

	public void setSession(SessionProperties session) {
		this.session = session;
	}

}
4.在zhqx-security-browser项目的com.zhqx.security.browser.session包下AbstractSessionStrategy类,以及ZhqxInvalidSessionStrategy类,并修改原来的ZhqxExpiredSessionStrategy类。
即分别对重复登录和session失效登录做处理。
AbstractSessionStrategy类:
package com.zhqx.security.browser.session;

import java.io.IOException;

import javax.servlet.http.HttpServletRequest;
import javax.servlet.http.HttpServletResponse;

import org.apache.commons.lang.StringUtils;
import org.slf4j.Logger;
import org.slf4j.LoggerFactory;
import org.springframework.http.HttpStatus;
import org.springframework.security.web.DefaultRedirectStrategy;
import org.springframework.security.web.RedirectStrategy;
import org.springframework.security.web.util.UrlUtils;
import org.springframework.util.Assert;

import com.fasterxml.jackson.databind.ObjectMapper;
import com.zhqx.security.browser.support.SimpleResponse;

public class AbstractSessionStrategy {

	private final Logger logger = LoggerFactory.getLogger(getClass());

	//跳转的url
	private String destinationUrl;
	//重定向策略
	private RedirectStrategy redirectStrategy = new DefaultRedirectStrategy();
	//跳转前是否创建新的session
	private boolean createNewSession = true;

	private ObjectMapper objectMapper = new ObjectMapper();

	public AbstractSessionStrategy(String invalidSessionUrl) {
		Assert.isTrue(UrlUtils.isValidRedirectUrl(invalidSessionUrl), "url must start with '/' or with 'http(s)'");
		this.destinationUrl = invalidSessionUrl;
	}

	protected void onSessionInvalid(HttpServletRequest request, HttpServletResponse response)
			throws IOException {

		logger.info("session失效");

		if (createNewSession) {
			request.getSession();
		}

		String sourceUrl = request.getRequestURI();
		String targetUrl;

		//如果当前请求是.html请求,session失效时则跳转到默认的html页面
		if (StringUtils.endsWithIgnoreCase(sourceUrl, ".html")) {
			targetUrl = destinationUrl;
			logger.info("跳转到" + targetUrl);
			redirectStrategy.sendRedirect(request, response, targetUrl);
		}else{//如果当前请求不是.html请求,session失效时则返回json信息
			Object result = buildResponseContent(request);
			response.setStatus(HttpStatus.UNAUTHORIZED.value());
			response.setContentType("application/json;charset=UTF-8");
			response.getWriter().write(objectMapper.writeValueAsString(result));
		}

	}

	protected Object buildResponseContent(HttpServletRequest request) {
	    String message = "session已失效";
	    if (isConcurrency()) {
	        message = message + ",有可能是并发登录导致的";
	    }
	    return new SimpleResponse(message);
	}

	//session失效是否是并发导致的
	protected boolean isConcurrency() {
		return false;
	}

	public void setCreateNewSession(boolean createNewSession) {
		this.createNewSession = createNewSession;
	}

}
ZhqxExpiredSessionStrategy类:
package com.zhqx.security.browser.session;

import java.io.IOException;

import javax.servlet.ServletException;

import org.springframework.security.web.session.SessionInformationExpiredEvent;
import org.springframework.security.web.session.SessionInformationExpiredStrategy;

public class ZhqxExpiredSessionStrategy extends AbstractSessionStrategy implements SessionInformationExpiredStrategy {

	public ZhqxExpiredSessionStrategy(String invalidSessionUrl) {
		super(invalidSessionUrl);
	}

	@Override
	public void onExpiredSessionDetected(SessionInformationExpiredEvent event) throws IOException, ServletException {
		onSessionInvalid(event.getRequest(), event.getResponse());
	}

	@Override
	protected boolean isConcurrency() {
		return true;
	}

}
ZhqxInvalidSessionStrategy类:
package com.zhqx.security.browser.session;

import java.io.IOException;

import javax.servlet.ServletException;
import javax.servlet.http.HttpServletRequest;
import javax.servlet.http.HttpServletResponse;

import org.springframework.security.web.session.InvalidSessionStrategy;

public class ZhqxInvalidSessionStrategy extends AbstractSessionStrategy implements InvalidSessionStrategy {

	public ZhqxInvalidSessionStrategy(String invalidSessionUrl) {
		super(invalidSessionUrl);
	}

	@Override
	public void onInvalidSessionDetected(HttpServletRequest request, HttpServletResponse response)
			throws IOException, ServletException {
		onSessionInvalid(request, response);
	}

}
5.在zhqx-security-browser项目中新增BrowserSecurityBeanConfig类:
package com.zhqx.security.browser;

import org.springframework.beans.factory.annotation.Autowired;
import org.springframework.boot.autoconfigure.condition.ConditionalOnMissingBean;
import org.springframework.context.annotation.Bean;
import org.springframework.context.annotation.Configuration;
import org.springframework.security.web.session.InvalidSessionStrategy;
import org.springframework.security.web.session.SessionInformationExpiredStrategy;

import com.zhqx.security.browser.session.ZhqxExpiredSessionStrategy;
import com.zhqx.security.browser.session.ZhqxInvalidSessionStrategy;
import com.zhqx.security.core.properties.SecurityProperties;

//用来检测调用者有没有重写
//session过期和重复登录提示的类
@Configuration
public class BrowserSecurityBeanConfig {

	@Autowired
	private SecurityProperties securityProperties;

	@Bean
	@ConditionalOnMissingBean(InvalidSessionStrategy.class)
	public InvalidSessionStrategy invalidSessionStrategy(){
		return new ZhqxInvalidSessionStrategy(securityProperties.getBrowser().getSession().getSessionInvalidUrl());
	}

	@Bean
	@ConditionalOnMissingBean(SessionInformationExpiredStrategy.class)
	public SessionInformationExpiredStrategy sessionInformationExpiredStrategy(){
		return new ZhqxExpiredSessionStrategy(securityProperties.getBrowser().getSession().getSessionInvalidUrl());
	}

}
6.修改zhqx-security-browser项目中的BrowserSecurityConfig类:
@Configuration
public class BrowserSecurityConfig extends AbstractChannelSecurityConfig {

	//只显示新增部分代码,其余代码省略

	@Autowired
	private SessionInformationExpiredStrategy sessionInformationExpiredStrategy;

	@Autowired
	private InvalidSessionStrategy invalidSessionStrategy;

	@Override
	protected void configure(HttpSecurity http) throws Exception {

		applyPasswordAuthenticationConfig(http);

		http.apply(validateCodeSecurityConfig)
				.and()
			.apply(smsCodeAuthenticationSecurityConfig)
				.and()
			.apply(zhqxSocialSecurityConfig)
				.and()
			.rememberMe()
				.tokenRepository(persistentTokenRepository())
				.tokenValiditySeconds(securityProperties.getBrowser().getRememberMeSeconds())
				.userDetailsService(userDetailsService)
				.and()
			.sessionManagement()
				.invalidSessionStrategy(invalidSessionStrategy)
				.maximumSessions(securityProperties.getBrowser().getSession().getMaximumSessions())
				.maxSessionsPreventsLogin(securityProperties.getBrowser().getSession().isMaxSessionsPreventsLogin())
				.expiredSessionStrategy(sessionInformationExpiredStrategy)
				.and()
				.and()
			.authorizeRequests()
				.antMatchers(
					SecurityConstants.DEFAULT_UNAUTHENTICATION_URL,
					SecurityConstants.DEFAULT_LOGIN_PROCESSING_URL_MOBILE,
					securityProperties.getBrowser().getLoginPage(),
					SecurityConstants.DEFAULT_VALIDATE_CODE_URL_PREFIX + "/*",
					"/error", securityProperties.getBrowser().getSignUpUrl(),
					"/user/regist",
					securityProperties.getBrowser().getSession().getSessionInvalidUrl())
					.permitAll()
				.anyRequest()
				.authenticated()
				.and()
			.csrf().disable();

	}

}
7.在zhqx-security-browser项目的src/main/resources/resources目录下新增zhqx-session-invalid.html页面:
<!DOCTYPE html>
<html>
<head>
<meta charset="UTF-8">
<title>Session失效</title>
</head>
<body>
	<h2>安全模块默认的session失效页面</h2>
	<h3>请通过zhqx.security.browser.session.sessionInvalidUrl配置自己的页面URL</h3>
</body>
</html>
a.全部修改完毕后,将session失效时间设置为2分钟。在谷歌浏览器中访问:http://localhost:8080/zhqx-login.html。
使用正常用户名和密码登录。登录后访问:http://localhost:8080/user/me。
b.2分钟后,再次刷新页面。因为我们访问的请求是非.html结尾的。页面显示如下结果:
{
content: "session已失效"
}
c.浏览器中再次访问:http://localhost:8080/zhqx-login.html。使用正常用户名和密码登录。登录后访问:http://localhost:8080/index.html。
d.2分钟后,再次刷新页面。因为我们访问的请求是.html结尾的。页面显示如下结果:
安全模块默认的session失效页面
请通过zhqx.security.browser.session.sessionInvalidUrl配置自己的页面URL
e.谷歌浏览器中再次访问:http://localhost:8080/zhqx-login.html。使用正常用户名和密码登录。登录后访问:http://localhost:8080/user/me。
f.在另一个浏览器中再次访问:http://localhost:8080/zhqx-login.html。使用相同的用户名和密码登录。回到谷歌浏览器中,刷新页面,
显示如下结果:
{
content: "session已失效,有可能是并发登录导致的"
}
g.谷歌浏览器中再次访问:http://localhost:8080/zhqx-login.html。使用正常用户名和密码登录。登录后访问:http://localhost:8080/index.html。
h.在另一个浏览器中再次访问:http://localhost:8080/zhqx-login.html。使用相同的用户名和密码登录。回到谷歌浏览器中,刷新页面,
显示如下结果:
安全模块默认的session失效页面
请通过zhqx.security.browser.session.sessionInvalidUrl配置自己的页面URL
通过上面步骤的测试,说明我们的Session重构是正常的。在这里,我们可以完成进一步的重构。
修改zhqx-security-core项目中com.zhqx.security.core.properties包下的SecurityConstants类。
public interface SecurityConstants {

	//只显示修改部分代码,其余省略...

	//session失效默认的跳转地址
	public static final String DEFAULT_SESSION_INVALID_URL = "/session/invalid";
}
修改zhqx-security-browser项目中com.zhqx.security.browser.session包下的AbstractSessionStrategy类:
public class AbstractSessionStrategy {
	//只显示修改的代码,其余省略...

	//将原来的protected Object buildResponseContent(HttpServletRequest request)方法删除

	protected void onSessionInvalid(HttpServletRequest request, HttpServletResponse response) throws IOException {

		if (createNewSession) {
			request.getSession();
		}

		String sourceUrl = request.getRequestURI();
		String targetUrl;

		if (StringUtils.endsWithIgnoreCase(sourceUrl, ".html")) {
			targetUrl = destinationUrl+".html";
			logger.info("session失效,跳转到"+targetUrl);
			redirectStrategy.sendRedirect(request, response, targetUrl);
		}else{
			String message = "session已失效";
			if(isConcurrency()){
				message = message + ",有可能是并发登录导致的";
			}
			response.setStatus(HttpStatus.UNAUTHORIZED.value());
			response.setContentType("application/json;charset=UTF-8");
			response.getWriter().write(objectMapper.writeValueAsString(new SimpleResponse(message)));
		}

	}
}
修改zhqx-security-browser项目中BrowserSecurityController类:
//将这个方法删除或者注释掉
//	@GetMapping("/session/invalid")
//	@ResponseStatus(code= HttpStatus.UNAUTHORIZED)
//	public SimpleResponse sessionInvaild() {
//		String message = "session 失效,请重新登录";
//		return new SimpleResponse(message);
//	}
修改zhqx-security-browser项目中BrowserSecurityConfig类:
@Configuration
public class BrowserSecurityConfig extends AbstractChannelSecurityConfig {
	//只显示修改部分代码...其余省略

	@Override
	protected void configure(HttpSecurity http) throws Exception {

		applyPasswordAuthenticationConfig(http);

		http.apply(validateCodeSecurityConfig)
				.and()
			.apply(smsCodeAuthenticationSecurityConfig)
				.and()
			.apply(zhqxSocialSecurityConfig)
				.and()
			.rememberMe()
				.tokenRepository(persistentTokenRepository())
				.tokenValiditySeconds(securityProperties.getBrowser().getRememberMeSeconds())
				.userDetailsService(userDetailsService)
				.and()
			.sessionManagement()
				.invalidSessionStrategy(invalidSessionStrategy)
				.maximumSessions(securityProperties.getBrowser().getSession().getMaximumSessions())
				.maxSessionsPreventsLogin(securityProperties.getBrowser().getSession().isMaxSessionsPreventsLogin())
				.expiredSessionStrategy(sessionInformationExpiredStrategy)
				.and()
				.and()
			.authorizeRequests()
				.antMatchers(
					SecurityConstants.DEFAULT_UNAUTHENTICATION_URL,
					SecurityConstants.DEFAULT_LOGIN_PROCESSING_URL_MOBILE,
					securityProperties.getBrowser().getLoginPage(),
					SecurityConstants.DEFAULT_VALIDATE_CODE_URL_PREFIX + "/*",
					"/error", securityProperties.getBrowser().getSignUpUrl(),
					"/user/regist",
					securityProperties.getBrowser().getSession().getSessionInvalidUrl() + ".html",
					securityProperties.getBrowser().getSession().getSessionInvalidUrl() + ".json")
					.permitAll()
				.anyRequest()
				.authenticated()
				.and()
			.csrf().disable();

	}

}
在zhqx-security-browser项目的src/main/resources/resources目录下新增session文件夹,并将该目录下的zhqx-session-invalid.html页面改名为invalid.html放入session文件夹下。
4、spring-session
这里由于版本的原因[当前springboot版本是2.0.8],需要对项目的pom依赖做修改。在springboot2.x中以及集成了一个spring-session。所以实际上,zhqx-security-browser项目的pom文件中下面的依赖实际上是多余的。
<dependency>
	<groupId>org.springframework.session</groupId>
	<artifactId>spring-session</artifactId>
	<version>1.3.4.RELEASE</version>
</dependency>
如果我们需要使用redis对session进行存储。我们可以重写引入一个新的依赖。zhqx-security-browser项目的pom文件如下:
<project xmlns="http://maven.apache.org/POM/4.0.0"
	xmlns:xsi="http://www.w3.org/2001/XMLSchema-instance"
	xsi:schemaLocation="http://maven.apache.org/POM/4.0.0 https://maven.apache.org/xsd/maven-4.0.0.xsd">
	<modelVersion>4.0.0</modelVersion>
	<artifactId>zhqx-security-browser</artifactId>
	<parent>
		<groupId>com.zhqx.security</groupId>
		<artifactId>zhqx-security</artifactId>
		<version>1.0.0-SNAPSHOT</version>
		<relativePath>../zhqx-security</relativePath>
	</parent>

	<dependencies>
		<dependency>
			<groupId>com.zhqx.security</groupId>
			<artifactId>zhqx-security-core</artifactId>
			<version>${zhqx.security.version}</version>
		</dependency>
		<dependency>
    		<groupId>org.springframework.session</groupId>
    		<artifactId>spring-session-data-redis</artifactId>
		</dependency>
	</dependencies>
</project>
1.将redis服务启动,修改zhqx-security-demo项目中src/main/resources目录下的配置文件application.yml。做如下修改:
#只显示修改部分,其余省略...
spring:
  #session管理
  session:
    store-type: redis
2.启动服务,浏览器访问:http://localhost:8080/zhqx-login.html。发现验证码无法显示,且后台报错:
Failed to serialize object using DefaultSerializer; nested exception is java.lang.IllegalArgumentException: DefaultSerializer requires a Serializable payload but received an object of type [com.zhqx.security.core.validate.code.image.ImageCode]
ImageCode没有实现序列化。放到redis里面的东西,要求可以序列化。这里我们让ImageCode的父类ValidateCode实现Serializable接口。并同时修改ImageCode类
ValidateCode类:
package com.zhqx.security.core.validate.code;

import java.io.Serializable;
import java.time.LocalDateTime;

public class ValidateCode implements Serializable {

	private static final long serialVersionUID = -1424132534902215186L;

	//省略未修改内容。

}
ImageCode类:
package com.zhqx.security.core.validate.code.image;

import java.awt.image.BufferedImage;
import java.time.LocalDateTime;

import com.zhqx.security.core.validate.code.ValidateCode;

public class ImageCode extends ValidateCode {

	private static final long serialVersionUID = 3284653544930812308L;

	//省略未修改内容。
}
在这里我们不仅要求类实现序列化,同时还要求类里的属性实现序列化。可ImageCode类的BufferedImage类是java提供的类,默认并没有实现序列化。
我们要修改放入session的内容,我们之前是将整个ValidateCode放入session的,实际上我们只需要放图片的内容就可以了。
修改zhqx-security-core项目com.zhqx.security.core.validate.code.impl包下的AbstractValidateCodeProcessor类:
public abstract class AbstractValidateCodeProcessor<C extends ValidateCode> implements ValidateCodeProcessor {

	// 只显示修改部分代码...其余省略

	// 保存校验码
	private void save(ServletWebRequest request, C validateCode) {
		//只要图片验证码内容以及过期时间...假如是ImageCode,就避免放入BufferedImage到session里了
		ValidateCode code = new ValidateCode(validateCode.getCode(), validateCode.getExpireTime());
		sessionStrategy.setAttribute(request, getSessionKey(request), code);
	}
}
首先在8080端口启动服务,浏览器访问:http://localhost:8080/zhqx-login.html。用户名和密码登录后,访问:http://localhost:8080/user/me。
再次在8060端口启动服务,浏览器访问:http://localhost:8060/user/me,发现不需要登录,就可以直接显示信息了。
说明我们在redis中保存的session生效了。
退出登录
1.默认退出
修改zhqx-security-demo项目的src/main/resources/resources目录下的index.html
<!DOCTYPE html>
<html>
<head>
<meta charset="UTF-8">
<title>Insert title here</title>
</head>
<body>
	index<br>

	<a href="/logout">退出</a>
</body>
</html>
启动服务,浏览器访问:http://localhost:8080/zhqx-login.html。用户名和密码登录,登陆后访问:http://localhost:8800/index.html。
点击退出后,浏览器地址跳转到:http://localhost:8080/authentication/require?logout。并显示如下内容:
{
content: "访问的服务需要身份认证,请引导用户到登录页"
}
springsecurity默认的退出会进行如下行为:
a.使当前的session失效
b.清楚与当前用户相关的remember-me记录
c.清空当前的SecurityContext
d.重定向到登录页【本案例配置的默认登录地址是/authentication/require】。配置在zhqx-security-core项目com.zhqx.security.core.authentication包下的AbstractChannelSecurityConfig类中。
2.自定义退出
a.自定义退出地址/signout
修改zhqx-security-demo项目的src/main/resources/resources目录下的index.html
<!DOCTYPE html>
<html>
<head>
<meta charset="UTF-8">
<title>Insert title here</title>
</head>
<body>
	index<br>

	<a href="/signout">退出</a>
</body>
</html>
修改zhqx-security-browser项目的BrowserSecurityConfig类:
//只显示修改部分代码,其余省略...

@Override
protected void configure(HttpSecurity http) throws Exception {

	applyPasswordAuthenticationConfig(http);

	http.apply(validateCodeSecurityConfig)
			.and()
		.apply(smsCodeAuthenticationSecurityConfig)
			.and()
		.apply(zhqxSocialSecurityConfig)
			.and()
		.rememberMe()
			.tokenRepository(persistentTokenRepository())
			.tokenValiditySeconds(securityProperties.getBrowser().getRememberMeSeconds())
			.userDetailsService(userDetailsService)
			.and()
		.sessionManagement()
			.invalidSessionStrategy(invalidSessionStrategy)
			.maximumSessions(securityProperties.getBrowser().getSession().getMaximumSessions())
			.maxSessionsPreventsLogin(securityProperties.getBrowser().getSession().isMaxSessionsPreventsLogin())
			.expiredSessionStrategy(sessionInformationExpiredStrategy)
			.and()
			.and()
		.logout()
			.logoutUrl("/signout")//自定义退出登录地址
			.and()
		.authorizeRequests()
			.antMatchers(
				SecurityConstants.DEFAULT_UNAUTHENTICATION_URL,
				SecurityConstants.DEFAULT_LOGIN_PROCESSING_URL_MOBILE,
				securityProperties.getBrowser().getLoginPage(),
				SecurityConstants.DEFAULT_VALIDATE_CODE_URL_PREFIX + "/*",
				"/error", securityProperties.getBrowser().getSignUpUrl(),
				"/user/regist",
				securityProperties.getBrowser().getSession().getSessionInvalidUrl() + ".html",
				securityProperties.getBrowser().getSession().getSessionInvalidUrl() + ".json")
				.permitAll()
			.anyRequest()
			.authenticated()
			.and()
		.csrf().disable();

}
b.自定义退出成功后跳转的地址,在zhqx-security-browser项目的src/main/resources/resources包下新建zhqx-logout.html。
<!DOCTYPE html>
<html>
<head>
<meta charset="UTF-8">
<title>退出</title>
</head>
<body>
	<h2>退出成功</h2>
</body>
</html>
修改zhqx-security-browser项目的BrowserSecurityConfig类:
//只显示修改部分代码,其余省略...

@Override
protected void configure(HttpSecurity http) throws Exception {

	applyPasswordAuthenticationConfig(http);

	http.apply(validateCodeSecurityConfig)
			.and()
		.apply(smsCodeAuthenticationSecurityConfig)
			.and()
		.apply(zhqxSocialSecurityConfig)
			.and()
		.rememberMe()
			.tokenRepository(persistentTokenRepository())
			.tokenValiditySeconds(securityProperties.getBrowser().getRememberMeSeconds())
			.userDetailsService(userDetailsService)
			.and()
		.sessionManagement()
			.invalidSessionStrategy(invalidSessionStrategy)
			.maximumSessions(securityProperties.getBrowser().getSession().getMaximumSessions())
			.maxSessionsPreventsLogin(securityProperties.getBrowser().getSession().isMaxSessionsPreventsLogin())
			.expiredSessionStrategy(sessionInformationExpiredStrategy)
			.and()
			.and()
		.logout()
			.logoutUrl("/signout")//自定义退出登录地址
			.logoutSuccessUrl("zhqx-logout.html")//自定义退出成功跳转地址
			.and()
		.authorizeRequests()
			.antMatchers(
				SecurityConstants.DEFAULT_UNAUTHENTICATION_URL,
				SecurityConstants.DEFAULT_LOGIN_PROCESSING_URL_MOBILE,
				securityProperties.getBrowser().getLoginPage(),
				SecurityConstants.DEFAULT_VALIDATE_CODE_URL_PREFIX + "/*",
				"/error", securityProperties.getBrowser().getSignUpUrl(),
				"/user/regist",
				securityProperties.getBrowser().getSession().getSessionInvalidUrl() + ".html",
				securityProperties.getBrowser().getSession().getSessionInvalidUrl() + ".json")
				.permitAll()
			.anyRequest()
			.authenticated()
			.and()
		.csrf().disable();

}
c.自定义退出成功后,进一步详细处理逻辑。
在zhqx-security-browser项目新增包com.zhqx.security.browser.logout,在包下新增类ZhqxLogoutSuccessHandler。
package com.zhqx.security.browser.logout;

import java.io.IOException;

import javax.servlet.ServletException;
import javax.servlet.http.HttpServletRequest;
import javax.servlet.http.HttpServletResponse;

import org.springframework.security.core.Authentication;
import org.springframework.security.web.authentication.logout.LogoutSuccessHandler;

public class ZhqxLogoutSuccessHandler implements LogoutSuccessHandler {

	@Override
	public void onLogoutSuccess(HttpServletRequest request, HttpServletResponse response, Authentication authentication)
			throws IOException, ServletException {

	}
}
修改zhqx-security-browser项目的BrowserSecurityBeanConfig类。让默认的退出成功处理器可以覆盖,实现调用者可自定义配置。
@Configuration
public class BrowserSecurityBeanConfig {

	//只显示修改的部分代码...其余省略
	@Bean
	@ConditionalOnMissingBean(LogoutSuccessHandler.class)
	public LogoutSuccessHandler logoutSuccessHandler(){
		return new ZhqxLogoutSuccessHandler();
	}

}
d.如果用户配置了退出页面,则退出后跳转到退出页面。如果用户没有配置则返回退出json信息。
修改zhqx-security-core项目中com.zhqx.security.core.properties包下的BrowserProperties类:
package com.zhqx.security.core.properties;

public class BrowserProperties {
	//只显示修改代码,其余省略...

	//默认退出返回页面
	private String signOutUrl;

	public String getSignOutUrl() {
		return signOutUrl;
	}

	public void setSignOutUrl(String signOutUrl) {
		this.signOutUrl = signOutUrl;
	}

}
e.编写ZhqxLogoutSuccessHandler类详细的处理逻辑:
package com.zhqx.security.browser.logout;

import java.io.IOException;

import javax.servlet.ServletException;
import javax.servlet.http.HttpServletRequest;
import javax.servlet.http.HttpServletResponse;

import org.apache.commons.lang.StringUtils;
import org.slf4j.Logger;
import org.slf4j.LoggerFactory;
import org.springframework.security.core.Authentication;
import org.springframework.security.web.authentication.logout.LogoutSuccessHandler;

import com.fasterxml.jackson.databind.ObjectMapper;
import com.zhqx.security.browser.support.SimpleResponse;

public class ZhqxLogoutSuccessHandler implements LogoutSuccessHandler {

	private Logger logger = LoggerFactory.getLogger(getClass());

	private String signOutUrl;

	private ObjectMapper objectMapper = new ObjectMapper();

	//因为SecurityProperties不是用@Componet注解注入的,所以需要传递
	public ZhqxLogoutSuccessHandler(String signOutUrl) {
		this.signOutUrl = signOutUrl;
	}

	@Override
	public void onLogoutSuccess(HttpServletRequest request, HttpServletResponse response, Authentication authentication)
			throws IOException, ServletException {
		logger.info("退出成功");

		if (StringUtils.isBlank(signOutUrl)) {
			response.setContentType("application/json;charset=UTF-8");
			response.getWriter().write(objectMapper.writeValueAsString(new SimpleResponse("退出成功")));
		} else {//配置了退出页面
			response.sendRedirect(signOutUrl);
		}
	}
}
f.对BrowserSecurityBeanConfig类进行修改:
@Configuration
public class BrowserSecurityBeanConfig {

	//只显示修改的部分代码...其余省略
	@Bean
	@ConditionalOnMissingBean(LogoutSuccessHandler.class)
	public LogoutSuccessHandler logoutSuccessHandler(){
		return new ZhqxLogoutSuccessHandler(securityProperties.getBrowser().getSignOutUrl());
	}

}
g.修改zhqx-security-browser项目的com.zhqx.security.browser包下的BrowserSecurityConfig类,添加退出处理器:
@Configuration
public class BrowserSecurityConfig extends AbstractChannelSecurityConfig {

	//只显示修改部分代码,其余代码省略...
	@Autowired
	private LogoutSuccessHandler logoutSuccessHandler;

	@Override
	protected void configure(HttpSecurity http) throws Exception {

		applyPasswordAuthenticationConfig(http);

		http.apply(validateCodeSecurityConfig)
				.and()
			.apply(smsCodeAuthenticationSecurityConfig)
				.and()
			.apply(zhqxSocialSecurityConfig)
				.and()
			.rememberMe()
				.tokenRepository(persistentTokenRepository())
				.tokenValiditySeconds(securityProperties.getBrowser().getRememberMeSeconds())
				.userDetailsService(userDetailsService)
				.and()
			.sessionManagement()
				.invalidSessionStrategy(invalidSessionStrategy)
				.maximumSessions(securityProperties.getBrowser().getSession().getMaximumSessions())
				.maxSessionsPreventsLogin(securityProperties.getBrowser().getSession().isMaxSessionsPreventsLogin())
				.expiredSessionStrategy(sessionInformationExpiredStrategy)
				.and()
				.and()
			.logout()
				.logoutUrl("/signout")//自定义退出登录地址
				.logoutSuccessHandler(logoutSuccessHandler)//与logoutSuccessUrl互斥,只能配置其中一个
				//.logoutSuccessUrl("/zhqx-logout.html")//自定义退出成功跳转地址
				.and()
			.authorizeRequests()
				.antMatchers(
					SecurityConstants.DEFAULT_UNAUTHENTICATION_URL,
					SecurityConstants.DEFAULT_LOGIN_PROCESSING_URL_MOBILE,
					securityProperties.getBrowser().getLoginPage(),
					SecurityConstants.DEFAULT_VALIDATE_CODE_URL_PREFIX + "/*",
					"/error", securityProperties.getBrowser().getSignUpUrl(),
					"/user/regist",
					securityProperties.getBrowser().getSession().getSessionInvalidUrl() + ".html",
					securityProperties.getBrowser().getSession().getSessionInvalidUrl() + ".json")
					.permitAll()
				.anyRequest()
				.authenticated()
				.and()
			.csrf().disable();

	}

}
h.退出后,清除浏览器中session的相关cookie信息。
@Configuration
public class BrowserSecurityConfig extends AbstractChannelSecurityConfig {

	//只显示修改部分代码,其余代码省略...

	@Override
	protected void configure(HttpSecurity http) throws Exception {

		applyPasswordAuthenticationConfig(http);

		http.apply(validateCodeSecurityConfig)
				.and()
			.apply(smsCodeAuthenticationSecurityConfig)
				.and()
			.apply(zhqxSocialSecurityConfig)
				.and()
			.rememberMe()
				.tokenRepository(persistentTokenRepository())
				.tokenValiditySeconds(securityProperties.getBrowser().getRememberMeSeconds())
				.userDetailsService(userDetailsService)
				.and()
			.sessionManagement()
				.invalidSessionStrategy(invalidSessionStrategy)
				.maximumSessions(securityProperties.getBrowser().getSession().getMaximumSessions())
				.maxSessionsPreventsLogin(securityProperties.getBrowser().getSession().isMaxSessionsPreventsLogin())
				.expiredSessionStrategy(sessionInformationExpiredStrategy)
				.and()
				.and()
			.logout()
				.logoutUrl("/signout")//自定义退出登录地址
				.logoutSuccessHandler(logoutSuccessHandler)//与logoutSuccessUrl互斥,只能配置其中一个
				.deleteCookies("JSESSIONID")//删除session相关信息
				//.logoutSuccessUrl("/zhqx-logout.html")//自定义退出成功跳转地址
				.and()
			.authorizeRequests()
				.antMatchers(
					SecurityConstants.DEFAULT_UNAUTHENTICATION_URL,
					SecurityConstants.DEFAULT_LOGIN_PROCESSING_URL_MOBILE,
					securityProperties.getBrowser().getLoginPage(),
					SecurityConstants.DEFAULT_VALIDATE_CODE_URL_PREFIX + "/*",
					"/error", securityProperties.getBrowser().getSignUpUrl(),
					"/user/regist",
					securityProperties.getBrowser().getSession().getSessionInvalidUrl() + ".html",
					securityProperties.getBrowser().getSession().getSessionInvalidUrl() + ".json")
					.permitAll()
				.anyRequest()
				.authenticated()
				.and()
			.csrf().disable();

	}

}
启动服务,浏览器访问:http://localhost:8080/zhqx-login.html。用户名和密码登录,访问:http://localhost:8080/index.html。
点击退出,浏览器显示:
{
content: "退出成功"
}
在zhqx-security-demo项目中配置src/main/resources/resources文件夹下新建demo-logout.html:
<!DOCTYPE html>
<html>
<head>
<meta charset="UTF-8">
<title>退出</title>
</head>
<body>
	<h2>demo退出成功</h2>
</body>
</html>
修改zhqx-security-demo项目中配置文件application.yml新增退出页面的配置:
# 只显示修改部分代码,其余部分省略
zhqx:
  security:
    browser:
#      loginPage: /demo-login.html
#      loginResponseType: REDIRECT
      signUpUrl: /demo-regist.html
      sign-out-url: /demo-logout.html
修改zhqx-security-browser项目的BrowserSecurityConfig类,将退出后显示的页面放行:
@Configuration
public class BrowserSecurityConfig extends AbstractChannelSecurityConfig {
	//只显示修改部分代码,其余省略...

	@Override
	protected void configure(HttpSecurity http) throws Exception {

		applyPasswordAuthenticationConfig(http);

		http.apply(validateCodeSecurityConfig)
				.and()
			.apply(smsCodeAuthenticationSecurityConfig)
				.and()
			.apply(zhqxSocialSecurityConfig)
				.and()
			.rememberMe()
				.tokenRepository(persistentTokenRepository())
				.tokenValiditySeconds(securityProperties.getBrowser().getRememberMeSeconds())
				.userDetailsService(userDetailsService)
				.and()
			.sessionManagement()
				.invalidSessionStrategy(invalidSessionStrategy)
				.maximumSessions(securityProperties.getBrowser().getSession().getMaximumSessions())
				.maxSessionsPreventsLogin(securityProperties.getBrowser().getSession().isMaxSessionsPreventsLogin())
				.expiredSessionStrategy(sessionInformationExpiredStrategy)
				.and()
				.and()
			.logout()
				.logoutUrl("/signout")//自定义退出登录地址
				.logoutSuccessHandler(logoutSuccessHandler)//与logoutSuccessUrl互斥,只能配置其中一个
				.deleteCookies("JSESSIONID")//删除session相关信息
				//.logoutSuccessUrl("/zhqx-logout.html")//自定义退出成功跳转地址
				.and()
			.authorizeRequests()
				.antMatchers(
					SecurityConstants.DEFAULT_UNAUTHENTICATION_URL,
					SecurityConstants.DEFAULT_LOGIN_PROCESSING_URL_MOBILE,
					securityProperties.getBrowser().getLoginPage(),
					SecurityConstants.DEFAULT_VALIDATE_CODE_URL_PREFIX + "/*",
					"/error", securityProperties.getBrowser().getSignUpUrl(),
					"/user/regist",
					securityProperties.getBrowser().getSession().getSessionInvalidUrl() + ".html",
					securityProperties.getBrowser().getSession().getSessionInvalidUrl() + ".json",
					securityProperties.getBrowser().getSignOutUrl())//退出页放行
					.permitAll()
				.anyRequest()
				.authenticated()
				.and()
			.csrf().disable();

	}

}
启动服务,浏览器访问:http://localhost:8080/zhqx-login.html。用户名和密码登录,访问:http://localhost:8080/index.html。
点击退出,浏览器显示:
demo退出成功
说明我们的退出页面配置生效了。
原文链接: https://marshucheng1.github.io/2020/01/04/spring-security-4/