SpringSecurity默认登录验证
在前面案例中,为了方便了解RESTFul的相关知识,我们使用注解,让SpringSecurity不再生效。我们将注解从启动类删除。
//将该注解删除
@EnableAutoConfiguration(exclude = {
	org.springframework.boot.autoconfigure.security.servlet.SecurityAutoConfiguration.class
})

//删除后的启动类
package com.zhqx;

import org.springframework.boot.SpringApplication;
import org.springframework.boot.autoconfigure.SpringBootApplication;
import org.springframework.web.bind.annotation.GetMapping;
import org.springframework.web.bind.annotation.RestController;

import springfox.documentation.swagger2.annotations.EnableSwagger2;

@SpringBootApplication
@RestController
@EnableSwagger2
public class DemoApplication {
	public static void main(String[] args) {
		SpringApplication.run(DemoApplication.class, args);
	}

	@GetMapping("/hello")
	public String hello() {
		return "hello spring security";
	}
}
此时通过浏览器访问:http://localhost:8080/user会自动跳转到一个登录页面,这就是SpringSecurity帮助我们做的安全验证。
默认的用户名是user、控制台中我们可以看到默认密码:
Using generated security password: 43eaed85-917b-4807-9fb7-87a1c6b90c62
在zhqx-security-browser项目中添加默认验证配置类:
package com.zhqx.security.browser;

import org.springframework.context.annotation.Configuration;
import org.springframework.security.config.annotation.web.builders.HttpSecurity;
import org.springframework.security.config.annotation.web.configuration.WebSecurityConfigurerAdapter;

@Configuration
public class BrowserSecurityConfig extends WebSecurityConfigurerAdapter {

	@Override
	protected void configure(HttpSecurity http) throws Exception {
		//http.httpBasic()//指定身份验证为弹出窗口登录
		http.formLogin()//指定身份验证为表单登录
		.and()
		.authorizeRequests()//以下都是授权的配置
		.anyRequest()//任何请求
		.authenticated();//都需要身份验证
	}

}
自定义用户认证逻辑
SpringSecurity默认的用户登录验证是不符合我们要求的。所以我们需要自定义。
1.处理用户信息获取逻辑
正常情况下,我们需要从自己的数据库查找符合情况的用户,而不是Security默认提供的用户名和密码。所以我们需要自定义用户获取逻辑。
在zhqx-security-browser项目中添加新的类:
package com.zhqx.security.browser;

import org.slf4j.Logger;
import org.slf4j.LoggerFactory;
import org.springframework.security.core.authority.AuthorityUtils;
import org.springframework.security.core.userdetails.User;
import org.springframework.security.core.userdetails.UserDetails;
import org.springframework.security.core.userdetails.UserDetailsService;
import org.springframework.security.core.userdetails.UsernameNotFoundException;
import org.springframework.stereotype.Component;

@Component
public class MyUserDetailService implements UserDetailsService {

	private Logger logger = LoggerFactory.getLogger(getClass());

	@Override
	public UserDetails loadUserByUsername(String username) throws UsernameNotFoundException {
		logger.info("登录用户名:" + username);
		//根据用户名查找用户信息
		//这里就是需要从本地数据库查找用户信息了

		//这里参数分别表示用户名,密码,以及授权的权限集合
		return new User(username, "123456", AuthorityUtils.commaSeparatedStringToAuthorityList("admin"));
	}
}
此时启动服务,浏览器访问http://localhost:8080/user会自动跳转到一个登录页面,输入test用户名以及123456密码,这时候会发现控制台报错。
java.lang.IllegalArgumentException: There is no PasswordEncoder mapped for the id "null"
这里,SpringBoot2.x版本抛弃了原来的NoOpPasswordEncoder,要求用户保存的密码必须要使用加密算法后存储,在登录验证的时候Security会将获得的密码在进行编码后再和数据库中加密后的密码进行对比。
为了能够正常进行,我们可以在配置类BrowserSecurityConfig中增加配置,将密码验证换回原来的验证方式:
//将密码加密改为不需要加密的方式,Springboot2.x以前默认为不加密
@Bean
public static PasswordEncoder passwordEncoder() {
	 return NoOpPasswordEncoder.getInstance();
}
2.处理用户信息校验逻辑
在上面的校验中,当我们根据用户名查找用户进行完之后,实际开发过程中,就会要求校验用户信息了。
package com.zhqx.security.browser;

import org.slf4j.Logger;
import org.slf4j.LoggerFactory;
import org.springframework.security.core.authority.AuthorityUtils;
import org.springframework.security.core.userdetails.User;
import org.springframework.security.core.userdetails.UserDetails;
import org.springframework.security.core.userdetails.UserDetailsService;
import org.springframework.security.core.userdetails.UsernameNotFoundException;
import org.springframework.stereotype.Component;

@Component
public class MyUserDetailService implements UserDetailsService {

	private Logger logger = LoggerFactory.getLogger(getClass());

	@Override
	public UserDetails loadUserByUsername(String username) throws UsernameNotFoundException {
		logger.info("登录用户名:" + username);
		//根据用户名查找用户信息
		//这里就是需要从本地数据库查找用户信息了

		//校验用户信息的逻辑,实际开发过程中,我们可以让自己的实体类继承UserDetails.
		//这里4个布尔值,分别表示用户是否可用、账号是否过期、密码是否过期、账号是否锁定
		//默认值为:不可用、已过期、密码已过期、账号已锁定
		User user = new User(username, "123456", true, true, true, true, AuthorityUtils.commaSeparatedStringToAuthorityList("admin"));
		return user;
	}

}
启动服务,修改不同的布尔值,浏览器访问http://localhost:8080/user,可以观察错误提示信息。这里如果最后一个是false,则默认只会返回最后一个错误信息。
3.自定义密码加密解密
在上面的案例中,在Springboot2.x版本中,默认是需要使用密码加密解密的方式来登录验证的。我们的处理是,恢复到2.x之前的版本,默认不加密解密。
所以我们需要自定义密码的加密解密,修改BrowserSecurityConfig配置类:
@Bean
public static PasswordEncoder passwordEncoder() {
	//import org.springframework.security.crypto.bcrypt.BCryptPasswordEncoder;
	//这里用Spring默认实现好的一个加密方式(也可以使用自己的加密方式)
    return new BCryptPasswordEncoder();
}
此时启动服务,浏览器访问http://localhost:8080/user,输入正确的密码123456,仍然提示用户名或密码错误。
这是因为,默认输入的密码123456,会进行加密。而我们从数据库查找出来的密码是写死的123456,所以是匹配不上的。修改MyUserDetailService:
package com.zhqx.security.browser;

import org.slf4j.Logger;
import org.slf4j.LoggerFactory;
import org.springframework.beans.factory.annotation.Autowired;
import org.springframework.security.core.authority.AuthorityUtils;
import org.springframework.security.core.userdetails.User;
import org.springframework.security.core.userdetails.UserDetails;
import org.springframework.security.core.userdetails.UserDetailsService;
import org.springframework.security.core.userdetails.UsernameNotFoundException;
import org.springframework.security.crypto.password.PasswordEncoder;
import org.springframework.stereotype.Component;

@Component
public class MyUserDetailService implements UserDetailsService {

	private Logger logger = LoggerFactory.getLogger(getClass());

	@Autowired
	private PasswordEncoder passwordEncoder;

	@Override
	public UserDetails loadUserByUsername(String username) throws UsernameNotFoundException {
		logger.info("登录用户名:" + username);
		//根据用户名查找用户信息
		//这里就是需要从本地数据库查找用户信息了

		//校验用户信息的逻辑,实际开发过程中,我们可以让自己的实体类继承UserDetails.
		//这里4个布尔值,分别表示用户是否失效、账号是否过期、密码是否过期、账号是否锁定
		//默认值为:不可用、已过期、密码已过期、账号已锁定
		//passwordEncoder.encode("123456")这里需要注意的是,正常情况下,应该是在注册用户时进行的操作
		String password = passwordEncoder.encode("123456");
		User user = new User(username, password, true, true, true, true, AuthorityUtils.commaSeparatedStringToAuthorityList("admin"));
		return user;
	}

}
个性化用户认证流程
在实际开发过程中,我需要使用自己的登录页面,以及自定义登录成功或者失败的处理逻辑。
1.自定义表单登录页面
登录页面在zhqx-security-browser项目的src/main/resources/resources/目录下
在BrowserSecurityConfig配置类中修改:
@Override
protected void configure(HttpSecurity http) throws Exception {
	//http.httpBasic()//指定身份验证为弹出窗口登录
	http.formLogin()//指定身份验证为表单登录
	.loginPage("/zhqx-login.html")//指定登录页面-需要在src/main/resources/resources/目录下新建
	.and()
	.authorizeRequests()//以下都是授权的配置
	.anyRequest()//任何请求
	.authenticated();//都需要身份验证
}
当我们在src/main/resources/resources/目录下添加了登录页面后,启动服务,在浏览器访问http://localhost:8080/user,页面会
出现重定向次数过的的提示。
这是因为,当我们第一次访问时,会转到/zhqx-login.html,但是因为我们后面做的授权是对所有请求都生效,所以/zhqx-login.html也在验证范围内,所以要进一步修改,放行自定义登录页面,如果页面引入静态资源,也要一起放行,否则样式会不正常。
protected void configure(HttpSecurity http) throws Exception {
	//http.httpBasic()//指定身份验证为弹出窗口登录
	http.formLogin()//指定身份验证为表单登录
	.loginPage("/zhqx-login.html")//指定登录页面-需要在src/main/resources/resources/目录下新建
	.and()
	.authorizeRequests()//以下都是授权的配置
	.antMatchers("/zhqx-login.html", "/css/**", "/js/**", "/images/**").permitAll()///zhqx-login.html不做身份验证
	.anyRequest()//任何请求
	.authenticated();//都需要身份验证
}
这里,如果自定义的页面需要引入样式,在src/main/resources/目录下,新建static目录,在static目录中,新增js、css、images等需要引入网页的资源。
在zhqx-login.html页面中,如果想引入静态资源文件,应该使用类似如下方式:
<link type="text/css" rel="stylesheet" href="/css/style.css" />

<script src="/js/jquery-1.8.2.min.js"></script>

<img src="/images/icon1.png" />
于此同时,为了能够正常访问静态资源,需要将页面引入的静态资源同样在antMatchers(需要放行的资源)放行。
自定义页面zhqx-login.html代码(注意用户名和密码的name属性必须是username和password):
<!DOCTYPE html>
<html>
<head>
<meta charset="UTF-8" />
<meta name="renderer" content="webkit" />
<meta name="force-rendering" content="webkit" />
<title></title>
<link type="text/css" rel="stylesheet" href="/css/style.css" />
<script src="/js/jquery-1.8.2.min.js"></script>
<script type="text/javascript">
	$(document).ready(function() {
		var height = $(document).height();
		$('body').css('height', height);
		var mart = height - 500;
		mart = mart / 2;
		$('.loginBox').css('marginTop', mart);
	})
</script>
</head>

<body>
	<div class="loginBox">
		<h1>用户登录</h1>
		<form action="/authentication/form" method="post">
			<div class="item">
				<div class="icon">
					<img src="/images/icon1.png" />
				</div>
				<div class="txt">
					<input name="username" type="text" placeholder="请输入您的用户名" />
				</div>
			</div>
			<div class="item">
				<div class="icon">
					<img src="/images/icon2.png" />
				</div>
				<div class="txt">
					<input name="password" type="password" placeholder="请输入您的密码" />
				</div>
			</div>
			<div class="item">
				<div class="icon">
					<img src="/images/icon3.png" />
				</div>
				<div class="txt">
					<input name="" type="text" placeholder="请输入验证码" />
				</div>
				<div class="yzm">
					<img src="/images/yzm.jpg" />
				</div>
			</div>
			<div class="item_3">
				<input name="" type="submit" value="确定" class="btn" />
			</div>
		</form>
	</div>
</body>
</html>
因为我们学习的内容是如何使用SpringSecurity,所以我们重新定义一个比较简单的登录页面zhqx-login.html:
不需要引入相关静态资源。所以配置类中不需要放行相关静态资源了。
<!DOCTYPE html>
<html>
<head>
<meta charset="UTF-8">
<title>登录</title>
</head>
<body>
	<h2>标准登录页面</h2>
	<h3>表单登录</h3>
	<form action="/authentication/form" method="post">
		<table>
			<tr>
				<td>用户名:</td>
				<td><input type="text" name="username"></td>
			</tr>
			<tr>
				<td>密码:</td>
				<td><input type="password" name="password"></td>
			</tr>
			<tr>
				<td colspan="2"><button type="submit">登录</button></td>
			</tr>
		</table>
	</form>
</body>
</html>
2.自定义表单登录请求
默认的SpringSecurity处理的表单登录请求是/login。在上面的页面中,我们的提交地址是/authentication/form。如何让我们自定义的表单提交请求生效呢。
默认的SpringSecurity表单登录处理请求在UsernamePasswordAuthenticationFilter中,默认的处理逻辑为:
public UsernamePasswordAuthenticationFilter() {
	super(new AntPathRequestMatcher("/login", "POST"));
}
在BrowserSecurityConfig配置类中配置自定义登录请求。
@Override
protected void configure(HttpSecurity http) throws Exception {
	//http.httpBasic()//指定身份验证为弹出窗口登录
	http.formLogin()//指定身份验证为表单登录
	.loginPage("/zhqx-login.html")//指定登录页面-需要在src/main/resources/resources/目录下新建
	.loginProcessingUrl("/authentication/form")//自定义登录表单提交请求
	.and()
	.authorizeRequests()//以下都是授权的配置
	.antMatchers("/zhqx-login.html").permitAll()///zhqx-login.html不做身份验证
	.anyRequest()//任何请求
	.authenticated();//都需要身份验证
}
配置好之后,在浏览器之中访问:http://localhost:8080/user,会跳转到http://localhost:8080/zhqx-login.html我们自定义的登录页面。
输入正确的用户名test,以及密码123456,确定提交我们发现此时浏览器没有出现任何变化,打开控制台,发现http://localhost:8080/authentication/form请求的返回状态码为302。
Springboot2.x之后,SpringSecurity做了一些改动,默认开启了跨站请求防护(CSRF-TOKEN)。而我们此时的请求是没有提供相关TOKEN的,所以访问不通过。
在SpringSecurity5.x之前,访问不通过可以在页面看到错误提示信息!5.X之后,错误提示信息也看不见了。这是因为,如果我们一旦自定义登录验证请求,原来默认的错误处理请求/error也同样被禁用了。
如果我们想显示默认的错误处理页面,我们需要将/error请求放行。
@Override
protected void configure(HttpSecurity http) throws Exception {
	//http.httpBasic()//指定身份验证为弹出窗口登录
	http.formLogin()//指定身份验证为表单登录
	.loginPage("/zhqx-login.html")//指定登录页面-需要在src/main/resources/resources/目录下新建
	.loginProcessingUrl("/authentication/form")//自定义登录表单提交请求
	.and()
	.authorizeRequests()//以下都是授权的配置
	.antMatchers("/zhqx-login.html", "/error").permitAll()///zhqx-login.html不做身份验证
	.anyRequest()//任何请求
	.authenticated();//都需要身份验证
}
在浏览器中再次访问:http://localhost:8080/user,输入正确的用户名和密码,此时虽然不能跳转到正常页面,但是我们可以看到浏览器中出现了错误提示信息,当然具体的错误原因,仍然不知道。
我们只要知道错误是因为我们请求没有添加CSRF-TOKEN所致。所以为了演示,我们需要禁用CSRF。
@Override
protected void configure(HttpSecurity http) throws Exception {
	//http.httpBasic()//指定身份验证为弹出窗口登录
	http.formLogin()//指定身份验证为表单登录
	.loginPage("/zhqx-login.html")//指定登录页面-需要在src/main/resources/resources/目录下新建
	.loginProcessingUrl("/authentication/form")//自定义登录表单提交请求
	.and()
	.authorizeRequests()//以下都是授权的配置
	.antMatchers("/zhqx-login.html", "/error").permitAll()///zhqx-login.html不做身份验证
	.anyRequest()//任何请求
	.authenticated()//都需要身份验证
	.and()
    .csrf().disable();//禁用CSRF验证
}
浏览器中再次访问http://localhost:8080/user。输入正确的用户名和密码,验证通过,跳到用户显示界面。
3.自定义登录验证控制器
上面的例子中,我们自定义了登录页面,但是正常情况下,当访问我们对外提供RESTFul接口服务时,我们需要返回的是json格式数据以及状态码。
我们可以通过自定义登录跳转控制器来实现,在控制器中处理请求,如果是.html结尾的请求,我们就返回登录页面,如果是直接访问接口类型请求,则返回json数据。
在zhqx-security-browser项目中新增一个返回对象SimpleResponse,用来包装处理返回结果。
package com.zhqx.security.browser.support;

public class SimpleResponse {

	public SimpleResponse(Object content){
		this.content = content;
	}

	private Object content;

	public Object getContent() {
		return content;
	}

	public void setContent(Object content) {
		this.content = content;
	}

}
在zhqx-security-browser项目中新增处理控制器BrowserSecurityController:
package com.zhqx.security.browser;

import java.io.IOException;

import javax.servlet.http.HttpServletRequest;
import javax.servlet.http.HttpServletResponse;

import org.apache.commons.lang.StringUtils;
import org.slf4j.Logger;
import org.slf4j.LoggerFactory;
import org.springframework.http.HttpStatus;
import org.springframework.security.web.DefaultRedirectStrategy;
import org.springframework.security.web.RedirectStrategy;
import org.springframework.security.web.savedrequest.HttpSessionRequestCache;
import org.springframework.security.web.savedrequest.RequestCache;
import org.springframework.security.web.savedrequest.SavedRequest;
import org.springframework.web.bind.annotation.RequestMapping;
import org.springframework.web.bind.annotation.ResponseStatus;
import org.springframework.web.bind.annotation.RestController;

import com.zhqx.security.browser.support.SimpleResponse;

@RestController
public class BrowserSecurityController {

	private Logger logger = LoggerFactory.getLogger(getClass());

	//SpringSecurity在做身份验证之前会将引发跳转的请求缓存
	private RequestCache requestCache = new HttpSessionRequestCache();
	//SpringSecurity用来处理请求跳转
	private RedirectStrategy redirectStrategy = new DefaultRedirectStrategy();

	//当需要身份认证时,跳转到这里
	@RequestMapping("/authentication/require")
	@ResponseStatus(code= HttpStatus.UNAUTHORIZED)//返回401状态码-未授权
	public SimpleResponse requireAuthentication(HttpServletRequest request,
			HttpServletResponse response) throws IOException {

		SavedRequest savedRequest = requestCache.getRequest(request, response);

		if (savedRequest != null) {
			String targetUrl = savedRequest.getRedirectUrl();
			logger.info("引发跳转的请求是:" + targetUrl);
			if (StringUtils.endsWithIgnoreCase(targetUrl, ".html")) {
				//这里返回的页面需要由用户自定义,后面会说
				redirectStrategy.sendRedirect(request, response, "");
			}
		}
		//不是html请求,返回处理结果
		return new SimpleResponse("访问的服务需要身份认证,请引导用户到登录页");
	}
}
因为我们处理的请求是/authentication/require,所以需要将BrowserSecurityConfig配置类中的请求改为一致。
@Override
protected void configure(HttpSecurity http) throws Exception {
	//http.httpBasic()//指定身份验证为弹出窗口登录
	http.formLogin()//指定身份验证为表单登录
	.loginPage("/authentication/require")//指定登录处理请求
	.loginProcessingUrl("/authentication/form")//自定义登录表单提交请求
	.and()
	.authorizeRequests()//以下都是授权的配置
	.antMatchers("/authentication/require", "/error").permitAll()//放行的请求
	.anyRequest()//任何请求
	.authenticated()//都需要身份验证
	.and()
    .csrf().disable();//禁用CSRF-TOKEN
}
上面我们说调用者可以自定义处理登录请求的验证方式,那么如何做呢?
自定义登录页面,在zhqx-security-demo项目的配置文件application.yml中新增配置
zhqx:
  security:
    browser:
      loginPage: /demo-login.html
同时,在src/main/resources/resources目录下,新建demo-login.html
<!DOCTYPE html>
<html>
<head>
<meta charset="UTF-8">
<title>登录</title>
</head>
<body>
	<h2>Demo登录页</h2>
</body>
</html>
在zhqx-security-core项目中,新增配置类,用于封装自定义的配置。其中BrowserProperties用来封装相关关于浏览器访问的配置内容。
SecurityProperties用来封装不同分类的配置类。SecurityCoreConfig则是用来让SecurityProperties配置生效。
BrowserProperties代码:
package com.zhqx.security.core.properties;

public class BrowserProperties {

	//默认值表示如果用户没有配置自己登录页面,则使用默认的页面
	private String loginPage = "/zhqx-login.html";

	public String getLoginPage() {
		return loginPage;
	}

	public void setLoginPage(String loginPage) {
		this.loginPage = loginPage;
	}

}
SecurityProperties代码:
package com.zhqx.security.core.properties;

import org.springframework.boot.context.properties.ConfigurationProperties;

//会读取配置文件中所有以zhqx.security开头的配置项
@ConfigurationProperties(prefix = "zhqx.security")
public class SecurityProperties {

	//所有browser配置项的内容,都会读取到BrowserProperties类中
	private BrowserProperties browser = new BrowserProperties();

	public BrowserProperties getBrowser() {
		return browser;
	}

	public void setBrowser(BrowserProperties browser) {
		this.browser = browser;
	}

}
这里@ConfigurationProperties会用黄字提醒,需要在zhqx-security-core项目的pom.xml文件中引入下面依赖:
<dependency>
	<groupId>org.springframework.boot</groupId>
	<artifactId>spring-boot-configuration-processor</artifactId>
	<optional>true</optional>
</dependency>
SecurityCoreConfig代码
package com.zhqx.security.core;

import org.springframework.boot.context.properties.EnableConfigurationProperties;
import org.springframework.context.annotation.Configuration;

import com.zhqx.security.core.properties.SecurityProperties;

//让配置类生效
@Configuration
@EnableConfigurationProperties(SecurityProperties.class)
public class SecurityCoreConfig {

}
修改zhqx-security-browser项目中的BrowserSecurityController类
//只显示新增的部分代码

//引入配置类,读取配置内容
@Autowired
private SecurityProperties securityProperties;

//当需要身份认证时,跳转到这里
@RequestMapping("/authentication/require")
@ResponseStatus(code= HttpStatus.UNAUTHORIZED)//返回401状态码-未授权
public SimpleResponse requireAuthentication(HttpServletRequest request,
		HttpServletResponse response) throws IOException {

	SavedRequest savedRequest = requestCache.getRequest(request, response);

	if (savedRequest != null) {
		String targetUrl = savedRequest.getRedirectUrl();
		logger.info("引发跳转的请求是:" + targetUrl);
		if (StringUtils.endsWithIgnoreCase(targetUrl, ".html")) {//如果请求包含.html后缀
			//这里返回的页面需要由用户自定义,后面会说
			redirectStrategy.sendRedirect(request, response, securityProperties.getBrowser().getLoginPage());
		}
	}
	//不是html请求,返回处理结果
	return new SimpleResponse("访问的服务需要身份认证,请引导用户到登录页");
}
修改BrowserSecurityConfig配置类,将配置的登录页放行
//只显示新增的部分代码

@Autowired
private SecurityProperties securityProperties;

@Override
protected void configure(HttpSecurity http) throws Exception {
	//http.httpBasic()//指定身份验证为弹出窗口登录
	http.formLogin()//指定身份验证为表单登录
	.loginPage("/authentication/require")//指定登录处理请求
	.loginProcessingUrl("/authentication/form")//自定义登录表单提交请求
	.and()
	.authorizeRequests()//以下都是授权的配置
	.antMatchers("/authentication/require", "/error", securityProperties.getBrowser().getLoginPage()).permitAll()//放行的请求
	.anyRequest()//任何请求
	.authenticated()//都需要身份验证
	.and()
    .csrf().disable();//禁用CSRF-TOKEN
}
配置好之后,我们通过浏览器分别访问:http://localhost:8080/user和http://localhost:8080/index.html看到不同的结果。
第一个访问我们看到的是访问的服务需要身份认证,请引导用户到登录页。第二个访问我们看到的是我们在zhqx-security-demo项目中配置的页面demo-login.html。
4.自定义登录成功和登录失败处理
自定义登录成功处理
SpringSecurity默认的登录成功处理接口是AuthenticationSuccessHandler。所以我们自定义类来实现这个接口。
新增登录成功处理类ZhqxAuthenticationSuccessHandler:
package com.zhqx.security.browser.authentication;

import java.io.IOException;

import javax.servlet.ServletException;
import javax.servlet.http.HttpServletRequest;
import javax.servlet.http.HttpServletResponse;

import org.slf4j.Logger;
import org.slf4j.LoggerFactory;
import org.springframework.beans.factory.annotation.Autowired;
import org.springframework.security.core.Authentication;
import org.springframework.security.web.authentication.AuthenticationSuccessHandler;
import org.springframework.stereotype.Component;

import com.fasterxml.jackson.databind.ObjectMapper;

@Component("zhqxAuthenticationSuccessHandler")
public class ZhqxAuthenticationSuccessHandler implements AuthenticationSuccessHandler {

	private Logger logger = LoggerFactory.getLogger(getClass());

	@Autowired
	private ObjectMapper objectMapper;

	//Authentication封装认证信息
	@Override
	public void onAuthenticationSuccess(HttpServletRequest request, HttpServletResponse response,
			Authentication authentication) throws IOException, ServletException {
		logger.info("登录成功");

		//将封装认证信息以json格式返回
		response.setContentType("application/json;charset=UTF-8");
		response.getWriter().write(objectMapper.writeValueAsString(authentication));
	}

}
添加了自定义的处理类之后,还需要在BrowserSecurityConfig配置类中配置登录成功处理类。
//只显示新增部分代码

//这里对象名应该与自定义的登录成功处理类ZhqxAuthenticationSuccessHandler注册的对象名一致
@Autowired
private AuthenticationSuccessHandler zhqxAuthenticationSuccessHandler;

@Override
protected void configure(HttpSecurity http) throws Exception {
	//http.httpBasic()//指定身份验证为弹出窗口登录
	http.formLogin()//指定身份验证为表单登录
	.loginPage("/authentication/require")//指定登录处理请求
	.loginProcessingUrl("/authentication/form")//自定义登录表单提交请求
	.successHandler(zhqxAuthenticationSuccessHandler)//自定义登录成功处理类
	.and()
	.authorizeRequests()//以下都是授权的配置
	.antMatchers("/authentication/require", "/error", securityProperties.getBrowser().getLoginPage()).permitAll()//放行的请求
	.anyRequest()//任何请求
	.authenticated()//都需要身份验证
	.and()
    .csrf().disable();//禁用CSRF-TOKEN
}
启动服务,访问http://localhost:8080/index.html。跳转到登录页面,输入正确的用户名和密码。页面结果如下:
{
authorities: [
{
authority: "admin"
}
],
details: {
remoteAddress: "0:0:0:0:0:0:0:1",
sessionId: "893F133E8BB06F173903AA38AB8AC7C2"
},
authenticated: true,
principal: {
password: null,
username: "test",
authorities: [
{
authority: "admin"
}
],
accountNonExpired: true,
accountNonLocked: true,
credentialsNonExpired: true,
enabled: true
},
credentials: null,
name: "test"
}
这里principal返回的对象实际上就是我们自己封装的用户对象,实际开发过程中,这个用户对象可以继承UserDetails这个类
自定义登录失败处理
新增登录失败处理类ZhqxAuthenctiationFailureHandler
package com.zhqx.security.browser.authentication;

import java.io.IOException;

import javax.servlet.ServletException;
import javax.servlet.http.HttpServletRequest;
import javax.servlet.http.HttpServletResponse;

import org.slf4j.Logger;
import org.slf4j.LoggerFactory;
import org.springframework.beans.factory.annotation.Autowired;
import org.springframework.http.HttpStatus;
import org.springframework.security.core.AuthenticationException;
import org.springframework.security.web.authentication.AuthenticationFailureHandler;
import org.springframework.stereotype.Component;

import com.fasterxml.jackson.databind.ObjectMapper;

@Component("zhqxAuthenticationFailureHandler")
public class ZhqxAuthenticationFailureHandler implements AuthenticationFailureHandler {

	private Logger logger = LoggerFactory.getLogger(getClass());

	@Autowired
	private ObjectMapper objectMapper;

	@Override
	public void onAuthenticationFailure(HttpServletRequest request, HttpServletResponse response,
			AuthenticationException exception) throws IOException, ServletException {
		logger.info("登录失败");

		//将返回状态码设置为500
		response.setStatus(HttpStatus.INTERNAL_SERVER_ERROR.value());
		//将封装异常信息以json格式返回
		response.setContentType("application/json;charset=UTF-8");
		response.getWriter().write(objectMapper.writeValueAsString(exception));

	}

}
在配置类BrowserSecurityConfig中配置自定义登录失败
//只显示新增部分代码

@Autowired
private AuthenticationFailureHandler zhqxAuthenticationFailureHandler;

@Override
protected void configure(HttpSecurity http) throws Exception {
	//http.httpBasic()//指定身份验证为弹出窗口登录
	http.formLogin()//指定身份验证为表单登录
	.loginPage("/authentication/require")//指定登录处理请求
	.loginProcessingUrl("/authentication/form")//自定义登录表单提交请求
	.successHandler(zhqxAuthenticationSuccessHandler)//自定义登录成功处理类
	.failureHandler(zhqxAuthenticationFailureHandler)//自定义登录失败处理类
	.and()
	.authorizeRequests()//以下都是授权的配置
	.antMatchers("/authentication/require", "/error", securityProperties.getBrowser().getLoginPage()).permitAll()//放行的请求
	.anyRequest()//任何请求
	.authenticated()//都需要身份验证
	.and()
    .csrf().disable();//禁用CSRF-TOKEN
}
启动服务,访问http://localhost:8080/index.html。跳转到登录页面,输入错误的密码。页面结果如下:
{
cause: null,
stackTrace: [......],
localizedMessage: "用户名或密码错误",
message: "用户名或密码错误",
suppressed: [ ]
}
通过上面的学习,我们可以自定义登录成功或者失败的处理,但是这种只能返回json的方式并不是人人都需要的,可能有的人就需要在登录失败时,仍然跳转到登录页面,然后显示错误信息。而有人需要在登录成功后,继续访问之前的请求。
5.用户自定义登录失败和成功处理,是返回json还是跳转页面(之前的请求)
在zhqx-security-core中自定义登录枚举LoginResponseType。
package com.zhqx.security.core.properties;

public enum LoginResponseType {
	//跳转
	REDIRECT,
	//json
	JSON
}
在浏览器配置类BrowserProperties中添加登录枚举。
//只显示新增部分代码

//登录请求响应方式,默认为JSON
private LoginResponseType loginResponseType = LoginResponseType.JSON;

public LoginResponseType getLoginResponseType() {
	return loginResponseType;
}

public void setLoginResponseType(LoginResponseType loginResponseType) {
	this.loginResponseType = loginResponseType;
}
重新更改我们的登录成功处理类ZhqxAuthenticationSuccessHandler以及登录失败处理类ZhqxAuthenctiationFailureHandler。
ZhqxAuthenticationSuccessHandler修改为:
package com.zhqx.security.browser.authentication;

import java.io.IOException;

import javax.servlet.ServletException;
import javax.servlet.http.HttpServletRequest;
import javax.servlet.http.HttpServletResponse;

import org.slf4j.Logger;
import org.slf4j.LoggerFactory;
import org.springframework.beans.factory.annotation.Autowired;
import org.springframework.security.core.Authentication;
import org.springframework.security.web.authentication.SavedRequestAwareAuthenticationSuccessHandler;
import org.springframework.stereotype.Component;

import com.fasterxml.jackson.databind.ObjectMapper;
import com.zhqx.security.core.properties.LoginResponseType;
import com.zhqx.security.core.properties.SecurityProperties;

//这里不再是实现AuthenticationSuccessHandler接口,而是继承默认的处理类SavedRequestAwareAuthenticationSuccessHandler
@Component("zhqxAuthenticationSuccessHandler")
public class ZhqxAuthenticationSuccessHandler extends SavedRequestAwareAuthenticationSuccessHandler {

	private Logger logger = LoggerFactory.getLogger(getClass());

	@Autowired
	private ObjectMapper objectMapper;

	@Autowired
	private SecurityProperties securityProperties;

	//Authentication封装认证信息
	@Override
	public void onAuthenticationSuccess(HttpServletRequest request, HttpServletResponse response,
			Authentication authentication) throws IOException, ServletException {
		logger.info("登录成功");

		if (LoginResponseType.JSON.equals(securityProperties.getBrowser().getLoginResponseType())) {
			response.setContentType("application/json;charset=UTF-8");
			response.getWriter().write(objectMapper.writeValueAsString(authentication));
		} else {
			super.onAuthenticationSuccess(request, response, authentication);
		}
	}

}
ZhqxAuthenticationFailureHandler修改为:
package com.zhqx.security.browser.authentication;

import java.io.IOException;

import javax.servlet.ServletException;
import javax.servlet.http.HttpServletRequest;
import javax.servlet.http.HttpServletResponse;

import org.slf4j.Logger;
import org.slf4j.LoggerFactory;
import org.springframework.beans.factory.annotation.Autowired;
import org.springframework.http.HttpStatus;
import org.springframework.security.core.AuthenticationException;
import org.springframework.security.web.authentication.SimpleUrlAuthenticationFailureHandler;
import org.springframework.stereotype.Component;

import com.fasterxml.jackson.databind.ObjectMapper;
import com.zhqx.security.browser.support.SimpleResponse;
import com.zhqx.security.core.properties.LoginResponseType;
import com.zhqx.security.core.properties.SecurityProperties;

//不再实现AuthenticationFailureHandlerk接口,基础默认处理类SimpleUrlAuthenticationFailureHandler
@Component("zhqxAuthenticationFailureHandler")
public class ZhqxAuthenticationFailureHandler extends SimpleUrlAuthenticationFailureHandler {

	private Logger logger = LoggerFactory.getLogger(getClass());

	@Autowired
	private ObjectMapper objectMapper;

	@Autowired
	private SecurityProperties securityProperties;

	@Override
	public void onAuthenticationFailure(HttpServletRequest request, HttpServletResponse response,
			AuthenticationException exception) throws IOException, ServletException {
		logger.info("登录失败");

		if (LoginResponseType.JSON.equals(securityProperties.getBrowser().getLoginResponseType())) {
			//返回状态码设置为500
			response.setStatus(HttpStatus.INTERNAL_SERVER_ERROR.value());
			response.setContentType("application/json;charset=UTF-8");
			response.getWriter().write(objectMapper.writeValueAsString(exception));
		}else{
			super.onAuthenticationFailure(request, response, exception);
		}

	}
}
在zhqx-security-demo项目的src/main/resources/resources目录下,新增一个主页index.html
<!DOCTYPE html>
<html>
<head>
<meta charset="UTF-8">
<title>Insert title here</title>
</head>
<body>
	index
</body>
</html>
启动服务,浏览器访问http://localhost:8080/user,得到的结果是一个json数据。直接访问http://localhost:8080/test.html跳转到登录页面。输入错误的密码或者正确的密码,返回的也都是json格式返回数据。
这是因为我们默认配置的是返回json的数据格式。
在zhqx-security-demo项目的配置文件中新增配置,当请求是.html结尾时,验证通过后,返回请求的.html。
zhqx:
  security:
    browser:
      #loginPage: /demo-login.html
      loginResponseType: REDIRECT
启动服务,浏览器访问http://localhost:8080/index.html,跳转到登录页面,输入错误的密码,则使用Springboot默认的错误提示页面。输入正确的密码,则返回我们添加的index.html。说明配置成功。
测试成功后,将相关配置注释掉,方便观察后面的测试。
#zhqx:
#  security:
#    browser:
#      loginPage: /demo-login.html
#      loginResponseType: REDIRECT
6.添加图片验证码功能-关联SpringSecurity
开发验证码接口,显示验证码
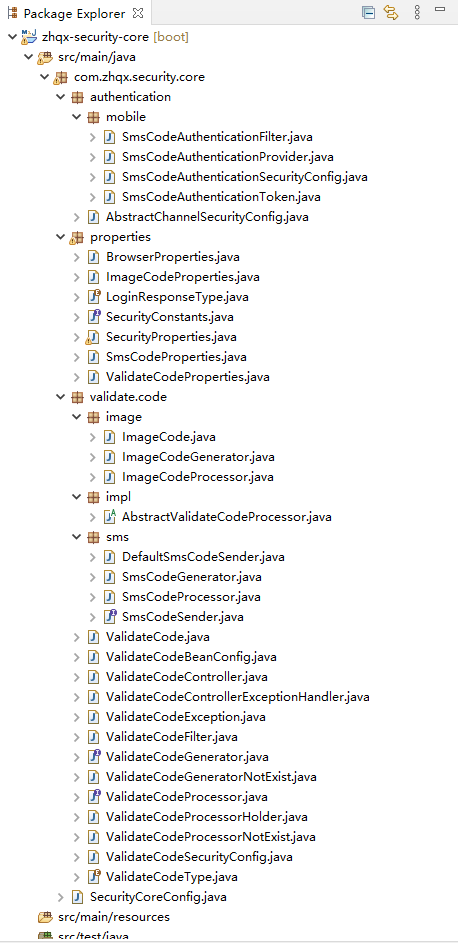
开发生成图形验证码的接口,应该放在zhqx-security-core项目中完成,方便其他使用者也能使用。
增加验证码类ImageCode:
package com.zhqx.security.core.validate.code;

import java.awt.image.BufferedImage;
import java.time.LocalDateTime;

public class ImageCode {
	private BufferedImage image;

	private String code;//验证码

	private LocalDateTime expireTime;//过期时间

	//expireIn当前设置的验证码失效时间(单位秒)
	public ImageCode(BufferedImage image, String code, int expireIn) {
		super();
		this.image = image;
		this.code = code;
		this.expireTime = LocalDateTime.now().plusSeconds(expireIn);
	}

	public ImageCode(BufferedImage image, String code, LocalDateTime expireTime) {
		super();
		this.image = image;
		this.code = code;
		this.expireTime = expireTime;
	}

	//判断验证码是否过期
	public boolean isExpried() {
		//判断当前时间是否大于参数时间,true表示过期,false表示未过期
		return LocalDateTime.now().isAfter(expireTime);
	}

	public BufferedImage getImage() {
		return image;
	}

	public void setImage(BufferedImage image) {
		this.image = image;
	}

	public String getCode() {
		return code;
	}

	public void setCode(String code) {
		this.code = code;
	}

	public LocalDateTime getExpireTime() {
		return expireTime;
	}

	public void setExpireTime(LocalDateTime expireTime) {
		this.expireTime = expireTime;
	}

}
增加验证码获取控制器ValidateCodeController:
package com.zhqx.security.core.validate.code;

import java.awt.Color;
import java.awt.Font;
import java.awt.Graphics;
import java.awt.image.BufferedImage;
import java.io.IOException;
import java.util.Random;

import javax.imageio.ImageIO;
import javax.servlet.http.HttpServletRequest;
import javax.servlet.http.HttpServletResponse;

import org.springframework.social.connect.web.HttpSessionSessionStrategy;
import org.springframework.social.connect.web.SessionStrategy;
import org.springframework.web.bind.annotation.GetMapping;
import org.springframework.web.bind.annotation.RestController;
import org.springframework.web.context.request.ServletWebRequest;

@RestController
public class ValidateCodeController {

	public static final String SESSION_KEY = "SESSION_KEY_IMAGE_CODE";

	private SessionStrategy sessionStrategy = new HttpSessionSessionStrategy();

	@GetMapping("/code/image")
	public void createCode(HttpServletRequest request, HttpServletResponse response) throws IOException {
		ImageCode imageCode = createCode(request);
		//将验证码放到session中
		sessionStrategy.setAttribute(new ServletWebRequest(request), SESSION_KEY, imageCode);
		ImageIO.write(imageCode.getImage(), "JPEG", response.getOutputStream());
	}

	private ImageCode createCode(HttpServletRequest request) {
		//图片的宽高
		int width = 67;
		int height = 23;
		BufferedImage image = new BufferedImage(width, height, BufferedImage.TYPE_INT_RGB);

		Graphics g = image.getGraphics();

		Random random = new Random();

		g.setColor(getRandColor(200, 250));
		g.fillRect(0, 0, width, height);
		g.setFont(new Font("Times New Roman", Font.ITALIC, 20));
		g.setColor(getRandColor(160, 200));
		//干扰线
		for (int i = 0; i < 155; i++) {
			int x = random.nextInt(width);
			int y = random.nextInt(height);
			int xl = random.nextInt(12);
			int yl = random.nextInt(12);
			g.drawLine(x, y, x + xl, y + yl);
		}
		//验证码随机数,4位
		String sRand = "";
		for (int i = 0; i < 4; i++) {
			String rand = String.valueOf(random.nextInt(10));
			sRand += rand;
			g.setColor(new Color(20 + random.nextInt(110), 20 + random.nextInt(110), 20 + random.nextInt(110)));
			g.drawString(rand, 13 * i + 6, 16);
		}

		g.dispose();
		//设置60秒过期
		return new ImageCode(image, sRand, 60);
	}

	//生成随机背景条纹
	private Color getRandColor(int fc, int bc) {
		Random random = new Random();
		if (fc > 255) {
			fc = 255;
		}
		if (bc > 255) {
			bc = 255;
		}
		int r = fc + random.nextInt(bc - fc);
		int g = fc + random.nextInt(bc - fc);
		int b = fc + random.nextInt(bc - fc);
		return new Color(r, g, b);
	}

}
在zhqx-security-browser项目中的默认登录页面zhqx-login.html新增验证码获取:
<!-- 只显示新增的部分代码 -->

<tr>
	<td>图形验证码:</td>
	<td>
		<input type="text" name="imageCode">
		<img src="/code/image">
	</td>
</tr>
在zhqx-security-browser项目的配置类中BrowserSecurityConfig,放行获取验证码的请求/code/image
//只显示新增的部分代码

@Override
protected void configure(HttpSecurity http) throws Exception {
	//http.httpBasic()//指定身份验证为弹出窗口登录
	http.formLogin()//指定身份验证为表单登录
	.loginPage("/authentication/require")//指定登录处理请求
	.loginProcessingUrl("/authentication/form")//自定义登录表单提交请求
	.successHandler(zhqxAuthenticationSuccessHandler)//自定义登录成功处理类
	.failureHandler(zhqxAuthenticationFailureHandler)//自定义登录失败处理类
	.and()
	.authorizeRequests()//以下都是授权的配置
	.antMatchers("/authentication/require", "/error",
			securityProperties.getBrowser().getLoginPage(), "/code/image").permitAll()//放行的请求
	.anyRequest()//任何请求
	.authenticated()//都需要身份验证
	.and()
    .csrf().disable();//禁用CSRF-TOKEN
}
启动服务,访问locahost:8080/test.html跳转到登录页面,可以看到验证码成功显示了。
自定义验证码验证过滤器,添加验证码验证逻辑
自定义验证码验证错误异常ValidateCodeException。方便进行细化判断。
package com.zhqx.security.core.validate.code;

import org.springframework.security.core.AuthenticationException;

//AuthenticationException所以身份验证过程中出现异常的基类
public class ValidateCodeException extends AuthenticationException {

	private static final long serialVersionUID = 1L;

	public ValidateCodeException(String msg) {
		super(msg);
	}
}
自定义验证码过滤器ValidateCodeFilter:
package com.zhqx.security.core.validate.code;

import java.io.IOException;

import javax.servlet.FilterChain;
import javax.servlet.ServletException;
import javax.servlet.http.HttpServletRequest;
import javax.servlet.http.HttpServletResponse;

import org.apache.commons.lang.StringUtils;
import org.springframework.security.web.authentication.AuthenticationFailureHandler;
import org.springframework.social.connect.web.HttpSessionSessionStrategy;
import org.springframework.social.connect.web.SessionStrategy;
import org.springframework.web.bind.ServletRequestBindingException;
import org.springframework.web.bind.ServletRequestUtils;
import org.springframework.web.context.request.ServletWebRequest;
import org.springframework.web.filter.OncePerRequestFilter;

public class ValidateCodeFilter extends OncePerRequestFilter {

	//引入验证失败处理器,当出现异常时,进行处理
	private AuthenticationFailureHandler authenticationFailureHandler;

	//默认操作session工具类
	private SessionStrategy sessionStrategy = new HttpSessionSessionStrategy();

	@Override
	protected void doFilterInternal(HttpServletRequest request, HttpServletResponse response, FilterChain filterChain)
			throws ServletException, IOException {
		//判断是否是提交登录表单的请求
		if (StringUtils.equals("/authentication/form", request.getRequestURI())
				&& StringUtils.equalsIgnoreCase(request.getMethod(), "post")) {
			try {//是登录请求,则开始校验
				validate(new ServletWebRequest(request));
			} catch (ValidateCodeException e) {//这里使用自定义的验证码异常ValidateCodeException,而不是Exception
				//处理异常
				authenticationFailureHandler.onAuthenticationFailure(request, response, e);
			}
		}
		//如果不是登录验证请求,执行后续流程
		filterChain.doFilter(request, response);
	}

	private void validate(ServletWebRequest request) throws ServletRequestBindingException {
		//从session中获取验证码
		ImageCode codeInSession = (ImageCode) sessionStrategy.getAttribute(request, ValidateCodeController.SESSION_KEY);
		//从请求参数中获取验证码
		String codeInRequest = ServletRequestUtils.getStringParameter(request.getRequest(), "imageCode");

		if (StringUtils.isBlank(codeInRequest)) {
			throw new ValidateCodeException("验证码的值不能为空");
		}

		if (codeInSession == null) {
			throw new ValidateCodeException("验证码不存在");
		}

		if (codeInSession.isExpried()) {
			//验证码失效,从sesion中移除
			sessionStrategy.removeAttribute(request, ValidateCodeController.SESSION_KEY);
			throw new ValidateCodeException("验证码已过期");
		}

		if (!StringUtils.equals(codeInSession.getCode(), codeInRequest)) {
			throw new ValidateCodeException("验证码不匹配");
		}
		//验证码通过,从sesion中移除
		sessionStrategy.removeAttribute(request, ValidateCodeController.SESSION_KEY);
	}

	//添加get、set方法,方便将我们自定义的失败处理器赋值
	public AuthenticationFailureHandler getAuthenticationFailureHandler() {
		return authenticationFailureHandler;
	}

	public void setAuthenticationFailureHandler(AuthenticationFailureHandler authenticationFailureHandler) {
		this.authenticationFailureHandler = authenticationFailureHandler;
	}

	public SessionStrategy getSessionStrategy() {
		return sessionStrategy;
	}

	public void setSessionStrategy(SessionStrategy sessionStrategy) {
		this.sessionStrategy = sessionStrategy;
	}
}
将自定义的验证码过滤器添加到整个SpringSecurity验证过滤器流程中,加到UsernamePasswordAuthenticationFilter过滤器之前。
修改zhqx-security-browser项目中的BrowserSecurityConfig配置类:
//只显示修改的部分代码

@Override
protected void configure(HttpSecurity http) throws Exception {
	ValidateCodeFilter validateCodeFilter = new ValidateCodeFilter();
	//将我们自定义的登录失败控制器赋值给验证码过滤器中的验证失败处理控制器
	validateCodeFilter.setAuthenticationFailureHandler(zhqxAuthenctiationFailureHandler);

	//http.httpBasic()//指定身份验证为弹出窗口登录
	//将验证码过滤器添加到UsernamePasswordAuthenticationFilter过滤器之前
	http.addFilterBefore(validateCodeFilter, UsernamePasswordAuthenticationFilter.class)
	.formLogin()//指定身份验证为表单登录
	.loginPage("/authentication/require")//指定登录处理请求
	.loginProcessingUrl("/authentication/form")//自定义登录表单提交请求
	.successHandler(zhqxAuthenticationSuccessHandler)//自定义登录成功处理类
	.failureHandler(zhqxAuthenticationFailureHandler)//自定义登录失败处理类
	.and()
	.authorizeRequests()//以下都是授权的配置
	.antMatchers("/authentication/require", "/error",
			securityProperties.getBrowser().getLoginPage(), "/code/image").permitAll()//放行的请求
	.anyRequest()//任何请求
	.authenticated()//都需要身份验证
	.and()
    .csrf().disable();//禁用CSRF-TOKEN
}
启动服务器。浏览器访问:http://localhost:8080/index.html。输入正确的用户名和密码。不输入验证码,此时,页面有如下类似信息:
{"methodName":"run","fileName":"Thread.java","lineNumber":748,"className":"java.lang.Thread","nativeMethod":fal se}],"localizedMessage":"验证码的值不能为空","message":"验证码的值不能为空","suppressed":[]}{"authorities": [{"authority":"admin"}],"details": {"remoteAddress":"0:0:0:0:0:0:0:1","sessionId":"64DFCC48354A7C12912F7D9FAE2AFAEA"},"authenticated":true,"princi pal":{"password":null,"username":"test","authorities": [{"authority":"admin"}],"accountNonExpired":true,"accountNonLocked":true,"credentialsNonExpired":true,"enabled" :true},"credentials":null,"name":"test"}
这里,我们可以看到验证码为空的验证信息出现了,但是后面的用户信息同样出现了,这并不是我们预期的结果。
这里有2个问题,第一个是错误的提示信息太多,第二个是当验证码不通过时,执行了后续的用户登录校验。
首先修改返回错误信息太多,在zhqx-security-browser项目中自定义的失败处理控制器ZhqxAuthenctiationFailureHandler中修改:
//只显示部分修改代码

@Override
public void onAuthenticationFailure(HttpServletRequest request, HttpServletResponse response,
		AuthenticationException exception) throws IOException, ServletException {
	logger.info("登录失败");

	if (LoginResponseType.JSON.equals(securityProperties.getBrowser().getLoginResponseType())) {
		//返回状态码设置为500
		response.setStatus(HttpStatus.INTERNAL_SERVER_ERROR.value());
		response.setContentType("application/json;charset=UTF-8");
		//只返回错误信息
		response.getWriter().write(objectMapper.writeValueAsString(new SimpleResponse(exception.getMessage())));
	}else{
		super.onAuthenticationFailure(request, response, exception);
	}

}
第二个,验证码验证出现错误时,继续执行后续验证,修改zhqx-security-core项目中的ValidateCodeFilter:
//只显示部分修改代码

@Override
protected void doFilterInternal(HttpServletRequest request, HttpServletResponse response, FilterChain filterChain)
		throws ServletException, IOException {
	//判断是否是提交登录表单的请求
	if (StringUtils.equals("/authentication/form", request.getRequestURI())
			&& StringUtils.equalsIgnoreCase(request.getMethod(), "post")) {
		try {//是登录请求,则开始校验
			validate(new ServletWebRequest(request));
		} catch (ValidateCodeException e) {//这里使用自定义的验证码异常ValidateCodeException,而不是Exception
			//处理异常
			authenticationFailureHandler.onAuthenticationFailure(request, response, e);
			//出现异常时,不再往后执行
			return;
		}
	}
	//验证通过
	filterChain.doFilter(request, response);
}
调整完代码后,我们通过浏览器再次访问:http://localhost:8080/index.html。输入正确的用户名和密码。不输入验证码,此时,页面如下:
{
content: "验证码不存在"
}
输入正确的用户名密码以及正确的验证码之后,页面信息如下:
{
authorities: [
{
authority: "admin"
}
],
details: {
remoteAddress: "0:0:0:0:0:0:0:1",
sessionId: "5EE4E83D6A9A4191D7F31FA54759F2AD"
},
authenticated: true,
principal: {
password: null,
username: "test",
authorities: [
{
authority: "admin"
}
],
accountNonExpired: true,
accountNonLocked: true,
credentialsNonExpired: true,
enabled: true
},
credentials: null,
name: "test"
}
重构验证码代码,方便调用者自定义验证码功能
主要实现三个方面:
1.验证码的基本参数可配置。验证码图片的大小、数字长度等。
2.验证码拦截的接口可配置。不仅仅是登录可以使用验证码,也可以自定义其他请求地址使用验证码。
3.验证码的生成逻辑可配置。可以使用自定义的验证码内容。
1.验证码的基本参数可配置。验证码图片的大小、数字长度等。
在zhqx-security-core项目中定义默认的应用配置。新增配置类ImageCodeProperties。
package com.zhqx.security.core.properties;

public class ImageCodeProperties {

	private int width = 67;

	private int height = 23;

	private int length = 4;

	private int expireIn = 60;

	public int getWidth() {
		return width;
	}

	public void setWidth(int width) {
		this.width = width;
	}

	public int getHeight() {
		return height;
	}

	public void setHeight(int height) {
		this.height = height;
	}

	public int getLength() {
		return length;
	}

	public void setLength(int length) {
		this.length = length;
	}

	public int getExpireIn() {
		return expireIn;
	}

	public void setExpireIn(int expireIn) {
		this.expireIn = expireIn;
	}

}
封装一个能够引入所有验证码的配置类ValidateCodeProperties。并引入图片验证码的配置类。
package com.zhqx.security.core.properties;

public class ValidateCodeProperties {

	private ImageCodeProperties image = new ImageCodeProperties();

	public ImageCodeProperties getImage() {
		return image;
	}

	public void setImage(ImageCodeProperties image) {
		this.image = image;
	}
}
在SecurityProperties全局配置类中,引入验证码配置类。
package com.zhqx.security.core.properties;

import org.springframework.boot.context.properties.ConfigurationProperties;

//会读取配置文件中所有以zhqx.security开头的配置项
@ConfigurationProperties(prefix = "zhqx.security")
public class SecurityProperties {

	//所有browser配置项的内容,都会读取到BrowserProperties类中
	private BrowserProperties browser = new BrowserProperties();
	//所有类型的验证码配置项
	private ValidateCodeProperties code = new ValidateCodeProperties();

	public BrowserProperties getBrowser() {
		return browser;
	}

	public void setBrowser(BrowserProperties browser) {
		this.browser = browser;
	}

	public ValidateCodeProperties getCode() {
		return code;
	}

	public void setCode(ValidateCodeProperties code) {
		this.code = code;
	}

}
在zhqx-security-demo项目中的配置文件中,添加图片验证码长度以及宽度的配置。实现应用项目可以配置的要求。
//只显示修改部分内容。
zhqx:
  security:
#    browser:
#      loginPage: /demo-login.html
#      loginResponseType: REDIRECT
    code:
      image:
        length: 6
		width: 100
在zhqx-security-core项目的ValidateCodeController控制器中,引入全局配置类,进而引入验证码配置。
//只显示新增的部分内容。

@Autowired
private SecurityProperties securityProperties = new SecurityProperties();

@GetMapping("/code/image")
public void createCode(HttpServletRequest request, HttpServletResponse response) throws IOException {
	//将原来的createCode方法名改为generate,并且参数类型改为ServletWebRequest
	ImageCode imageCode = generate(new ServletWebRequest(request));
	//将验证码放到session中
	sessionStrategy.setAttribute(new ServletWebRequest(request), SESSION_KEY, imageCode);
	ImageIO.write(imageCode.getImage(), "JPEG", response.getOutputStream());
}

//这里用ServletWebRequest代替了HttpServletRequest,是为了配合使用ServletRequestUtils工具了提供的方法。
private ImageCode generate(ServletWebRequest request) {
	//图片的宽高-从请求中获取,请求中没有,则使用配置值。
	int width = ServletRequestUtils.getIntParameter(request.getRequest(), "width", securityProperties.getCode().getImage().getWidth());
	int height = ServletRequestUtils.getIntParameter(request.getRequest(), "height", securityProperties.getCode().getImage().getHeight());
	BufferedImage image = new BufferedImage(width, height, BufferedImage.TYPE_INT_RGB);

	Graphics g = image.getGraphics();

	Random random = new Random();

	g.setColor(getRandColor(200, 250));
	g.fillRect(0, 0, width, height);
	g.setFont(new Font("Times New Roman", Font.ITALIC, 20));
	g.setColor(getRandColor(160, 200));
	//干扰线
	for (int i = 0; i < 155; i++) {
		int x = random.nextInt(width);
		int y = random.nextInt(height);
		int xl = random.nextInt(12);
		int yl = random.nextInt(12);
		g.drawLine(x, y, x + xl, y + yl);
	}
	//验证码随机数,4位
	String sRand = "";
	//验证码长度从配置中获取
	for (int i = 0; i < securityProperties.getCode().getImage().getLength(); i++) {
		String rand = String.valueOf(random.nextInt(10));
		sRand += rand;
		g.setColor(new Color(20 + random.nextInt(110), 20 + random.nextInt(110), 20 + random.nextInt(110)));
		g.drawString(rand, 13 * i + 6, 16);
	}

	g.dispose();
	//设置60秒过期-从配置中获取
	return new ImageCode(image, sRand, securityProperties.getCode().getImage().getExpireIn());
}
修改zhqx-security-browser项目中的默认登录页zhqx-login.html:
<!-- 只显示修改的部分内容 -->

<tr>
	<td>图形验证码:</td>
	<td>
		<input type="text" name="imageCode">
		<img src="/code/image?width=200">
	</td>
</tr>
启动服务,浏览器访问:http://localhost:8080/zhqx-login.html。从页面结果我们可以看到:
请求里携带的宽度参数200会覆盖配置的宽度参数100,而配置的验证码长度6会覆盖默认的验证码长度4。说明我们的参数可配置已经实现了。
2.验证码拦截的接口可配置:配置需要验证验证码的请求
在zhqx-security-core项目的ImageCodeProperties配置类中添加参数。
//只显示新增部分代码

//如果有多个请求需要用到图像验证码,可以以 , 隔开
private String url;

public String getUrl() {
	return url;
}

public void setUrl(String url) {
	this.url = url;
}
在zhqx-security-demo项目的配置文件中,配置需要验证码的请求:
//只显示新增部分代码

zhqx:
  security:
#    browser:
#      loginPage: /demo-login.html
#      loginResponseType: REDIRECT
    code:
      image:
        length: 6
        width: 100
        url: /user,/user/*
修改zhqx-security-core项目的验证码过滤器ValidateCodeFilter
package com.zhqx.security.core.validate.code;

import java.io.IOException;
import java.util.HashSet;
import java.util.Set;

import javax.servlet.FilterChain;
import javax.servlet.ServletException;
import javax.servlet.http.HttpServletRequest;
import javax.servlet.http.HttpServletResponse;

import org.apache.commons.lang.StringUtils;
import org.springframework.beans.factory.InitializingBean;
import org.springframework.security.web.authentication.AuthenticationFailureHandler;
import org.springframework.social.connect.web.HttpSessionSessionStrategy;
import org.springframework.social.connect.web.SessionStrategy;
import org.springframework.util.AntPathMatcher;
import org.springframework.web.bind.ServletRequestBindingException;
import org.springframework.web.bind.ServletRequestUtils;
import org.springframework.web.context.request.ServletWebRequest;
import org.springframework.web.filter.OncePerRequestFilter;

import com.zhqx.security.core.properties.SecurityProperties;

//实现InitializingBean接口是为了在其他参数都处理完毕后,初始化我们的url值
public class ValidateCodeFilter extends OncePerRequestFilter implements InitializingBean{

	//引入验证失败处理器,当出现异常时,进行处理
	private AuthenticationFailureHandler authenticationFailureHandler;

	//默认操作session工具类
	private SessionStrategy sessionStrategy = new HttpSessionSessionStrategy();

	//存放所有需要拦截的url,针对图片验证码
	private Set<String> urls = new HashSet<>();

	private SecurityProperties securityProperties;

	private AntPathMatcher pathMatcher = new AntPathMatcher();

	//InitializingBean提供方法
	@Override
	public void afterPropertiesSet() throws ServletException {
		super.afterPropertiesSet();
		//从配置中获取配置的url
		String[] configUrls = StringUtils.splitByWholeSeparatorPreserveAllTokens(securityProperties.getCode().getImage().getUrl(), ",");
		for (String configUrl : configUrls) {
			urls.add(configUrl);
		}
		//登录请求一定需要验证码
		urls.add("/authentication/form");
 	}

	@Override
	protected void doFilterInternal(HttpServletRequest request, HttpServletResponse response, FilterChain filterChain)
			throws ServletException, IOException {
		boolean action = false;

		for (String url : urls) {
			//如果访问的请求,能够与任意一个配置的请求匹配上,则说明需要验证码
			if (pathMatcher.match(url, request.getRequestURI())) {
				action = true;
			}
		}

		//判断是否是需要验证验证码的请求
		if (action) {
			try {//是,则开始校验
				validate(new ServletWebRequest(request));
			} catch (ValidateCodeException e) {//这里使用自定义的验证码异常ValidateCodeException,而不是Exception
				//处理异常
				authenticationFailureHandler.onAuthenticationFailure(request, response, e);
				//出现异常时,不再往后执行
				return;
			}
		}
		//验证通过
		filterChain.doFilter(request, response);
	}

	private void validate(ServletWebRequest request) throws ServletRequestBindingException {
		//从session中获取验证码
		ImageCode codeInSession = (ImageCode) sessionStrategy.getAttribute(request, ValidateCodeController.SESSION_KEY);
		//从请求参数中获取验证码
		String codeInRequest = ServletRequestUtils.getStringParameter(request.getRequest(), "imageCode");

		if (StringUtils.isBlank(codeInRequest)) {
			throw new ValidateCodeException("验证码的值不能为空");
		}

		if (codeInSession == null) {
			throw new ValidateCodeException("验证码不存在");
		}

		if (codeInSession.isExpried()) {
			//验证码失效,从sesion中移除
			sessionStrategy.removeAttribute(request, ValidateCodeController.SESSION_KEY);
			throw new ValidateCodeException("验证码已过期");
		}

		if (!StringUtils.equals(codeInSession.getCode(), codeInRequest)) {
			throw new ValidateCodeException("验证码不匹配");
		}
		//验证码通过,从sesion中移除
		sessionStrategy.removeAttribute(request, ValidateCodeController.SESSION_KEY);
	}

	public AuthenticationFailureHandler getAuthenticationFailureHandler() {
		return authenticationFailureHandler;
	}

	public void setAuthenticationFailureHandler(AuthenticationFailureHandler authenticationFailureHandler) {
		this.authenticationFailureHandler = authenticationFailureHandler;
	}

	public SessionStrategy getSessionStrategy() {
		return sessionStrategy;
	}

	public void setSessionStrategy(SessionStrategy sessionStrategy) {
		this.sessionStrategy = sessionStrategy;
	}

	public Set<String> getUrls() {
		return urls;
	}

	public void setUrls(Set<String> urls) {
		this.urls = urls;
	}

	public SecurityProperties getSecurityProperties() {
		return securityProperties;
	}

	public void setSecurityProperties(SecurityProperties securityProperties) {
		this.securityProperties = securityProperties;
	}

}
修改zhqx-security-browser项目中的配置类BrowserSecurityConfig。
//只显示修改部分代码

@Override
protected void configure(HttpSecurity http) throws Exception {
	ValidateCodeFilter validateCodeFilter = new ValidateCodeFilter();
	//将我们自定义的登录失败控制器赋值给验证码过滤器中的验证失败处理控制器
	validateCodeFilter.setAuthenticationFailureHandler(zhqxAuthenticationFailureHandler);
	//初始化ValidateCodeFilter中的配置类
	validateCodeFilter.setSecurityProperties(securityProperties);
	//调用ValidateCodeFilter的初始化方法
	validateCodeFilter.afterPropertiesSet();

	//http.httpBasic()//指定身份验证为弹出窗口登录
	//将验证码过滤器添加到UsernamePasswordAuthenticationFilter过滤器之前
	http.addFilterBefore(validateCodeFilter, UsernamePasswordAuthenticationFilter.class)
	.formLogin()//指定身份验证为表单登录
	.loginPage("/authentication/require")//指定登录处理请求
	.loginProcessingUrl("/authentication/form")//自定义登录表单提交请求
	.successHandler(zhqxAuthenticationSuccessHandler)//自定义登录成功处理类
	.failureHandler(zhqxAuthenticationFailureHandler)//自定义登录失败处理类
	.and()
	.authorizeRequests()//以下都是授权的配置
	.antMatchers("/authentication/require", "/error",
			securityProperties.getBrowser().getLoginPage(), "/code/image").permitAll()//放行的请求
	.anyRequest()//任何请求
	.authenticated()//都需要身份验证
	.and()
    .csrf().disable();//禁用CSRF-TOKEN
}
启动服务:访问http://localhost:8080/zhqx-login.html,什么都输入,得到的页面结果为:
{
content: "验证码的值不能为空"
}
访问http://localhost:8080/user,页面的返回结果为:
{
content: "验证码的值不能为空"
}
访问http://localhost:8080/user/1,页面的返回结果为:
{
content: "验证码的值不能为空"
}
说明我们配置需要验证码的请求生效了。测试完成后,将需要验证码的请求去掉:
zhqx:
  security:
#    browser:
#      loginPage: /demo-login.html
#      loginResponseType: REDIRECT
    code:
      image:
        length: 6
        width: 100
        url:
3.验证码生成逻辑可配置,自定义自己的验证码生成器
在zhqx-security-core项目中增加验证码生成接口,
package com.zhqx.security.core.validate.code;

import org.springframework.web.context.request.ServletWebRequest;

public interface ValidateCodeGenerator {

	ImageCode generate(ServletWebRequest request);
}
在zhqx-security-core项目中新增验证码接口的实现类,并且将ValidateCodeController控制器中相关关于验证码生成的代码,移入该实现类中:
package com.zhqx.security.core.validate.code;

import java.awt.Color;
import java.awt.Font;
import java.awt.Graphics;
import java.awt.image.BufferedImage;
import java.util.Random;

import org.springframework.beans.factory.annotation.Autowired;
import org.springframework.web.bind.ServletRequestUtils;
import org.springframework.web.context.request.ServletWebRequest;

import com.zhqx.security.core.properties.SecurityProperties;

public class ImageCodeGenerator implements ValidateCodeGenerator {

	@Autowired
	private SecurityProperties securityProperties;

	// 这里用ServletWebRequest代替了HttpServletRequest,是为了配合使用ServletRequestUtils工具了提供的方法。
	public ImageCode generate(ServletWebRequest request) {
		// 图片的宽高-从请求中获取,请求中没有,则使用配置值。
		int width = ServletRequestUtils.getIntParameter(request.getRequest(), "width",
				securityProperties.getCode().getImage().getWidth());
		int height = ServletRequestUtils.getIntParameter(request.getRequest(), "height",
				securityProperties.getCode().getImage().getHeight());
		BufferedImage image = new BufferedImage(width, height, BufferedImage.TYPE_INT_RGB);

		Graphics g = image.getGraphics();

		Random random = new Random();

		g.setColor(getRandColor(200, 250));
		g.fillRect(0, 0, width, height);
		g.setFont(new Font("Times New Roman", Font.ITALIC, 20));
		g.setColor(getRandColor(160, 200));
		// 干扰线
		for (int i = 0; i < 155; i++) {
			int x = random.nextInt(width);
			int y = random.nextInt(height);
			int xl = random.nextInt(12);
			int yl = random.nextInt(12);
			g.drawLine(x, y, x + xl, y + yl);
		}
		// 验证码随机数,4位
		String sRand = "";
		// 验证码长度从配置中获取
		for (int i = 0; i < securityProperties.getCode().getImage().getLength(); i++) {
			String rand = String.valueOf(random.nextInt(10));
			sRand += rand;
			g.setColor(new Color(20 + random.nextInt(110), 20 + random.nextInt(110), 20 + random.nextInt(110)));
			g.drawString(rand, 13 * i + 6, 16);
		}

		g.dispose();
		// 设置60秒过期-从配置中获取
		return new ImageCode(image, sRand, securityProperties.getCode().getImage().getExpireIn());
	}

	// 生成随机背景条纹
	private Color getRandColor(int fc, int bc) {
		Random random = new Random();
		if (fc > 255) {
			fc = 255;
		}
		if (bc > 255) {
			bc = 255;
		}
		int r = fc + random.nextInt(bc - fc);
		int g = fc + random.nextInt(bc - fc);
		int b = fc + random.nextInt(bc - fc);
		return new Color(r, g, b);
	}

	public SecurityProperties getSecurityProperties() {
		return securityProperties;
	}

	public void setSecurityProperties(SecurityProperties securityProperties) {
		this.securityProperties = securityProperties;
	}
}
修改后的ValidateCodeController类为:
package com.zhqx.security.core.validate.code;

import java.io.IOException;

import javax.imageio.ImageIO;
import javax.servlet.http.HttpServletRequest;
import javax.servlet.http.HttpServletResponse;

import org.springframework.beans.factory.annotation.Autowired;
import org.springframework.social.connect.web.HttpSessionSessionStrategy;
import org.springframework.social.connect.web.SessionStrategy;
import org.springframework.web.bind.annotation.GetMapping;
import org.springframework.web.bind.annotation.RestController;
import org.springframework.web.context.request.ServletWebRequest;

@RestController
public class ValidateCodeController {

	public static final String SESSION_KEY = "SESSION_KEY_IMAGE_CODE";

	private SessionStrategy sessionStrategy = new HttpSessionSessionStrategy();

	//引入验证码生成类
	@Autowired
	private ValidateCodeGenerator imageCodeGenerator;

	@GetMapping("/code/image")
	public void createCode(HttpServletRequest request, HttpServletResponse response) throws IOException {
		//将原来的createCode方法名改为generate,并且参数类型改为ServletWebRequest
		ImageCode imageCode = imageCodeGenerator.generate(new ServletWebRequest(request));
		//将验证码放到session中
		sessionStrategy.setAttribute(new ServletWebRequest(request), SESSION_KEY, imageCode);
		ImageIO.write(imageCode.getImage(), "JPEG", response.getOutputStream());
	}

}
启动服务,访问:http://localhost:8080/zhqx-login.html发现验证码仍然可以正常生成
新增验证码配置类ValidateCodeBeanConfig管理和加载我们的:
package com.zhqx.security.core.validate.code;

import org.springframework.beans.factory.annotation.Autowired;
import org.springframework.boot.autoconfigure.condition.ConditionalOnMissingBean;
import org.springframework.context.annotation.Bean;
import org.springframework.context.annotation.Configuration;

import com.zhqx.security.core.properties.SecurityProperties;

@Configuration
public class ValidateCodeBeanConfig {

	@Autowired
	private SecurityProperties securityProperties;

	//@ConditionalOnMissingBean先从Spring容器中寻找是否存在对应的类,
	//如果已经有了imageCodeGenerator对应的类,则不会执行方法体中默认的初始化内容
	//整体功能相当于在ImageCodeGenerator类上加@Component注解,由于是采用配置的方式,所以不能直接使用@Component
	@Bean
	@ConditionalOnMissingBean(name = "imageCodeGenerator")
	public ValidateCodeGenerator imageValidateCodeGenerator() {
		ImageCodeGenerator codeGenerator = new ImageCodeGenerator();
		codeGenerator.setSecurityProperties(securityProperties);
		return codeGenerator;
	}
}
在zhqx-security-demo项目中新增自定义的验证码生成类
package com.zhqx.code;

import org.springframework.stereotype.Component;
import org.springframework.web.context.request.ServletWebRequest;

import com.zhqx.security.core.validate.code.ImageCode;
import com.zhqx.security.core.validate.code.ValidateCodeGenerator;

@Component("imageCodeGenerator")
public class DemoImageCodeGenerator implements ValidateCodeGenerator {

	@Override
	public ImageCode generate(ServletWebRequest request) {
		System.out.println("更高级的图形验证码生成代码");
		return null;
	}

}
启动服务,访问:http://localhost:8080/zhqx-login.html,发现页面验证码不能正常显示.控制台打印了内容:
更高级的图形验证码生成代码.
说明我们已经实现了调用者可以自定义自己的验证码生成器。测试完成后,将自定义的验证码注释掉。
package com.zhqx.code;

import org.springframework.stereotype.Component;
import org.springframework.web.context.request.ServletWebRequest;

import com.zhqx.security.core.validate.code.ImageCode;
import com.zhqx.security.core.validate.code.ValidateCodeGenerator;

//@Component("imageCodeGenerator")
public class DemoImageCodeGenerator implements ValidateCodeGenerator {

	@Override
	public ImageCode generate(ServletWebRequest request) {
		System.out.println("更高级的图形验证码生成代码");
		return null;
	}

}
这里是一个很重要的开发思想:以增量的方式去适应变化.
7.为登录验证增加[记住我]功能
用户在登录一次后,系统会记录用户一段时间,用户在这段时间内再次访问app,不需要再次登录。我们可以使用SpringSecurity提供的记住我功能。
修改zhqx-security-browser项目中的登录页面demo-login.html:增加记住的复选框。
<!DOCTYPE html>
<html>
<head>
<meta charset="UTF-8">
<title>登录</title>
</head>
<body>
	<h2>标准登录页面</h2>
	<h3>表单登录</h3>
	<form action="/authentication/form" method="post">
		<table>
			<tr>
				<td>用户名:</td>
				<td><input type="text" name="username"></td>
			</tr>
			<tr>
				<td>密码:</td>
				<td><input type="password" name="password"></td>
			</tr>
			<tr>
				<td>图形验证码:</td>
				<td>
					<input type="text" name="imageCode">
					<img src="/code/image?width=200">
				</td>
			</tr>
			<tr>
				<!-- 这里name值是固定的remember-me -->
				<td colspan='2'><input name="remember-me" type="checkbox" value="true" />记住我</td>
			</tr>
			<tr>
				<td colspan="2"><button type="submit">登录</button></td>
			</tr>
		</table>
	</form>
</body>
</html>
修改zhqx-security-core项目中的浏览器配置类BrowserProperties,增加保存登录信息的时间。
//只显示新增部分代码

//记住我的时间-秒
private int rememberMeSeconds = 3600;

public int getRememberMeSeconds() {
	return rememberMeSeconds;
}

public void setRememberMeSeconds(int rememberMeSeconds) {
	this.rememberMeSeconds = rememberMeSeconds;
}
修改zhqx-security-browser项目中的配置类BrowserSecurityConfig:
package com.zhqx.security.browser;

import javax.sql.DataSource;

import org.springframework.beans.factory.annotation.Autowired;
import org.springframework.context.annotation.Bean;
import org.springframework.context.annotation.Configuration;
import org.springframework.security.config.annotation.web.builders.HttpSecurity;
import org.springframework.security.config.annotation.web.configuration.WebSecurityConfigurerAdapter;
import org.springframework.security.core.userdetails.UserDetailsService;
import org.springframework.security.crypto.bcrypt.BCryptPasswordEncoder;
import org.springframework.security.crypto.password.PasswordEncoder;
import org.springframework.security.web.authentication.AuthenticationFailureHandler;
import org.springframework.security.web.authentication.AuthenticationSuccessHandler;
import org.springframework.security.web.authentication.UsernamePasswordAuthenticationFilter;
import org.springframework.security.web.authentication.rememberme.JdbcTokenRepositoryImpl;
import org.springframework.security.web.authentication.rememberme.PersistentTokenRepository;

import com.zhqx.security.core.properties.SecurityProperties;
import com.zhqx.security.core.validate.code.ValidateCodeFilter;

@Configuration
public class BrowserSecurityConfig extends WebSecurityConfigurerAdapter {

	@Autowired
	private SecurityProperties securityProperties;

	//这里对象名应该与自定义的登录成功处理类ZhqxAuthenticationSuccessHandler注册的对象名一致
	@Autowired
	private AuthenticationSuccessHandler zhqxAuthenticationSuccessHandler;

	@Autowired
	private AuthenticationFailureHandler zhqxAuthenticationFailureHandler;

	//注入数据源
	@Autowired
	private DataSource dataSource;

	//引入用户验证服务--也就是我们自定义实现的MyUserDetailService
	@Autowired
	private UserDetailsService userDetailsService;

	@Bean
	public static PasswordEncoder passwordEncoder() {
		//import org.springframework.security.crypto.bcrypt.BCryptPasswordEncoder;
		//这里用Spring默认实现好的一个加密方式(也可以使用自己的加密方式)
	    return new BCryptPasswordEncoder();
	}

	//引入SpringSecurity提供的记住我功能,配置token
	@Bean
	public PersistentTokenRepository persistentTokenRepository() {
		JdbcTokenRepositoryImpl tokenRepository = new JdbcTokenRepositoryImpl();
		tokenRepository.setDataSource(dataSource);
		//启动的时候创建存储用户登录信息表
		tokenRepository.setCreateTableOnStartup(true);
		return tokenRepository;
	}

	@Override
	protected void configure(HttpSecurity http) throws Exception {
		ValidateCodeFilter validateCodeFilter = new ValidateCodeFilter();
		//将我们自定义的登录失败控制器赋值给验证码过滤器中的验证失败处理控制器
		validateCodeFilter.setAuthenticationFailureHandler(zhqxAuthenctiationFailureHandler);
		//初始化ValidateCodeFilter中的配置类
		validateCodeFilter.setSecurityProperties(securityProperties);
		//调用ValidateCodeFilter的初始化方法
		validateCodeFilter.afterPropertiesSet();

		//http.httpBasic()//指定身份验证为弹出窗口登录
		//将验证码过滤器添加到UsernamePasswordAuthenticationFilter过滤器之前
		http.addFilterBefore(validateCodeFilter, UsernamePasswordAuthenticationFilter.class)
		.formLogin()//指定身份验证为表单登录
		.loginPage("/authentication/require")//指定登录处理请求
		.loginProcessingUrl("/authentication/form")//自定义登录表单提交请求
		.successHandler(zhqxAuthenticationSuccessHandler)//自定义登录成功处理类
		.failureHandler(zhqxAuthenticationFailureHandler)//自定义登录失败处理类
		.and()
		.rememberMe()//增加记住我功能
		.tokenRepository(persistentTokenRepository())//存储token
		.tokenValiditySeconds(securityProperties.getBrowser().getRememberMeSeconds())//设置失效时间
		.userDetailsService(userDetailsService)
		.and()
		.authorizeRequests()//以下都是授权的配置
		.antMatchers("/authentication/require", "/error",
				securityProperties.getBrowser().getLoginPage(), "/code/image").permitAll()//放行的请求
		.anyRequest()//任何请求
		.authenticated()//都需要身份验证
		.and()
        .csrf().disable();//禁用CSRF-TOKEN
	}

}
启动服务,打开数据库,会发现数据库中多了一张表persistent_logins。里面暂时没有数据。
打开浏览器:访问http://localhost:8080/user,此时因为没有登录,页面返回如下内容:
{
content: "访问的服务需要身份认证,请引导用户到登录页"
}
我们访问:http://localhost:8080/zhqx-login.html登录页面。输入正确的用户名、密码和验证码。并勾选记住我选项。
登录成功后。打开数据库表persistent_logins,会发现多了一条记录。
test UE26/TYu2IfG/TB0nCIGNQ== BAikTS2bxT8lnPTHx2GaWg== 2020-01-03 16:01:46
这说明数据库记录了此次勾选记住我后,产生的token信息。
此后,将服务关闭,再次启动服务,会出现persistent_logins表已经存在的错误,我们在配置类中,将建表的代码注释掉:
//引入SpringSecurity提供的记住我功能,配置token
@Bean
public PersistentTokenRepository persistentTokenRepository() {
	JdbcTokenRepositoryImpl tokenRepository = new JdbcTokenRepositoryImpl();
	tokenRepository.setDataSource(dataSource);
	//启动的时候创建存储用户登录信息表
	//tokenRepository.setCreateTableOnStartup(true);
	return tokenRepository;
}
再次启动服务,访问:http://localhost:8080/user,发现此时不需要登录验证,也能正常访问。说明我们成功添加了记住我功能。
8.短信验证码登录
1.开发短信验证码接口:
在zhqx-security-core项目中增加短信验证码实体类:
package com.zhqx.security.core.validate.code;

import java.time.LocalDateTime;

public class ValidateCode {

	private String code;//验证码

	private LocalDateTime expireTime;//过期时间

	//expireIn当前设置的验证码失效时间(单位秒)
	public ValidateCode(String code, int expireIn) {
		super();
		this.code = code;
		this.expireTime = LocalDateTime.now().plusSeconds(expireIn);
	}

	public ValidateCode(String code, LocalDateTime expireTime) {
		super();
		this.code = code;
		this.expireTime = expireTime;
	}

	//判断验证码是否过期
	public boolean isExpried() {
		//判断当前时间是否大于参数时间,true表示过期,false表示未过期
		return LocalDateTime.now().isAfter(expireTime);
	}

	public String getCode() {
		return code;
	}

	public void setCode(String code) {
		this.code = code;
	}

	public LocalDateTime getExpireTime() {
		return expireTime;
	}

	public void setExpireTime(LocalDateTime expireTime) {
		this.expireTime = expireTime;
	}

}
从实体类中可以看到,我们的ValidateCode与我们的ImageCode只差一个属性,所以我们可以让ImageCode继承ValidateCode
package com.zhqx.security.core.validate.code;

import java.awt.image.BufferedImage;
import java.time.LocalDateTime;

public class ImageCode extends ValidateCode {

	private BufferedImage image;

	public ImageCode(BufferedImage image, String code, int expireIn) {
		super(code, expireIn);
		this.image = image;
	}

	public ImageCode(BufferedImage image, String code, LocalDateTime expireTime) {
		super(code, expireTime);
		this.image = image;
	}

	public BufferedImage getImage() {
		return image;
	}

	public void setImage(BufferedImage image) {
		this.image = image;
	}
}
同时,我们需要修改验证码生成接口ValidateCodeGenerator:
package com.zhqx.security.core.validate.code;

import org.springframework.web.context.request.ServletWebRequest;

public interface ValidateCodeGenerator {

	ValidateCode generate(ServletWebRequest request);
}
封装短信验证码发送的接口:
package com.zhqx.security.core.validate.code.sms;

public interface SmsCodeSender {
	void send(String mobile, String code);
}
定义一个默认的短信发送实现:
package com.zhqx.security.core.validate.code.sms;

public class DefaultSmsCodeSender implements SmsCodeSender {

	@Override
	public void send(String mobile, String code) {
		System.out.println("向手机" + mobile + "发送短信验证码" + code);
	}
}
在验证码配置类ValidateCodeBeanConfig中,配置默认短信发送实现:
package com.zhqx.security.core.validate.code;

import org.springframework.beans.factory.annotation.Autowired;
import org.springframework.boot.autoconfigure.condition.ConditionalOnMissingBean;
import org.springframework.context.annotation.Bean;
import org.springframework.context.annotation.Configuration;

import com.zhqx.security.core.properties.SecurityProperties;
import com.zhqx.security.core.validate.code.sms.DefaultSmsCodeSender;
import com.zhqx.security.core.validate.code.sms.SmsCodeSender;

@Configuration
public class ValidateCodeBeanConfig {

	@Autowired
	private SecurityProperties securityProperties;

	//@ConditionalOnMissingBean先从Spring容器中寻找是否存在对应的类,
	//如果已经有了imageCodeGenerator对应的类,则不会执行方法体中默认的初始化内容
	//整体功能相当于在ImageCodeGenerator类上加@Component注解,由于是采用配置的方式,所以不能直接使用@Component
	@Bean
	@ConditionalOnMissingBean(name = "imageCodeGenerator")
	public ValidateCodeGenerator imageValidateCodeGenerator() {
		ImageCodeGenerator codeGenerator = new ImageCodeGenerator();
		codeGenerator.setSecurityProperties(securityProperties);
		return codeGenerator;
	}
	//找到SmsCodeSender接口的实现,则不会执行方法体
	@Bean
	@ConditionalOnMissingBean(SmsCodeSender.class)
	public SmsCodeSender smsCodeSender() {
		return new DefaultSmsCodeSender();
	}
}
修改验证码控制器ValidateCodeController,增加短信验证码发送实现。
package com.zhqx.security.core.validate.code;

import java.io.IOException;

import javax.imageio.ImageIO;
import javax.servlet.http.HttpServletRequest;
import javax.servlet.http.HttpServletResponse;

import org.springframework.beans.factory.annotation.Autowired;
import org.springframework.social.connect.web.HttpSessionSessionStrategy;
import org.springframework.social.connect.web.SessionStrategy;
import org.springframework.web.bind.ServletRequestBindingException;
import org.springframework.web.bind.ServletRequestUtils;
import org.springframework.web.bind.annotation.GetMapping;
import org.springframework.web.bind.annotation.RestController;
import org.springframework.web.context.request.ServletWebRequest;

import com.zhqx.security.core.validate.code.sms.SmsCodeSender;

@RestController
public class ValidateCodeController {

	public static final String SESSION_KEY = "SESSION_KEY_IMAGE_CODE";

	private SessionStrategy sessionStrategy = new HttpSessionSessionStrategy();

	//引入图片验证码生成类
	@Autowired
	private ValidateCodeGenerator imageCodeGenerator;

	//引入短信验证码生成类
	@Autowired
	private ValidateCodeGenerator smsCodeGenerator;

	@Autowired
	private SmsCodeSender smsCodeSender;

	@GetMapping("/code/image")
	public void createCode(HttpServletRequest request, HttpServletResponse response) throws IOException {
		//将原来的createCode方法名改为generate,并且参数类型改为ServletWebRequest
		ImageCode imageCode = (ImageCode) imageCodeGenerator.generate(new ServletWebRequest(request));
		//将验证码放到session中
		sessionStrategy.setAttribute(new ServletWebRequest(request), SESSION_KEY, imageCode);
		ImageIO.write(imageCode.getImage(), "JPEG", response.getOutputStream());
	}

	@GetMapping("/code/sms")
	public void createSmsCode(HttpServletRequest request, HttpServletResponse response) throws IOException, ServletRequestBindingException {
		ValidateCode smsCode = smsCodeGenerator.generate(new ServletWebRequest(request));
		//将验证码放到session中
		sessionStrategy.setAttribute(new ServletWebRequest(request), SESSION_KEY, smsCode);
		//从请求参数中获取手机,且请求参数必须包含mobile参数
		String mobile = ServletRequestUtils.getRequiredStringParameter(request, "mobile");
		//发送验证码到手机
		smsCodeSender.send(mobile, smsCode.getCode());
	}

}
修改zhqx-security-browser项目中的默认登录页zhqx-login.html,增加短信登录。
<!DOCTYPE html>
<html>
<head>
<meta charset="UTF-8">
<title>登录</title>
</head>
<body>
	<h2>标准登录页面</h2>
	<h3>表单登录</h3>
	<form action="/authentication/form" method="post">
		<table>
			<tr>
				<td>用户名:</td>
				<td><input type="text" name="username"></td>
			</tr>
			<tr>
				<td>密码:</td>
				<td><input type="password" name="password"></td>
			</tr>
			<tr>
				<td>图形验证码:</td>
				<td>
					<input type="text" name="imageCode">
					<img src="/code/image?width=200">
				</td>
			</tr>
			<tr>
				<td colspan='2'><input name="remember-me" type="checkbox" value="true" />记住我</td>
			</tr>
			<tr>
				<td colspan="2"><button type="submit">登录</button></td>
			</tr>
		</table>
	</form>

	<h3>短信登录</h3>
	<form action="/authentication/mobile" method="post">
		<table>
			<tr>
				<td>手机号:</td>
				<td><input type="text" name="mobile" value="13012345678"></td>
			</tr>
			<tr>
				<td>短信验证码:</td>
				<td>
					<input type="text" name="smsCode">
					<a href="/code/sms?mobile=13012345678">发送验证码</a>
				</td>
			</tr>
			<tr>
				<td colspan="2"><button type="submit">登录</button></td>
			</tr>
		</table>
	</form>
</body>
</html>
增加短信验证码配置类:
package com.zhqx.security.core.properties;

public class SmsCodeProperties {

	private int length = 6;

	private int expireIn = 60;

	//如果有多个请求需要用到短信验证码,可以以 , 隔开
	private String url;

	public String getUrl() {
		return url;
	}

	public void setUrl(String url) {
		this.url = url;
	}

	public int getLength() {
		return length;
	}

	public void setLength(int length) {
		this.length = length;
	}

	public int getExpireIn() {
		return expireIn;
	}

	public void setExpireIn(int expireIn) {
		this.expireIn = expireIn;
	}


}
发现图片验证码配置类与短信验证码配置类有很多重复地方,所以修改图片验证码配置类ImageCodeProperties。
package com.zhqx.security.core.properties;

public class ImageCodeProperties extends SmsCodeProperties {

	private int width = 67;

	private int height = 23;

	//默认初始化的图片验证码长度是4
	public ImageCodeProperties() {
		setLength(4);
	}

	public int getWidth() {
		return width;
	}

	public void setWidth(int width) {
		this.width = width;
	}

	public int getHeight() {
		return height;
	}

	public void setHeight(int height) {
		this.height = height;
	}

}
在验证码总配置ValidateCodeProperties中添加短信验证码配置类:
package com.zhqx.security.core.properties;

public class ValidateCodeProperties {

	private ImageCodeProperties image = new ImageCodeProperties();

	private SmsCodeProperties sms = new SmsCodeProperties();

	public ImageCodeProperties getImage() {
		return image;
	}

	public void setImage(ImageCodeProperties image) {
		this.image = image;
	}

	public SmsCodeProperties getSms() {
		return sms;
	}

	public void setSms(SmsCodeProperties sms) {
		this.sms = sms;
	}
}
新增短信验证码生成器:
package com.zhqx.security.core.validate.code;

import org.apache.commons.lang.RandomStringUtils;
import org.springframework.beans.factory.annotation.Autowired;
import org.springframework.stereotype.Component;
import org.springframework.web.context.request.ServletWebRequest;

import com.zhqx.security.core.properties.SecurityProperties;

@Component("smsCodeGenerator")
public class SmsCodeGenerator implements ValidateCodeGenerator {

	@Autowired
	private SecurityProperties securityProperties;

	public ValidateCode generate(ServletWebRequest request) {
		//验证码长度可配置
		String code = RandomStringUtils.randomNumeric(securityProperties.getCode().getSms().getLength());
		//验证码过期时间可配置
		return new ValidateCode(code, securityProperties.getCode().getSms().getExpireIn());
	}

	public SecurityProperties getSecurityProperties() {
		return securityProperties;
	}

	public void setSecurityProperties(SecurityProperties securityProperties) {
		this.securityProperties = securityProperties;
	}

}
启动服务,会发现此时服务无法启动,控制台出现如下错误:
Exception encountered during context initialization - cancelling refresh attempt:
org.springframework.beans.factory.UnsatisfiedDependencyException:
Error creating bean with name 'validateCodeController':
Unsatisfied dependency expressed through field 'imageCodeGenerator';
nested exception is org.springframework.beans.factory.NoUniqueBeanDefinitionException:
No qualifying bean of type 'com.zhqx.security.core.validate.code.ValidateCodeGenerator' available:
expected single matching bean but found 2: smsCodeGenerator,imageValidateCodeGenerator
意思是说在ValidateCodeController控制器类中,在初始化
//引入图片验证码生成类
@Autowired
private ValidateCodeGenerator imageCodeGenerator;
时出现错误。因为我们修改的代码中,ValidateCodeGenerator接口我们有2个实现类,所以初始化时,Spring容器为我们匹配到了2个bean。
所以我们需要修改ValidateCodeBeanConfig验证码配置类。指定图片验证码生成的bean的名称。(通常来说应该是不需要特别指定的,此处不指定会出错。)。
//只显示修改部分代码

//@ConditionalOnMissingBean先从Spring容器中寻找是否存在对应的类,
//如果已经有了imageCodeGenerator对应的类,则不会执行方法体中默认的初始化内容
//整体功能相当于在ImageCodeGenerator类上加@Component注解,由于是采用配置的方式,所以不能直接使用@Component
@Bean(name = "imageCodeGenerator")
@ConditionalOnMissingBean(name = "imageCodeGenerator")
public ValidateCodeGenerator imageValidateCodeGenerator() {
	ImageCodeGenerator imageCodeGenerator = new ImageCodeGenerator();
	imageCodeGenerator.setSecurityProperties(securityProperties);
	return imageCodeGenerator;
}
指定图片验证码注入时的名称,这样就不会出错了。再次启动,浏览器访问:http://localhost:8080/zhqx-login.html。在页面点击
发送验证码出现安全验证。
需要在zhqx-security-browser项目的配置类BrowserSecurityConfig中放行验证码的请求:/code/sms。
//只显示修改部分代码

@Override
protected void configure(HttpSecurity http) throws Exception {
	ValidateCodeFilter validateCodeFilter = new ValidateCodeFilter();
	//将我们自定义的登录失败控制器赋值给验证码过滤器中的验证失败处理控制器
	validateCodeFilter.setAuthenticationFailureHandler(zhqxAuthenticationFailureHandler);
	//初始化ValidateCodeFilter中的配置类
	validateCodeFilter.setSecurityProperties(securityProperties);
	//调用ValidateCodeFilter的初始化方法
	validateCodeFilter.afterPropertiesSet();

	//http.httpBasic()//指定身份验证为弹出窗口登录
	//将验证码过滤器添加到UsernamePasswordAuthenticationFilter过滤器之前
	http.addFilterBefore(validateCodeFilter, UsernamePasswordAuthenticationFilter.class)
	.formLogin()//指定身份验证为表单登录
	.loginPage("/authentication/require")//指定登录处理请求
	.loginProcessingUrl("/authentication/form")//自定义登录表单提交请求
	.successHandler(zhqxAuthenticationSuccessHandler)//自定义登录成功处理类
	.failureHandler(zhqxAuthenticationFailureHandler)//自定义登录失败处理类
	.and()
	.rememberMe()//增加记住我功能
	.tokenRepository(persistentTokenRepository())//存储token
	.tokenValiditySeconds(securityProperties.getBrowser().getRememberMeSeconds())//设置失效时间
	.userDetailsService(userDetailsService)
	.and()
	.authorizeRequests()//以下都是授权的配置
	.antMatchers("/authentication/require", "/error",
			securityProperties.getBrowser().getLoginPage(), "/code/image", "/code/sms").permitAll()//放行的请求
	.anyRequest()//任何请求
	.authenticated()//都需要身份验证
	.and()
    .csrf().disable();//禁用CSRF-TOKEN
}
修改完毕后,再次浏览器访问:http://localhost:8080/zhqx-login.html。在页面点击发送验证码。后台打印出正常内容。
如果需要修改默认验证码生成的长度,修改zhqx-security-demo项目中的配置文件:
zhqx:
  security:
#    browser:
#      loginPage: /demo-login.html
#      loginResponseType: REDIRECT
    code:
      image:
        length: 6
        width: 100
        url:
      sms:
        length: 4
修改完毕后,再次浏览器访问:http://localhost:8080/zhqx-login.html。在页面点击发送验证码。后台打印正常内容,发现验证长度是4位:
向手机13012345678发送短信验证码6904
9.整个验证码功能模块的重构
前面,我们已经实现了整体的功能模块,包括短信验证码、和图片验证码。但是在更高级的开发过程中,为了更好的扩展程序,还可以对我们整个验证码功能模块进行重构。整体简要结构图如下:
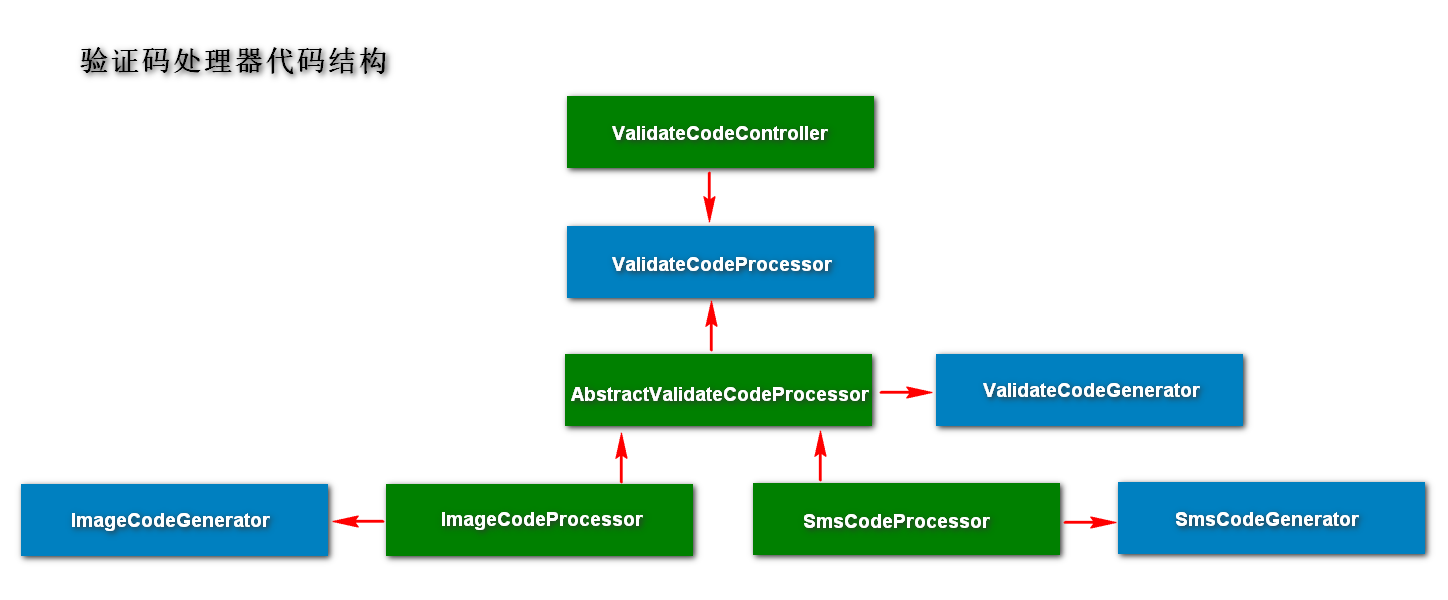
我们将整个验证码创建过程抽象成一个验证码处理器接口ValidateCodeProcessor。定义一个验证码生成抽象类AbstractValidateCodeProcessor,由该抽象类判断生成的验证码类型是图片验证码还是短信验证码。
在AbstractValidateCodeProcessor抽象类中,封装了验证码生成器接口ValidateCodeGenerator。抽象类会处理验证码请求,然后根据验证码类型,实例化具体的验证码生成器。
分别定义了图片验证码处理器ImageCodeProcessor和短信验证码处理器SmsCodeProcessor实现AbstractValidateCodeProcessor。
分别实现各自的验证码发送逻辑。
在ValidateCodeController原来的验证码生成逻辑,则统一由验证码生成器接口ValidateCodeProcessor处理。该接口会根据具体的请求,实例化不同的验证码处理器。
zhqx-security-core项目中整体重构后的代码结构如下图:
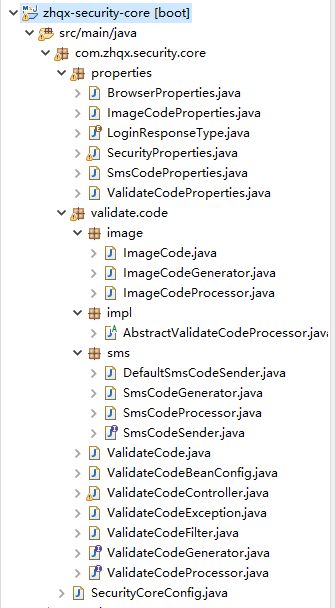
所有涉及到的重构代码如下:
验证码处理器接口ValidateCodeProcessor:
package com.zhqx.security.core.validate.code;

import org.springframework.web.context.request.ServletWebRequest;

//校验码处理器,封装不同校验码的处理逻辑
public interface ValidateCodeProcessor {

	//验证码放入session时的前缀
	String SESSION_KEY_PREFIX = "SESSION_KEY_FOR_CODE_";

	//创建校验码
	void create(ServletWebRequest request) throws Exception;
}
验证码处理器接口ValidateCodeProcessor抽象实现类AbstractValidateCodeProcessor:
package com.zhqx.security.core.validate.code.impl;

import java.util.Map;

import org.apache.commons.lang.StringUtils;
import org.springframework.beans.factory.annotation.Autowired;
import org.springframework.social.connect.web.HttpSessionSessionStrategy;
import org.springframework.social.connect.web.SessionStrategy;
import org.springframework.web.context.request.ServletWebRequest;

import com.zhqx.security.core.validate.code.ValidateCode;
import com.zhqx.security.core.validate.code.ValidateCodeGenerator;
import com.zhqx.security.core.validate.code.ValidateCodeProcessor;

public abstract class AbstractValidateCodeProcessor<C extends ValidateCode> implements ValidateCodeProcessor {

	//操作session的工具类
	private SessionStrategy sessionStrategy = new HttpSessionSessionStrategy();

	//收集系统中所有的 {@link ValidateCodeGenerator} 接口的实现。
	//Spring会自动收集所有对ValidateCodeGenerator接口的实现类,并将实现类的默认bean名称当作key封装到String中
	//在本项目中则是<imageCodeGenerator, ImageCodeGenerator>,<smsCodeGenerator, SmsCodeGenerator>
	@Autowired
	private Map<String, ValidateCodeGenerator> validateCodeGenerators;

	//验证码使用过程:生成、保存、发送
	@Override
	public void create(ServletWebRequest request) throws Exception {
		C validateCode = generate(request);
		save(request, validateCode);
		send(request, validateCode);
	}

	//生成校验码
	@SuppressWarnings("unchecked")
	private C generate(ServletWebRequest request) {
		String type = getProcessorType(request);
		ValidateCodeGenerator validateCodeGenerator = validateCodeGenerators.get(type + "CodeGenerator");
		//不同验证码请求类型,会调用不同的验证码生成器
		return (C) validateCodeGenerator.generate(request);
	}

	//保存校验码
	private void save(ServletWebRequest request, C validateCode) {
		sessionStrategy.setAttribute(request, SESSION_KEY_PREFIX + getProcessorType(request).toUpperCase(), validateCode);
	}

	//发送校验码,由子类实现
	protected abstract void send(ServletWebRequest request, C validateCode) throws Exception;

	//根据请求的url获取校验码的类型
	//项目中图片验证码的请求为/code/image,短信验证码的请求为/code/sms
	private String getProcessorType(ServletWebRequest request) {
		//根据请求后半段
		return StringUtils.substringAfter(request.getRequest().getRequestURI(), "/code/");
	}

}
图片验证码处理器ImageCodeProcessor:
package com.zhqx.security.core.validate.code.image;

import javax.imageio.ImageIO;

import org.springframework.stereotype.Component;
import org.springframework.web.context.request.ServletWebRequest;

import com.zhqx.security.core.validate.code.impl.AbstractValidateCodeProcessor;

//图片验证码处理器
@Component("imageCodeProcessor")
public class ImageCodeProcessor extends AbstractValidateCodeProcessor<ImageCode> {

	//发送图形验证码,将其写到响应中
	@Override
	protected void send(ServletWebRequest request, ImageCode imageCode) throws Exception {
		ImageIO.write(imageCode.getImage(), "JPEG", request.getResponse().getOutputStream());
	}

}
短信验证码处理器SmsCodeProcessor:
package com.zhqx.security.core.validate.code.sms;

import org.springframework.beans.factory.annotation.Autowired;
import org.springframework.stereotype.Component;
import org.springframework.web.bind.ServletRequestUtils;
import org.springframework.web.context.request.ServletWebRequest;

import com.zhqx.security.core.validate.code.ValidateCode;
import com.zhqx.security.core.validate.code.impl.AbstractValidateCodeProcessor;

//短信验证码处理器
@Component("smsCodeProcessor")
public class SmsCodeProcessor extends AbstractValidateCodeProcessor<ValidateCode> {

	//短信验证码发送器
	@Autowired
	private SmsCodeSender smsCodeSender;

	@Override
	protected void send(ServletWebRequest request, ValidateCode validateCode) throws Exception {
		String mobile = ServletRequestUtils.getRequiredStringParameter(request.getRequest(), "mobile");
		smsCodeSender.send(mobile, validateCode.getCode());
	}

}
验证码处理器ValidateCodeController代码:
package com.zhqx.security.core.validate.code;

import java.util.Map;

import javax.servlet.http.HttpServletRequest;
import javax.servlet.http.HttpServletResponse;

import org.springframework.beans.factory.annotation.Autowired;
import org.springframework.web.bind.annotation.GetMapping;
import org.springframework.web.bind.annotation.PathVariable;
import org.springframework.web.bind.annotation.RestController;
import org.springframework.web.context.request.ServletWebRequest;

@RestController
public class ValidateCodeController {

	@Autowired
	private Map<String, ValidateCodeProcessor> validateCodeProcessor;

	//创建验证码,根据验证码类型不同,调用不同的 {@link ValidateCodeProcessor}接口实现
	@GetMapping("/code/{type}")
	public void createCode(HttpServletRequest request, HttpServletResponse response, @PathVariable String type)
			throws Exception {
		validateCodeProcessor.get(type + "CodeProcessor").create(new ServletWebRequest(request, response));
	}

}
由于验证码处理器中,代码做了修改,原来的静态public static final String SESSION_KEY = "SESSION_KEY_IMAGE_CODE";已经移除了。所有的SESSION由验证码处理器接口管理。
所以需要修改验证码过滤器ValidateCodeFilter中的验证码验证方法:
//只显示需要修改的代码部分

private void validate(ServletWebRequest request) throws ServletRequestBindingException {
	//从session中获取验证码
	ImageCode codeInSession = (ImageCode) sessionStrategy.getAttribute(request, ValidateCodeProcessor.SESSION_KEY_PREFIX + "IMAGE");
	//从请求参数中获取验证码
	String codeInRequest = ServletRequestUtils.getStringParameter(request.getRequest(), "imageCode");

	if (StringUtils.isBlank(codeInRequest)) {
		throw new ValidateCodeException("验证码的值不能为空");
	}

	if (codeInSession == null) {
		throw new ValidateCodeException("验证码不存在");
	}

	if (codeInSession.isExpried()) {
		//验证码失效,从sesion中移除
		sessionStrategy.removeAttribute(request, ValidateCodeProcessor.SESSION_KEY_PREFIX + "IMAGE");
		throw new ValidateCodeException("验证码已过期");
	}

	if (!StringUtils.equals(codeInSession.getCode(), codeInRequest)) {
		throw new ValidateCodeException("验证码不匹配");
	}
	//验证码通过,从sesion中移除
	sessionStrategy.removeAttribute(request, ValidateCodeProcessor.SESSION_KEY_PREFIX + "IMAGE");
}
代码重构完成后,我们需要同时放行/code/image请求和/code/sms请求,所以需要修改zhqx-security-browser项目中的配置类BrowserSecurityConfig:
//只显示修改部分代码

@Override
protected void configure(HttpSecurity http) throws Exception {
	ValidateCodeFilter validateCodeFilter = new ValidateCodeFilter();
	//将我们自定义的登录失败控制器赋值给验证码过滤器中的验证失败处理控制器
	validateCodeFilter.setAuthenticationFailureHandler(zhqxAuthenticationFailureHandler);
	//初始化ValidateCodeFilter中的配置类
	validateCodeFilter.setSecurityProperties(securityProperties);
	//调用ValidateCodeFilter的初始化方法
	validateCodeFilter.afterPropertiesSet();

	//http.httpBasic()//指定身份验证为弹出窗口登录
	//将验证码过滤器添加到UsernamePasswordAuthenticationFilter过滤器之前
	http.addFilterBefore(validateCodeFilter, UsernamePasswordAuthenticationFilter.class)
	.formLogin()//指定身份验证为表单登录
	.loginPage("/authentication/require")//指定登录处理请求
	.loginProcessingUrl("/authentication/form")//自定义登录表单提交请求
	.successHandler(zhqxAuthenticationSuccessHandler)//自定义登录成功处理类
	.failureHandler(zhqxAuthenticationFailureHandler)//自定义登录失败处理类
	.and()
	.rememberMe()//增加记住我功能
	.tokenRepository(persistentTokenRepository())//存储token
	.tokenValiditySeconds(securityProperties.getBrowser().getRememberMeSeconds())//设置失效时间
	.userDetailsService(userDetailsService)
	.and()
	.authorizeRequests()//以下都是授权的配置
	.antMatchers("/authentication/require", "/error",
			securityProperties.getBrowser().getLoginPage(), "/code/*").permitAll()//放行的请求
	.anyRequest()//任何请求
	.authenticated()//都需要身份验证
	.and()
    .csrf().disable();//禁用CSRF-TOKEN
}
10.使用短信验证码完成登录
首先,我们之前学习了基于表单的用户名和密码登录。但是我们不能将短信验证码登录穿插其中。这是2种不同的登录方式。我们可以仿照表单登录的 流程,单独写一个短信验证码登录流程出来。
首先我们需要构建一个SmsAuthenticationFilter过滤短信登录。用户发起登录请求后,会产生一个SmsAuthenticationToken。
请求会带着这个Token到达AuthenticationManager,由它进一步选择特定的校验器SmsAuthenticationProvider去处理校验逻辑。
在处理校验过程中,会调用UserDetailsService判断用户信息,如果登录成功,将信息标记成已认证Authentication。
因为所有项目可能都会使用短信验证,将代码写在zhqx-security-core项目中。
**
1.构建封装用户信息的
SmsCodeAuthenticationToken,代码参考UsernamePasswordAuthenticationToken:**
package com.zhqx.security.core.authentication.mobile;

import java.util.Collection;

import org.springframework.security.authentication.AbstractAuthenticationToken;
import org.springframework.security.core.GrantedAuthority;
import org.springframework.security.core.SpringSecurityCoreVersion;

public class SmsCodeAuthenticationToken extends AbstractAuthenticationToken {
	private static final long serialVersionUID = SpringSecurityCoreVersion.SERIAL_VERSION_UID;

	// ~ Instance fields
	// ================================================================================================

	//封装认证信息,认证之前应该放手机号,认证成功后,放登录成功的用户信息
	private final Object principal;

	// ~ Constructors
	// ===================================================================================================

	/**
	 * This constructor can be safely used by any code that wishes to create a
	 * <code>UsernamePasswordAuthenticationToken</code>, as the {@link #isAuthenticated()}
	 * will return <code>false</code>.
	 *
	 */
	public SmsCodeAuthenticationToken(String mobile) {
		super(null);
		this.principal = mobile;
		setAuthenticated(false);
	}

	/**
	 * This constructor should only be used by <code>AuthenticationManager</code> or
	 * <code>AuthenticationProvider</code> implementations that are satisfied with
	 * producing a trusted (i.e. {@link #isAuthenticated()} = <code>true</code>)
	 * authentication token.
	 *
	 * @param principal
	 * @param credentials
	 * @param authorities
	 */
	public SmsCodeAuthenticationToken(Object principal,
			Collection<? extends GrantedAuthority> authorities) {
		super(authorities);
		this.principal = principal;
		super.setAuthenticated(true); // must use super, as we override
	}

	// ~ Methods
	// ========================================================================================================

	public Object getCredentials() {
		return null;
	}

	public Object getPrincipal() {
		return this.principal;
	}

	public void setAuthenticated(boolean isAuthenticated) throws IllegalArgumentException {
		if (isAuthenticated) {
			throw new IllegalArgumentException(
					"Cannot set this token to trusted - use constructor which takes a GrantedAuthority list instead");
		}

		super.setAuthenticated(false);
	}

	@Override
	public void eraseCredentials() {
		super.eraseCredentials();
	}
}
2.构建
SmsCodeAuthenticationFilter过滤请求,用它来组装SmsCodeAuthenticationToken信息。参考UsernamePasswordAuthenticationFilter。代码如下:
package com.zhqx.security.core.authentication.mobile;

import javax.servlet.http.HttpServletRequest;
import javax.servlet.http.HttpServletResponse;

import org.springframework.security.authentication.AuthenticationServiceException;
import org.springframework.security.core.Authentication;
import org.springframework.security.core.AuthenticationException;
import org.springframework.security.web.authentication.AbstractAuthenticationProcessingFilter;
import org.springframework.security.web.util.matcher.AntPathRequestMatcher;
import org.springframework.util.Assert;

public class SmsCodeAuthenticationFilter extends AbstractAuthenticationProcessingFilter {
	// ~ Static fields/initializers
	// =====================================================================================

	public static final String ZHQX_FORM_MOBILE_KEY = "mobile";

	//请求中携带的参数的名称
	private String mobileParameter = ZHQX_FORM_MOBILE_KEY;
	//只处理post请求
	private boolean postOnly = true;

	// ~ Constructors
	// ===================================================================================================

	public SmsCodeAuthenticationFilter() {
		//当前过滤器处理的请求是什么,即短信登录form表单的提交请求
		super(new AntPathRequestMatcher("/authentication/mobile", "POST"));
	}

	// ~ Methods
	// ========================================================================================================

	public Authentication attemptAuthentication(HttpServletRequest request,
			HttpServletResponse response) throws AuthenticationException {
		//判断请求是否是post请求,不是则抛出异常
		if (postOnly && !request.getMethod().equals("POST")) {
			throw new AuthenticationServiceException(
					"Authentication method not supported: " + request.getMethod());
		}

		//获取手机号
		String mobile = obtainMobile(request);

		if (mobile == null) {
			mobile = "";
		}

		mobile = mobile.trim();

		//实例化Token信息
		SmsCodeAuthenticationToken authRequest = new SmsCodeAuthenticationToken(mobile);

		// Allow subclasses to set the "details" property
		//将请求信息,一起放入token
		setDetails(request, authRequest);

		//较给AuthenticationManager
		return this.getAuthenticationManager().authenticate(authRequest);
	}

	//从请求参数中获取手机号
	protected String obtainMobile(HttpServletRequest request) {
		return request.getParameter(mobileParameter);
	}

	/**
	 * Provided so that subclasses may configure what is put into the authentication
	 * request's details property.
	 *
	 * @param request that an authentication request is being created for
	 * @param authRequest the authentication request object that should have its details
	 * set
	 */
	protected void setDetails(HttpServletRequest request, SmsCodeAuthenticationToken authRequest) {
		authRequest.setDetails(authenticationDetailsSource.buildDetails(request));
	}

	/**
	 * Sets the parameter name which will be used to obtain the username from the login
	 * request.
	 *
	 * @param usernameParameter the parameter name. Defaults to "username".
	 */
	public void setMoblieParameter(String usernameParameter) {
		Assert.hasText(usernameParameter, "Username parameter must not be empty or null");
		this.mobileParameter = usernameParameter;
	}

	/**
	 * Defines whether only HTTP POST requests will be allowed by this filter. If set to
	 * true, and an authentication request is received which is not a POST request, an
	 * exception will be raised immediately and authentication will not be attempted. The
	 * <tt>unsuccessfulAuthentication()</tt> method will be called as if handling a failed
	 * authentication.
	 * <p>
	 * Defaults to <tt>true</tt> but may be overridden by subclasses.
	 */
	public void setPostOnly(boolean postOnly) {
		this.postOnly = postOnly;
	}

	public String getMobileParameter() {
		return mobileParameter;
	}

}
3.构建
SmsCodeAuthenticationProvider,提供校验逻辑。代码如下:
package com.zhqx.security.core.authentication.mobile;

import org.springframework.security.authentication.AuthenticationProvider;
import org.springframework.security.authentication.InternalAuthenticationServiceException;
import org.springframework.security.core.Authentication;
import org.springframework.security.core.AuthenticationException;
import org.springframework.security.core.userdetails.UserDetails;
import org.springframework.security.core.userdetails.UserDetailsService;

public class SmsCodeAuthenticationProvider implements AuthenticationProvider {

	private UserDetailsService userDetailsService;

	//校验逻辑
	@Override
	public Authentication authenticate(Authentication authentication) throws AuthenticationException {
		SmsCodeAuthenticationToken authenticationToken = (SmsCodeAuthenticationToken) authentication;
		//根据手机号读取用户信息
		UserDetails user = userDetailsService.loadUserByUsername((String) authenticationToken.getPrincipal());

		if (user == null) {
			throw new InternalAuthenticationServiceException("无法获取用户信息");
		}
		//如果读取到用户信息,重新构造token
		SmsCodeAuthenticationToken authenticationResult = new SmsCodeAuthenticationToken(user, user.getAuthorities());
		//将原来的token信息封装到新的token中
		authenticationResult.setDetails(authenticationToken.getDetails());

		return authenticationResult;
	}

	//当前校验器处理的token类型是什么
	@Override
	public boolean supports(Class<?> authentication) {
		return SmsCodeAuthenticationToken.class.isAssignableFrom(authentication);
	}

	public UserDetailsService getUserDetailsService() {
		return userDetailsService;
	}

	public void setUserDetailsService(UserDetailsService userDetailsService) {
		this.userDetailsService = userDetailsService;
	}

}
4.构建短信验证码的拦截过滤器
SmsCodeFilter:
package com.zhqx.security.core.validate.code;

import java.io.IOException;
import java.util.HashSet;
import java.util.Set;

import javax.servlet.FilterChain;
import javax.servlet.ServletException;
import javax.servlet.http.HttpServletRequest;
import javax.servlet.http.HttpServletResponse;

import org.apache.commons.lang.StringUtils;
import org.springframework.beans.factory.InitializingBean;
import org.springframework.security.web.authentication.AuthenticationFailureHandler;
import org.springframework.social.connect.web.HttpSessionSessionStrategy;
import org.springframework.social.connect.web.SessionStrategy;
import org.springframework.util.AntPathMatcher;
import org.springframework.web.bind.ServletRequestBindingException;
import org.springframework.web.bind.ServletRequestUtils;
import org.springframework.web.context.request.ServletWebRequest;
import org.springframework.web.filter.OncePerRequestFilter;

import com.zhqx.security.core.properties.SecurityProperties;

//实现InitializingBean接口是为了在其他参数都处理完毕后,初始化我们的url值
public class SmsCodeFilter extends OncePerRequestFilter implements InitializingBean{

	//引入验证失败处理器,当出现异常时,进行处理
	private AuthenticationFailureHandler authenticationFailureHandler;

	//默认操作session工具类
	private SessionStrategy sessionStrategy = new HttpSessionSessionStrategy();

	//存放所有需要拦截的url,针对图片验证码
	private Set<String> urls = new HashSet<>();

	private SecurityProperties securityProperties;

	private AntPathMatcher pathMatcher = new AntPathMatcher();

	//InitializingBean提供方法
	@Override
	public void afterPropertiesSet() throws ServletException {
		super.afterPropertiesSet();
		//从配置中获取配置的url(需要短信验证的地址)
		//这里需要注意的是在配置文件中一定要配置sms的url,否则启动会报错。这种错误不容易排查!
		String[] configUrls = StringUtils.splitByWholeSeparatorPreserveAllTokens(securityProperties.getCode().getSms().getUrl(), ",");
		for (String configUrl : configUrls) {
			urls.add(configUrl);
		}
		//手机登陆时,一定需要验证
		urls.add("/authentication/mobile");
 	}

	@Override
	protected void doFilterInternal(HttpServletRequest request, HttpServletResponse response, FilterChain filterChain)
			throws ServletException, IOException {
		boolean action = false;

		for (String url : urls) {
			//如果访问的请求,能够与任意一个配置的请求匹配上,则说明需要验证码
			if (pathMatcher.match(url, request.getRequestURI())) {
				action = true;
			}
		}

		//判断是否是需要验证验证码的请求
		if (action) {
			try {//是,则开始校验
				validate(new ServletWebRequest(request));
			} catch (ValidateCodeException e) {//这里使用自定义的验证码异常ValidateCodeException,而不是Exception
				//处理异常
				authenticationFailureHandler.onAuthenticationFailure(request, response, e);
				//出现异常时,不再往后执行
				return;
			}
		}
		//验证通过
		filterChain.doFilter(request, response);
	}

	private void validate(ServletWebRequest request) throws ServletRequestBindingException {
		//从session中获取短信验证码
		ValidateCode codeInSession = (ValidateCode) sessionStrategy.getAttribute(request, ValidateCodeProcessor.SESSION_KEY_PREFIX + "SMS");
		//从请求参数中获取短信验证码
		String codeInRequest = ServletRequestUtils.getStringParameter(request.getRequest(), "smsCode");

		if (StringUtils.isBlank(codeInRequest)) {
			throw new ValidateCodeException("验证码的值不能为空");
		}

		if (codeInSession == null) {
			throw new ValidateCodeException("验证码不存在");
		}

		if (codeInSession.isExpried()) {
			//验证码失效,从sesion中移除
			sessionStrategy.removeAttribute(request, ValidateCodeProcessor.SESSION_KEY_PREFIX + "SMS");
			throw new ValidateCodeException("验证码已过期");
		}

		if (!StringUtils.equals(codeInSession.getCode(), codeInRequest)) {
			throw new ValidateCodeException("验证码不匹配");
		}
		//验证码通过,从sesion中移除
		sessionStrategy.removeAttribute(request, ValidateCodeProcessor.SESSION_KEY_PREFIX + "SMS");
	}

	public AuthenticationFailureHandler getAuthenticationFailureHandler() {
		return authenticationFailureHandler;
	}

	public void setAuthenticationFailureHandler(AuthenticationFailureHandler authenticationFailureHandler) {
		this.authenticationFailureHandler = authenticationFailureHandler;
	}

	public SessionStrategy getSessionStrategy() {
		return sessionStrategy;
	}

	public void setSessionStrategy(SessionStrategy sessionStrategy) {
		this.sessionStrategy = sessionStrategy;
	}

	public Set<String> getUrls() {
		return urls;
	}

	public void setUrls(Set<String> urls) {
		this.urls = urls;
	}

	public SecurityProperties getSecurityProperties() {
		return securityProperties;
	}

	public void setSecurityProperties(SecurityProperties securityProperties) {
		this.securityProperties = securityProperties;
	}

}
在配置文件中增加sms的子属性url。因为调用了getUrl()方法。
spring:
  #session管理
  session:
    store-type: none
  #mysql数据库连接配置
  datasource:
    driver-class-name: com.mysql.jdbc.Driver
    url: jdbc:mysql://localhost:3306/security_demo?useUnicode=true&characterEncoding=utf8&useSSL=false&serverTimezone=UTC
    username: root
    password: 123123
zhqx:
  security:
#    browser:
#      loginPage: /demo-login.html
#      loginResponseType: REDIRECT
    code:
      image:
        length: 6
        width: 100
        url:
      sms:
        length: 4
        url:
5.增加配置类,将短信验证登录所有涉及的类添加到程序的验证中
短信验证码在后面可能应用到多个项目,所以在zhqx-security-core项目中增加配置SmsCodeAuthenticationSecurityConfig。
package com.zhqx.security.core.authentication.mobile;

import org.springframework.beans.factory.annotation.Autowired;
import org.springframework.security.authentication.AuthenticationManager;
import org.springframework.security.config.annotation.SecurityConfigurerAdapter;
import org.springframework.security.config.annotation.web.builders.HttpSecurity;
import org.springframework.security.core.userdetails.UserDetailsService;
import org.springframework.security.web.DefaultSecurityFilterChain;
import org.springframework.security.web.authentication.AuthenticationFailureHandler;
import org.springframework.security.web.authentication.AuthenticationSuccessHandler;
import org.springframework.security.web.authentication.UsernamePasswordAuthenticationFilter;
import org.springframework.stereotype.Component;

@Component
public class SmsCodeAuthenticationSecurityConfig extends SecurityConfigurerAdapter<DefaultSecurityFilterChain, HttpSecurity> {

	//失败处理器和成功处理器以及在zhqx-security-browser项目中实现过
	@Autowired
	private AuthenticationSuccessHandler zhqxAuthenticationSuccessHandler;

	@Autowired
	private AuthenticationFailureHandler zhqxAuthenticationFailureHandler;

	@Autowired
	private UserDetailsService userDetailsService;

	@Override
	public void configure(HttpSecurity http) throws Exception {
		//配置过滤器
		SmsCodeAuthenticationFilter smsCodeAuthenticationFilter = new SmsCodeAuthenticationFilter();
		//设置AuthenticationManager
		smsCodeAuthenticationFilter.setAuthenticationManager(http.getSharedObject(AuthenticationManager.class));
		//设置验证成功处理
		smsCodeAuthenticationFilter.setAuthenticationSuccessHandler(zhqxAuthenticationSuccessHandler);
		//设置验证失败处理
		smsCodeAuthenticationFilter.setAuthenticationFailureHandler(zhqxAuthenticationFailureHandler);
		//设置验证码校验器
		SmsCodeAuthenticationProvider smsCodeAuthenticationProvider = new SmsCodeAuthenticationProvider();
		smsCodeAuthenticationProvider.setUserDetailsService(userDetailsService);

		//将自定义的短信验证码过滤器添加到整个验证集合中
		http.authenticationProvider(smsCodeAuthenticationProvider)
			.addFilterAfter(smsCodeAuthenticationFilter, UsernamePasswordAuthenticationFilter.class);
	}

}
6.装配短信验证配置,使整个短信验证登录生效
修改zhqx-security-browser项目中的配置类BrowserSecurityConfig。
//只显示新增部分代码

//引入短信配置
@Autowired
private SmsCodeAuthenticationSecurityConfig smsCodeAuthenticationSecurityConfig;

@Override
protected void configure(HttpSecurity http) throws Exception {
	ValidateCodeFilter validateCodeFilter = new ValidateCodeFilter();
	//将我们自定义的登录失败控制器赋值给验证码过滤器中的验证失败处理控制器
	validateCodeFilter.setAuthenticationFailureHandler(zhqxAuthenticationFailureHandler);
	//初始化ValidateCodeFilter中的配置类
	validateCodeFilter.setSecurityProperties(securityProperties);
	//调用ValidateCodeFilter的初始化方法
	validateCodeFilter.afterPropertiesSet();

	//初始化短信验证码过滤器
	SmsCodeFilter smsCodeFilter = new SmsCodeFilter();
	smsCodeFilter.setAuthenticationFailureHandler(zhqxAuthenticationFailureHandler);
	smsCodeFilter.setSecurityProperties(securityProperties);
	smsCodeFilter.afterPropertiesSet();

	//http.httpBasic()//指定身份验证为弹出窗口登录
	http
	.addFilterBefore(smsCodeFilter, UsernamePasswordAuthenticationFilter.class)//添加短信验证码过滤器
	.addFilterBefore(validateCodeFilter, UsernamePasswordAuthenticationFilter.class)//将验证码过滤器添加到UsernamePasswordAuthenticationFilter过滤器之前
	.formLogin()//指定身份验证为表单登录
	.loginPage("/authentication/require")//指定登录处理请求
	.loginProcessingUrl("/authentication/form")//自定义登录表单提交请求
	.successHandler(zhqxAuthenticationSuccessHandler)//自定义登录成功处理类
	.failureHandler(zhqxAuthenticationFailureHandler)//自定义登录失败处理类
	.and()
	.rememberMe()//增加记住我功能
	.tokenRepository(persistentTokenRepository())//存储token
	.tokenValiditySeconds(securityProperties.getBrowser().getRememberMeSeconds())//设置失效时间
	.userDetailsService(userDetailsService)
	.and()
	.authorizeRequests()//以下都是授权的配置
	.antMatchers("/authentication/require", "/error",
			securityProperties.getBrowser().getLoginPage(), "/code/*").permitAll()//放行的请求
	.anyRequest()//任何请求
	.authenticated()//都需要身份验证
	.and()
    .csrf().disable()//禁用CSRF-TOKEN
    .apply(smsCodeAuthenticationSecurityConfig);//添加短信验证码配置
}
添加完毕后,启动服务,浏览器访问:http://localhost:8080/zhqx-login.html。通过验证可以知道短信验证码登录已经生效。
使用短信验证码登录,返回结果如下:
{
authorities: [],
details: {},
authenticated: true,
principal: {
password: null,
username: "13012345678",
authorities: [
{
authority: "admin"
}
],
accountNonExpired: true,
accountNonLocked: true,
credentialsNonExpired: true,
enabled: true
},
credentials: null,
name: "13012345678"
}
可以看到username为我们事先设定的手机号码。
11.重构代码,消除重复代码,让项目更易维护
由于重构的内容过多,只列出相关涉及重构的代码。
1.删除了原来在zhqx-security-core项目中的SmsCodeFilter。
2.修改了zhqx-security-core项目中的ValidateCodeFilter,代码如下:
package com.zhqx.security.core.validate.code;

import java.io.IOException;
import java.util.HashMap;
import java.util.Map;
import java.util.Set;

import javax.servlet.FilterChain;
import javax.servlet.ServletException;
import javax.servlet.http.HttpServletRequest;
import javax.servlet.http.HttpServletResponse;

import org.apache.commons.lang.StringUtils;
import org.springframework.beans.factory.InitializingBean;
import org.springframework.beans.factory.annotation.Autowired;
import org.springframework.security.web.authentication.AuthenticationFailureHandler;
import org.springframework.stereotype.Component;
import org.springframework.util.AntPathMatcher;
import org.springframework.web.context.request.ServletWebRequest;
import org.springframework.web.filter.OncePerRequestFilter;

import com.zhqx.security.core.properties.SecurityConstants;
import com.zhqx.security.core.properties.SecurityProperties;


@Component("validateCodeFilter")
public class ValidateCodeFilter extends OncePerRequestFilter implements InitializingBean {

	//验证码校验失败处理器
	@Autowired
	private AuthenticationFailureHandler authenticationFailureHandler;
	//系统配置信息
	@Autowired
	private SecurityProperties securityProperties;
	//系统中的校验码处理器
	@Autowired
	private ValidateCodeProcessorHolder validateCodeProcessorHolder;
	//存放所有需要校验验证码的url
	private Map<String, ValidateCodeType> urlMap = new HashMap<>();
	//验证请求url与配置的url是否匹配的工具类
	private AntPathMatcher pathMatcher = new AntPathMatcher();

	//初始化要拦截的url配置信息
	@Override
	public void afterPropertiesSet() throws ServletException {
		super.afterPropertiesSet();

		urlMap.put(SecurityConstants.DEFAULT_LOGIN_PROCESSING_URL_FORM, ValidateCodeType.IMAGE);
		addUrlToMap(securityProperties.getCode().getImage().getUrl(), ValidateCodeType.IMAGE);

		urlMap.put(SecurityConstants.DEFAULT_LOGIN_PROCESSING_URL_MOBILE, ValidateCodeType.SMS);
		addUrlToMap(securityProperties.getCode().getSms().getUrl(), ValidateCodeType.SMS);
	}

	//将系统中配置的需要校验验证码的URL根据校验的类型放入map
	protected void addUrlToMap(String urlString, ValidateCodeType type) {
		if (StringUtils.isNotBlank(urlString)) {
			String[] urls = StringUtils.splitByWholeSeparatorPreserveAllTokens(urlString, ",");
			for (String url : urls) {
				urlMap.put(url, type);
			}
		}
	}

	@Override
	protected void doFilterInternal(HttpServletRequest request, HttpServletResponse response, FilterChain chain)
			throws ServletException, IOException {

		ValidateCodeType type = getValidateCodeType(request);
		if (type != null) {
			logger.info("校验请求(" + request.getRequestURI() + ")中的验证码,验证码类型" + type);
			try {
				validateCodeProcessorHolder.findValidateCodeProcessor(type).validate(new ServletWebRequest(request, response));
				logger.info("验证码校验通过");
			} catch (ValidateCodeException exception) {
				authenticationFailureHandler.onAuthenticationFailure(request, response, exception);
				return;
			}
		}

		chain.doFilter(request, response);

	}

	//获取校验码的类型,如果当前请求不需要校验,则返回null
	private ValidateCodeType getValidateCodeType(HttpServletRequest request) {
		ValidateCodeType result = null;
		if (!StringUtils.equalsIgnoreCase(request.getMethod(), "get")) {
			Set<String> urls = urlMap.keySet();
			for (String url : urls) {
				if (pathMatcher.match(url, request.getRequestURI())) {
					result = urlMap.get(url);
				}
			}
		}
		return result;
	}

}
3.修改了zhqx-security-core项目中的ValidateCodeController,代码如下:
package com.zhqx.security.core.validate.code;

import javax.servlet.http.HttpServletRequest;
import javax.servlet.http.HttpServletResponse;

import org.springframework.beans.factory.annotation.Autowired;
import org.springframework.web.bind.annotation.GetMapping;
import org.springframework.web.bind.annotation.PathVariable;
import org.springframework.web.bind.annotation.RestController;
import org.springframework.web.context.request.ServletWebRequest;

import com.zhqx.security.core.properties.SecurityConstants;

@RestController
public class ValidateCodeController {

	@Autowired
	private ValidateCodeProcessorHolder validateCodeProcessorHolder;

	//创建验证码,根据验证码类型不同,调用不同的 {@link ValidateCodeProcessor}接口实现
	@GetMapping(SecurityConstants.DEFAULT_VALIDATE_CODE_URL_PREFIX + "/{type}")
	public void createCode(HttpServletRequest request, HttpServletResponse response, @PathVariable String type)
			throws Exception {
		validateCodeProcessorHolder.findValidateCodeProcessor(type).create(new ServletWebRequest(request, response));
	}

}
3.修改了zhqx-security-core项目中的ImageCodeProcessor、SmsCodeProcessor、SmsCodeGenerator类中的注解。
将原来的注解分别改为:@Component("imageValidateCodeProcessor")、@Component("smsValidateCodeProcessor")、@Component("smsValidateCodeGenerator")。
4.修改了zhqx-security-core项目中的ValidateCodeBeanConfig类。修改imageValidateCodeGenerator()方法的@bean名称。
将原来的改为:@Bean(name = "imageValidateCodeGenerator")。
5.修改了zhqx-security-core项目中的ValidateCodeProcessor类,带入如下:
package com.zhqx.security.core.validate.code;

import org.springframework.web.context.request.ServletWebRequest;

//校验码处理器,封装不同校验码的处理逻辑
public interface ValidateCodeProcessor {

	//验证码放入session时的前缀
	String SESSION_KEY_PREFIX = "SESSION_KEY_FOR_CODE_";

	//创建校验码
	void create(ServletWebRequest request) throws Exception;

	//校验验证码
	void validate(ServletWebRequest servletWebRequest);

}
6.在zhqx-security-core项目中增加了ValidateCodeType验证码类型枚举类,代码如下:
package com.zhqx.security.core.validate.code;

import com.zhqx.security.core.properties.SecurityConstants;

public enum ValidateCodeType {

	//短信验证码
	SMS {
		@Override
		public String getParamNameOnValidate() {
			return SecurityConstants.DEFAULT_PARAMETER_NAME_CODE_SMS;
		}
	},
	// 图片验证码
	IMAGE {
		@Override
		public String getParamNameOnValidate() {
			return SecurityConstants.DEFAULT_PARAMETER_NAME_CODE_IMAGE;
		}
	};

	//校验时从请求中获取的参数的名字
	public abstract String getParamNameOnValidate();

}
7.在zhqx-security-core项目中增加了ValidateCodeProcessorHolder验证码处理器,用来处理不同验证码代码如下:
package com.zhqx.security.core.validate.code;

import java.util.Map;

import org.springframework.beans.factory.annotation.Autowired;
import org.springframework.stereotype.Component;

@Component
public class ValidateCodeProcessorHolder {

	@Autowired
	private Map<String, ValidateCodeProcessor> validateCodeProcessors;

	public ValidateCodeProcessor findValidateCodeProcessor(ValidateCodeType type) {
		return findValidateCodeProcessor(type.toString().toLowerCase());
	}

	public ValidateCodeProcessor findValidateCodeProcessor(String type) {
		String name = type.toLowerCase() + ValidateCodeProcessor.class.getSimpleName();
		ValidateCodeProcessor processor = validateCodeProcessors.get(name);
		if (processor == null) {
			throw new ValidateCodeException("验证码处理器" + name + "不存在");
		}
		return processor;
	}
}
8.在zhqx-security-core项目中增加了SecurityConstants配置常量类,代码如下:
package com.zhqx.security.core.properties;

public interface SecurityConstants {

	//默认的处理验证码的url前缀
	public static final String DEFAULT_VALIDATE_CODE_URL_PREFIX = "/code";

	//当请求需要身份认证时,默认跳转的url SecurityController
	public static final String DEFAULT_UNAUTHENTICATION_URL = "/authentication/require";

	//默认的用户名密码登录请求处理url
	public static final String DEFAULT_LOGIN_PROCESSING_URL_FORM = "/authentication/form";

	//默认的手机验证码登录请求处理url
	public static final String DEFAULT_LOGIN_PROCESSING_URL_MOBILE = "/authentication/mobile";

	//默认登录页面
	public static final String DEFAULT_LOGIN_PAGE_URL = "/zhqx-login.html";

	//验证图片验证码时,http请求中默认的携带图片验证码信息的参数的名称
	public static final String DEFAULT_PARAMETER_NAME_CODE_IMAGE = "imageCode";

	//验证短信验证码时,http请求中默认的携带短信验证码信息的参数的名称
	public static final String DEFAULT_PARAMETER_NAME_CODE_SMS = "smsCode";

	//发送短信验证码 或 验证短信验证码时,传递手机号的参数的名称
	public static final String DEFAULT_PARAMETER_NAME_MOBILE = "mobile";

}
9.在zhqx-security-core项目中增加了ValidateCodeSecurityConfig验证码配置,配置过滤器位置,代码如下:
package com.zhqx.security.core.validate.code;

import javax.servlet.Filter;

import org.springframework.beans.factory.annotation.Autowired;
import org.springframework.security.config.annotation.SecurityConfigurerAdapter;
import org.springframework.security.config.annotation.web.builders.HttpSecurity;
import org.springframework.security.web.DefaultSecurityFilterChain;
import org.springframework.security.web.authentication.preauth.AbstractPreAuthenticatedProcessingFilter;
import org.springframework.stereotype.Component;

@Component("validateCodeSecurityConfig")
public class ValidateCodeSecurityConfig extends SecurityConfigurerAdapter<DefaultSecurityFilterChain, HttpSecurity> {

	@Autowired
	private Filter validateCodeFilter;

	@Override
	public void configure(HttpSecurity http) throws Exception {
		http.addFilterBefore(validateCodeFilter, AbstractPreAuthenticatedProcessingFilter.class);
	}

}
10.修改了zhqx-security-core项目中的AbstractValidateCodeProcessor验证码生成器抽象类,代码如下:
package com.zhqx.security.core.validate.code.impl;

import java.util.Map;

import org.apache.commons.lang.StringUtils;
import org.springframework.beans.factory.annotation.Autowired;
import org.springframework.social.connect.web.HttpSessionSessionStrategy;
import org.springframework.social.connect.web.SessionStrategy;
import org.springframework.web.bind.ServletRequestBindingException;
import org.springframework.web.bind.ServletRequestUtils;
import org.springframework.web.context.request.ServletWebRequest;

import com.zhqx.security.core.validate.code.ValidateCode;
import com.zhqx.security.core.validate.code.ValidateCodeException;
import com.zhqx.security.core.validate.code.ValidateCodeGenerator;
import com.zhqx.security.core.validate.code.ValidateCodeProcessor;
import com.zhqx.security.core.validate.code.ValidateCodeType;

public abstract class AbstractValidateCodeProcessor<C extends ValidateCode> implements ValidateCodeProcessor {

	// 操作session的工具类
	private SessionStrategy sessionStrategy = new HttpSessionSessionStrategy();

	// 收集系统中所有的 {@link ValidateCodeGenerator} 接口的实现。
	@Autowired
	private Map<String, ValidateCodeGenerator> validateCodeGenerators;

	@Override
	public void create(ServletWebRequest request) throws Exception {
		C validateCode = generate(request);
		save(request, validateCode);
		send(request, validateCode);
	}

	// 生成校验码
	@SuppressWarnings("unchecked")
	private C generate(ServletWebRequest request) {
		String type = getValidateCodeType(request).toString().toLowerCase();
		String generatorName = type + ValidateCodeGenerator.class.getSimpleName();
		ValidateCodeGenerator validateCodeGenerator = validateCodeGenerators.get(generatorName);
		if (validateCodeGenerator == null) {
			throw new ValidateCodeException("验证码生成器" + generatorName + "不存在");
		}
		return (C) validateCodeGenerator.generate(request);
	}

	// 保存校验码
	private void save(ServletWebRequest request, C validateCode) {
		sessionStrategy.setAttribute(request, getSessionKey(request), validateCode);
	}

	// 构建验证码放入session时的key
	private String getSessionKey(ServletWebRequest request) {
		return SESSION_KEY_PREFIX + getValidateCodeType(request).toString().toUpperCase();
	}

	// 发送校验码,由子类实现
	protected abstract void send(ServletWebRequest request, C validateCode) throws Exception;

	// 根据请求的url获取校验码的类型
	private ValidateCodeType getValidateCodeType(ServletWebRequest request) {
		String type = StringUtils.substringBefore(getClass().getSimpleName(), "CodeProcessor");
		return ValidateCodeType.valueOf(type.toUpperCase());
	}

	@SuppressWarnings("unchecked")
	@Override
	public void validate(ServletWebRequest request) {

		ValidateCodeType processorType = getValidateCodeType(request);
		String sessionKey = getSessionKey(request);

		C codeInSession = (C) sessionStrategy.getAttribute(request, sessionKey);

		String codeInRequest;
		try {
			codeInRequest = ServletRequestUtils.getStringParameter(request.getRequest(),
					processorType.getParamNameOnValidate());
		} catch (ServletRequestBindingException e) {
			throw new ValidateCodeException("获取验证码的值失败");
		}

		if (StringUtils.isBlank(codeInRequest)) {
			throw new ValidateCodeException(processorType + "验证码的值不能为空");
		}

		if (codeInSession == null) {
			throw new ValidateCodeException(processorType + "验证码不存在");
		}

		if (codeInSession.isExpried()) {
			sessionStrategy.removeAttribute(request, sessionKey);
			throw new ValidateCodeException(processorType + "验证码已过期");
		}

		if (!StringUtils.equals(codeInSession.getCode(), codeInRequest)) {
			throw new ValidateCodeException(processorType + "验证码不匹配");
		}

		sessionStrategy.removeAttribute(request, sessionKey);
	}

}
11.修改了zhqx-security-browser项目中的BrowserSecurityConfig配置类,代码如下:
package com.zhqx.security.browser;

import javax.sql.DataSource;

import org.springframework.beans.factory.annotation.Autowired;
import org.springframework.context.annotation.Bean;
import org.springframework.context.annotation.Configuration;
import org.springframework.security.config.annotation.web.builders.HttpSecurity;
import org.springframework.security.core.userdetails.UserDetailsService;
import org.springframework.security.crypto.bcrypt.BCryptPasswordEncoder;
import org.springframework.security.crypto.password.PasswordEncoder;
import org.springframework.security.web.authentication.rememberme.JdbcTokenRepositoryImpl;
import org.springframework.security.web.authentication.rememberme.PersistentTokenRepository;

import com.zhqx.security.core.authentication.AbstractChannelSecurityConfig;
import com.zhqx.security.core.authentication.mobile.SmsCodeAuthenticationSecurityConfig;
import com.zhqx.security.core.properties.SecurityConstants;
import com.zhqx.security.core.properties.SecurityProperties;
import com.zhqx.security.core.validate.code.ValidateCodeSecurityConfig;


@Configuration
public class BrowserSecurityConfig extends AbstractChannelSecurityConfig {

	@Autowired
	private SecurityProperties securityProperties;

	@Autowired
	private DataSource dataSource;

	@Autowired
	private UserDetailsService userDetailsService;

	@Autowired
	private SmsCodeAuthenticationSecurityConfig smsCodeAuthenticationSecurityConfig;

	@Autowired
	private ValidateCodeSecurityConfig validateCodeSecurityConfig;

	@Override
	protected void configure(HttpSecurity http) throws Exception {

		applyPasswordAuthenticationConfig(http);

		http.apply(validateCodeSecurityConfig)
				.and()
			.apply(smsCodeAuthenticationSecurityConfig)
				.and()
			.rememberMe()
				.tokenRepository(persistentTokenRepository())
				.tokenValiditySeconds(securityProperties.getBrowser().getRememberMeSeconds())
				.userDetailsService(userDetailsService)
				.and()
			.authorizeRequests()
				.antMatchers(
					SecurityConstants.DEFAULT_UNAUTHENTICATION_URL,
					SecurityConstants.DEFAULT_LOGIN_PROCESSING_URL_MOBILE,
					securityProperties.getBrowser().getLoginPage(),
					SecurityConstants.DEFAULT_VALIDATE_CODE_URL_PREFIX + "/*",
					"/error")
					.permitAll()
				.anyRequest()
				.authenticated()
				.and()
			.csrf().disable();

	}

	@Bean
	public PasswordEncoder passwordEncoder() {
		return new BCryptPasswordEncoder();
	}

	@Bean
	public PersistentTokenRepository persistentTokenRepository() {
		JdbcTokenRepositoryImpl tokenRepository = new JdbcTokenRepositoryImpl();
		tokenRepository.setDataSource(dataSource);
		//tokenRepository.setCreateTableOnStartup(true);
		return tokenRepository;
	}

}
11.修改了zhqx-security-browser项目中的BrowserSecurityController控制器,代码如下:
package com.zhqx.security.browser;

import java.io.IOException;

import javax.servlet.http.HttpServletRequest;
import javax.servlet.http.HttpServletResponse;

import org.apache.commons.lang.StringUtils;
import org.slf4j.Logger;
import org.slf4j.LoggerFactory;
import org.springframework.beans.factory.annotation.Autowired;
import org.springframework.http.HttpStatus;
import org.springframework.security.web.DefaultRedirectStrategy;
import org.springframework.security.web.RedirectStrategy;
import org.springframework.security.web.savedrequest.HttpSessionRequestCache;
import org.springframework.security.web.savedrequest.RequestCache;
import org.springframework.security.web.savedrequest.SavedRequest;
import org.springframework.web.bind.annotation.RequestMapping;
import org.springframework.web.bind.annotation.ResponseStatus;
import org.springframework.web.bind.annotation.RestController;

import com.zhqx.security.core.properties.SecurityConstants;
import com.zhqx.security.browser.support.SimpleResponse;
import com.zhqx.security.core.properties.SecurityProperties;

@RestController
public class BrowserSecurityController {

	private Logger logger = LoggerFactory.getLogger(getClass());

	//SpringSecurity在做身份验证之前会将引发跳转的请求缓存
	private RequestCache requestCache = new HttpSessionRequestCache();
	//SpringSecurity用来处理请求跳转
	private RedirectStrategy redirectStrategy = new DefaultRedirectStrategy();

	//引入配置类,读取配置内容
	@Autowired
	private SecurityProperties securityProperties;

	//当需要身份认证时,跳转到这里
	@RequestMapping(SecurityConstants.DEFAULT_UNAUTHENTICATION_URL)
	@ResponseStatus(code= HttpStatus.UNAUTHORIZED)//返回401状态码-未授权
	public SimpleResponse requireAuthentication(HttpServletRequest request,
			HttpServletResponse response) throws IOException {

		SavedRequest savedRequest = requestCache.getRequest(request, response);

		if (savedRequest != null) {
			String targetUrl = savedRequest.getRedirectUrl();
			logger.info("引发跳转的请求是:" + targetUrl);
			if (StringUtils.endsWithIgnoreCase(targetUrl, ".html")) {
				//这里返回的页面需要由用户自定义,后面会说
				redirectStrategy.sendRedirect(request, response, securityProperties.getBrowser().getLoginPage());
			}
		}
		//不是html请求,返回处理结果
		return new SimpleResponse("访问的服务需要身份认证,请引导用户到登录页");
	}
}
修改完成后,启动服务,浏览器访问:http://localhost:8080/user,跳转到登录页面,测试后,发现逻辑依旧正常,说明重构完成。
这里有一个小问题,在重构代码时,我们在AbstractValidateCodeProcessor以及ValidateCodeProcessorHolder类中。在处理
验证码获取验证码生成器不存在,以及验证码处理器不存在时。抛出的异常为:
// 生成校验码
@SuppressWarnings("unchecked")
private C generate(ServletWebRequest request) {
	String type = getValidateCodeType(request).toString().toLowerCase();
	String generatorName = type + ValidateCodeGenerator.class.getSimpleName();
	ValidateCodeGenerator validateCodeGenerator = validateCodeGenerators.get(generatorName);
	if (validateCodeGenerator == null) {
		throw new ValidateCodeException("验证码生成器" + generatorName + "不存在");
	}
	return (C) validateCodeGenerator.generate(request);
}
以及:
public ValidateCodeProcessor findValidateCodeProcessor(String type) {
	String name = type.toLowerCase() + ValidateCodeProcessor.class.getSimpleName();
	ValidateCodeProcessor processor = validateCodeProcessors.get(name);
	if (processor == null) {
		throw new ValidateCodeException("验证码处理器" + name + "不存在");
	}
	return processor;
}
我们将ValidateCodeBeanConfig类中的@Bean(name = "imageValidateCodeGenerator")注解注释掉。启动服务。
然后我们在浏览器直接访问http://localhost:8080/zhqx-login.html,发现验证码不存在。而我们直接http://localhost:8080/code/image时,得到如下提示结果:
{
content: "访问的服务需要身份认证,请引导用户到登录页"
}
但是,我们在后台控制中,实际上是放开了http://localhost:8080/code/image请求的。而此时提示的信息也与我们期待的结果不符,期待
结果如下:
{
content: "验证码生成器imageValidateCodeGenerator不存在"
}
这是因为,由于系统没有获取到验证码生成器,系统会抛出异常,但是当我们重写了登录验证流程时,覆盖了默认的对抛出异常的处理。而,我们调用默认异常处理都是写在登录失败的处理中,此时还没有涉及登录流程。当然不会给正确提示。
但是如果我们一切正常,系统在正常运行时,这个异常处理实际上是不需要的!!!系统运行正常,说明生成器肯定存在啊,怎么会存在这个异常呢
如果我们将代码注释掉:
// 生成校验码
@SuppressWarnings("unchecked")
private C generate(ServletWebRequest request) {
	String type = getValidateCodeType(request).toString().toLowerCase();
	String generatorName = type + ValidateCodeGenerator.class.getSimpleName();
	ValidateCodeGenerator validateCodeGenerator = validateCodeGenerators.get(generatorName);
	//if (validateCodeGenerator == null) {
		//throw new ValidateCodeException("验证码生成器" + generatorName + "不存在");
	//}
	return (C) validateCodeGenerator.generate(request);
}
此时我们在浏览器直接访问http://localhost:8080/zhqx-login.html,发现验证码不存在。直接访问http://localhost:8080/code/image时,页面会出现如下提示:
服务器内部错误!
这是因为我们在zhqx-security-demo项目中,覆盖了默认的对500状态码错误的默认提示内容,我们自定义了500错误状态码对应的页面。
这里提供一个解决方案:就是分别自定义:ValidateCodeGeneratorNotExist验证码生成器不存在时抛出异常,ValidateCodeProcessorNotExist验证码处理器不存在时抛出异常。
ValidateCodeGeneratorNotExist代码如下:
package com.zhqx.security.core.validate.code;

import org.springframework.security.core.AuthenticationException;

public class ValidateCodeGeneratorNotExist extends AuthenticationException {

	private static final long serialVersionUID = 1L;

	public ValidateCodeGeneratorNotExist(String msg) {
		super(msg);
	}

}
ValidateCodeProcessorNotExist代码如下:
package com.zhqx.security.core.validate.code;

import org.springframework.security.core.AuthenticationException;

public class ValidateCodeProcessorNotExist extends AuthenticationException {

	private static final long serialVersionUID = 1L;

	public ValidateCodeProcessorNotExist(String msg) {
		super(msg);
	}

}
增加处理自定义异常的控制器ValidateCodeControllerExceptionHandler:
package com.zhqx.security.core.validate.code;

import java.util.HashMap;
import java.util.Map;

import org.springframework.http.HttpStatus;
import org.springframework.web.bind.annotation.ControllerAdvice;
import org.springframework.web.bind.annotation.ExceptionHandler;
import org.springframework.web.bind.annotation.ResponseBody;
import org.springframework.web.bind.annotation.ResponseStatus;

@ControllerAdvice
public class ValidateCodeControllerExceptionHandler {

	// 当出现ValidateCodeProcessorNotExist时,使用该方法处理异常
	@ExceptionHandler(ValidateCodeProcessorNotExist.class)
	@ResponseBody // 返回json格式内容
	@ResponseStatus(HttpStatus.INTERNAL_SERVER_ERROR) // 返回的HTTP状态码
	public Map<String, Object> handleValidateCodeProcessorNotExist(ValidateCodeProcessorNotExist ex) {
		Map<String, Object> result = new HashMap<>();
		result.put("content", ex.getMessage());
		return result;
	}

	// 当出现ValidateCodeGeneratorNotExist时,使用该方法处理异常
	@ExceptionHandler(ValidateCodeGeneratorNotExist.class)
	@ResponseBody // 返回json格式内容
	@ResponseStatus(HttpStatus.INTERNAL_SERVER_ERROR) // 返回的HTTP状态码
	public Map<String, Object> handleValidateCodeGeneratorNotExist(ValidateCodeGeneratorNotExist ex) {
		Map<String, Object> result = new HashMap<>();
		result.put("content", ex.getMessage());
		return result;
	}

}
修改AbstractValidateCodeProcessor以及ValidateCodeProcessorHolder类的抛出异常:
AbstractValidateCodeProcessor修改代码:
//只显示修改部分代码

// 生成校验码
@SuppressWarnings("unchecked")
private C generate(ServletWebRequest request) {
	String type = getValidateCodeType(request).toString().toLowerCase();
	String generatorName = type + ValidateCodeGenerator.class.getSimpleName();
	ValidateCodeGenerator validateCodeGenerator = validateCodeGenerators.get(generatorName);
	if (validateCodeGenerator == null) {
		throw new ValidateCodeGeneratorNotExist("验证码生成器" + generatorName + "不存在");
	}
	return (C) validateCodeGenerator.generate(request);
}
ValidateCodeProcessorHolder修改代码:
//只显示修改部分代码

public ValidateCodeProcessor findValidateCodeProcessor(String type) {
	String name = type.toLowerCase() + ValidateCodeProcessor.class.getSimpleName();
	ValidateCodeProcessor processor = validateCodeProcessors.get(name);
	if (processor == null) {
		throw new ValidateCodeProcessorNotExist("验证码处理器" + name + "不存在");
	}
	return processor;
}
此时,启动服务,在浏览器直接访问http://localhost:8080/zhqx-login.html,发现验证码不存在。直接访问http://localhost:8080/code/image时,页面会出现如下提示:
{
content: "验证码生成器imageValidateCodeGenerator不存在"
}
说明,此时,系统处理自定义抛出异常是正常的。
测试正常后,我们将ValidateCodeBeanConfig类中注释的注解@Bean(name = "imageValidateCodeGenerator")放开,保证程序正常。
最后附上重构后的zhqx-security-core项目的代码结构图: